Category Archives: Tips

Using Polypropylene Lab Bottles to Rehydrate Yeast

Bel-Art Precisionware Wide-Mouth 500ml (16oz) Autoclavable Polypropylene Bottles; Polypropylene Cap, 53mm Closure (Pack of 12) (F10632-0007)
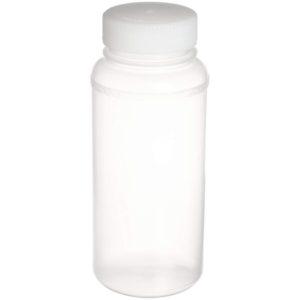
Pictured: (12) 500 mL Polypropylene Jars with 53 mm closures by Bel-Art Products affiliate link, note that multiple variations of this product may be available, as such a different version may appear at this link

Part of Our Homebrew Tips and Tricks Series.  Check out the complete list – Homebrewing Tips, Tricks & Shortcuts!

  • Note: This tip involves handling hot items.  Always use extreme caution when handling hot items to avoid being scalded.
  • In my opinion, Polypropylene is a good material for this.  It is commonly used in lab bottles and has a higher heat resistance when compared to HDPE and LDPE.
  • The pictured bottle is what I personally use.  There are lots of options out there.  Search Amazon for Polypropylene Lab Bottles to see what else may be available,  Some things to look for – proper temp ratings, use of food safe materials and microwaveable.
  • Consult your yeast manufacturer for specific amounts, temperatures and timing recommendations.

Rehydrating Yeast Step by Step

  • Place the appropriate amount of water in the bottle.  Some manufacturers recommend 10 grams of water per 1 gram of yeast.  Most packets are 11 grams.  That’s 110 grams.
  • Use an accurate gram scale to weigh the water.  For a common measurement like 110 grams, I mark my bottle with a Sharpie so I can easily measure out rehydration water without needing to weigh every time.
  • Place the lid on top of the bottle.  Important: Do not thread or tighten the lid!  It will burst if you do that.  You just want the lid setting loosely on top so that it can be sanitized by the steam.
  • Microwave until the water comes to a full boil.
  • Cooling to Temp, Slow Option: Let the bottle sit with cap loosened until it reaches proper hydration temperature.
  • Cooling to Temp, Quick Option: Very carefully tighten the cap down.  Run cool water over the bottle to reach proper rehydration temp.  This is going to be hot, be very careful!  I use heat resistant gloves for this.  The cooling will most likely cause the container to collapse on itself and could slightly misform it.
  • I use an Infrared thermometer to check temp as cooling commences.  Note that I do not open the bottle to check temp.  Just aim the IR thermometer at the mass of water inside the bottle.  I’m usually aiming for around 95 deg F.
  • Sprinkle the dry yeast in the container and place the lid on back on the bottle.  Let this sit for 10 to 15 minutes.
  • Gently swirl bottle to ensure the yeast is thoroughly mixed.
  • Pitch when you’re ready.
  • This method ensures a sanitary process.  The initial container and water are sanitized and there is no touching of the water with thermometers or stirring devices.
  • You could use a similar method to produce yeast washing water.
  • Search Amazon for “Polypropylene Lab Bottles” – Some things to look for – proper temp ratings, use of food safe materials and microwaveable.
  • Search Amazon for “digital gram scale”
  • Search Amazon for “infrared thermometer”
  • Search Amazon for “heat resistant kitchen gloves”
  • Review: Hands On: American Weigh 100g x 0.01g Digital Scale
  • Related Categories: YeastScales, Infrared Thermometers

Make sure the components you use are compatible and rated for your intended application.  Contact manufacturer with questions about suitability or a specific application.  Always read and follow manufacturer directions.

This post may contain affiliate links. We may make a commission when you use our links. This will never cost you extra. Thank you for supporting Homebrew Finds!

rp:tips1

Tip: Get a Refractometer – Save Beer & Breakage!

Anpro Brix Refractometer for Homebrew, Beer Wort Refractometer Dual Scale Specific Gravity 1.000-1.120 and Automatic Temperature Compensation 0-32% Replaces Homebrew Hydrometer, MPictured: Anpro Brix Refractometer for Homebrew, Beer Wort Refractometer Dual Scale Specific Gravity 1.000-1.120 and Automatic Temperature Compensation 0-32% via Amazon

Part of Our Homebrew Tips and Tricks Series.  Check out the complete list – Homebrewing Tips, Tricks & Shortcuts!


  • If you haven’t realized it yet… hydrometers are made out of breakable glass that can… break.  They also require a healthy sample size.
  • With a refractometer you need a sample size of just a couple drops.  That’s a lot of saved beer compared to a hydrometer.  So much so that a refractometer may very well pay for itself over time.
  • For me, getting a refractometer was one of those small, inexpensive upgrades that made a huge difference.
  • An quick estimation of unfermented wort gravity is easy to calculate.  OG is around 4 times the Brix reading obtained from your refractometer.  That becomes more and more inaccurate as gravities increase.
  • Refractometers can also be used to measure gravity throughout the fermentation process.  Just plug your numbers into a calculator for correction after fermentation begins.  See: Sean Terrill’s Refractometer Calculator
  • If you have a refractometer AND a hydrometer you can estimate ABV without a starting gravity.  See Tip 10 for more information on that.
  • Some shopping tips… Look for a dual scale (Brix and Gravity) model.  ATC/Automatic Temperature Correction is another important feature.  That automatically accounts for changes due to temperature within a certain range.
  • There are many offerings and they can change quickly.  Shop Around, Search Amazon for “dual scale refractometer” to compare prices and see what models are currently available.
  • If you have a higher budget, consider a digital model.  Generally speaking, those are not available with dual scale capabilities, but you get a digital readout of gravity readings.  That’s a nice feature.  Shop Around, Search Amazon for “digital brix refractometer” to compare prices and see what models are currently available.
  • Related Categories: Fermentation, Refractometers

Make sure the components you use are compatible and rated for your intended application.  Contact manufacturer with questions about suitability or a specific application.  Always read and follow manufacturer directions.


This post may contain affiliate links. We may make a commission when you use our links. This will never cost you extra. Thank you for supporting Homebrew Finds!

rp:tips9

Tip: Use Metric for Hops, Water Salts and Yeast Starters

homerbrew metric

Part of Our Homebrew Tips and Tricks Series.  Check out the complete list – Homebrewing Tips, Tricks & Shortcuts!


  • Grams are much easier and more accurate for measuring hops and water salts.
  • Of course, grams aren’t technically more accurate, a weight is a weight.  What I’m saying is they are practically more accurate.  For example 14 grams is .493835 ounces.   If you have 6 digit precision when using ounces on your scale, whammo, it doesn’t matter much, but a gram scale with 1 digit precision (Example 14.1 grams) is a lot easier to come by and gets you really close with fewer digits to concern yourself with.
  • A starter is also easier in metric.  Water to DME ratio is always 10 to 1.  1,000 mL (1 L) to 100 grams of DME.  Example –  Need to make a 1.5 L Starter?  You need 150 grams of DME.
  • Search Amazon for “Digital Gram Scale”
  • Resource Post: Yeast Starters & Fermentation
  • Related Categories: HopsYeastYeast StartersFermentation

This post may contain affiliate links. We may make a commission when you use our links. This will never cost you extra. Thank you for supporting Homebrew Finds!

Make sure the components you use are compatible and rated for your intended application.  Contact manufacturer with questions about suitability or a specific application.  Always read and follow manufacturer directions.

rp:tips#16

Tip: Second Easiest Way to Seal Mylar Bags using a FoodSaver-type Vacuum Sealers – hops & more

Part of Our Homebrew Tips and Tricks Series.  Check out the complete list – Homebrewing Tips, Tricks & Shortcuts!


Why Mylar?

Mylar bags block oxygen and are a great way to store hops and other oxygen sensitive materials.  As a testament to this, many hop distributors and sellers distribute hops in Mylar type bags.  Sometimes those are vacuum sealed and sometimes they are nitrogen flushed.

Mylar bags are not generally expensive, so that’s great!  The problem is vacuum sealers that can seal Mylar bags ARE expensive.  Sometimes very expensive.  That’s not great!

The “Snorkel” Method for Sealing Mylar Bags

  • Cut a 1″ strip off the top of a vacuum bag.
  • Fill the Mylar bag with hops or whatever you’re going to store.
  • Insert the 1″ strip into the filled bag so that the strip sticks out of the Mylar bag.
  • Trim the end of this strip so that about 1/2″ is sticking out of the Mylar bag.
  • Insert the top of the Mylar bag into the vacuum sealer bag, ensuring that the 1″ strip of vacuum bag is sticking slightly out of the top of the Mylar bag.  This acts as a channel.
  • Vacuum and Seal.
  • Because Mylar bags can be thicker that standard vacuum sealer bags, you may need to double seal the top with your vacuum sealer’s heat strip.
  • Trim the excess vacuum bag strip.
  • Trick Required: There is a trick here.  Notice I didn’t say FoodSaver bag.  I, initially, tried this with a FoodSaver bag and it wouldn’t seal correctly.  FoodSaver bags  are a bit thicker than most others on the market.  Look for a thinner style bag to try with this technique.
  • See Tip 11 for another method
  • In my opinion, this is the second easiest way to seal a Mylar Bag using a traditional type vacuum sealer.
  • Shop Around, Search Amazon for “mylar bags for food storage”
  • Shop Around, Search Amazon for “vacuum sealer bags”
  • Review: Hands on Review: FoodSaver V2244 Vacuum Sealer
  • Top Post: Vacuum Sealing Mylar Bags Using Traditional Vacuum Sealers
  • Related Categories: FoodSaverVacuum SealingHops

This post may contain affiliate links. We may make a commission when you use our links. This will never cost you extra. Thank you for supporting Homebrew Finds!

Make sure the components you use are compatible and rated for your intended application.  Contact manufacturer with questions about suitability or a specific application.  Always read and follow manufacturer directions.

rp:tips#12

Tip: Use The “Spray Bottle Method” to Apply Star San

star san spray bottle

Part of Our Homebrew Tips and Tricks Series.  Check out the complete list – Homebrewing Tips, Tricks & Shortcuts!


More Homebrew Finds!

This post may contain affiliate links. We may make a commission when you use our links. This will never cost you extra. Thank you for supporting Homebrew Finds!

Make sure the components you use are compatible and rated for your intended application.  Contact manufacturer with questions about suitability or a specific application.  Always read and follow manufacturer directions. rp:tips#14

Tip: Easiest Way to Seal Mylar Bags using a FoodSaver-type Vacuum Sealers – hops & more

Part of Our Homebrew Tips and Tricks Series.  Check out the complete list – Homebrewing Tips, Tricks & Shortcuts!


Why Mylar?

Mylar bags block oxygen and are a great way to store hops and other oxygen sensitive materials.  As a testament to this, many hop distributors and sellers distribute hops in Mylar type bags.  Sometimes those are vacuum sealed and sometimes they are nitrogen flushed.

Mylar bags are not generally expensive, so that’s great!  The problem is vacuum sealers that can seal Mylar bags ARE expensive.  Sometimes very expensive.  That’s not great!

The “Nested” Method for Sealing Mylar Bags

This post may contain affiliate links. We may make a commission when you use our links. This will never cost you extra. Thank you for supporting Homebrew Finds!

Make sure the components you use are compatible and rated for your intended application.  Contact manufacturer with questions about suitability or a specific application.  Always read and follow manufacturer directions.

rp:tips#11

Tip: Figure ABV Without a Starting OG Original Gravity

Part of Our Homebrew Tips and Tricks Series.  Check out the complete list – Homebrewing Tips, Tricks & Shortcuts!


  • Forgot to take an original gravity and still want an estimate of ABV?  No problem.  You’ll need a refractometer and a hydrometer.
  • Take careful measurements with each.  Thoroughly de-gas the sample to get a more accurate reading.
  • Run those numbers through this equation.  SG is the gravity reading obtained from the hydrometer,  Brix is the reading obtained from the refractometer.  ABV = [277.8851 – 277.4(SG) + 0.9956(Brix) + 0.00523(Brix2) + 0.000013(Brix3)] x (SG/0.79).
  • This is a great reason to get a refractometer.  There are many offerings and they can change quickly.  Shop Around, Search Amazon for “dual scale refractometer” to compare prices and see what models are currently available.
  • More reasons to get a refractometer!  See Tip 9.
  • Thanks to BYO for this formula.  Not a subscriber?  Subscribe to BYO
  • Related Categories: FermentationRefractometers

Make sure the components you use are compatible and rated for your intended application.  Contact manufacturer with questions about suitability or a specific application.  Always read and follow manufacturer directions.


This post may contain affiliate links. We may make a commission when you use our links. This will never cost you extra. Thank you for supporting Homebrew Finds!

rp:tips#10

Tip: Cut pH Strips in Half and Save 50%

COLORPHAST PH STRIPS 4-7 - 100 PACKColorpHast pH Strips – 4.0 to 7.0 (100 Strips) via MoreBeer

Part of Our Homebrew Tips and Tricks Series.  Check out the complete list – Homebrewing Tips, Tricks & Shortcuts!


This post may contain affiliate links. We may make a commission when you use our links. This will never cost you extra. Thank you for supporting Homebrew Finds!

Make sure the components you use are compatible and rated for your intended application.  Contact manufacturer with questions about suitability or a specific application.  Always read and follow manufacturer directions.

rp:tips#17

Tip: Consider Oetiker Stepless Clamps for Kegerator Gas and Beer Lines

Pictured: Oetiker 16700010 Stepless Ear Clamp via Amazon

Part of Our Homebrew Tips and Tricks Series.  Check out the complete list – Homebrewing Tips, Tricks & Shortcuts! This is a Top Post! See: All Top Posts


  • I use stainless steel Oetiker-style stepless clamps for most gas and beer applications.  I like the fact that they are, generally… stainless steel, stepless and the fact that they stay tight and will not loosen over time.
  • These clamps are designed so that there are no steps (gaps) on the inside.  That reduces the possibility that tubing will be torn or damaged.
  • These are single use clamps.  The upside of that is… Oetiker-style stepless clamps will not loosen over time.  When they’re tight, they’re tight.  I really like that for kegerator applications because… A: I don’t like to empty CO2 tanks for no good reason and B: I don’t like standing beer in my kegerator.
  • A sizing note – Oetiker-style Stepless clamp sizes generally refer to the largest diameter in mm.  So a size 13.3 means that the Oetiker Stepless clamp is 13.3 millimeters (about .52″) in diameter uncrimped.
  • Search Amazon for “Stepless Hose Clamps” to shop around and see what’s available
  • Related Top Post: Tips: Cleaning, Drying & Storing Tubing
  • Resource Page: Tips and Gear for your Kegerator
  • Related Categories: DraftTubing

Some specific sizes to consider…

I use a pair of nail nippers (meant for cutting heads off nails) but there are also purpose made tools for clamping Oetiker-style stepless clamps…

Also: Kegerator Tips & Gear | Keg Repair Part #s | Recent Keg Finds

Our Top Draft Resources

This post may contain affiliate links. We may make a commission when you use our links. This will never cost you extra. Thank you for supporting Homebrew Finds!

Make sure the components you use are compatible and rated for your intended application.  Contact manufacturer with questions about suitability or a specific application.  Always read and follow manufacturer directions.

toppost:oetiker rp:tips#34 tag:tpr

Tip: Dissolving DME More Easily – Cool or Hot Water?

Part of Our Homebrew Tips and Tricks Series.  Check out the complete list – Homebrewing Tips, Tricks & Shortcuts!


This post may contain affiliate links. We may make a commission when you use our links. This will never cost you extra. Thank you for supporting Homebrew Finds!

Make sure the components you use are compatible and rated for your intended application.  Contact manufacturer with questions about suitability or a specific application.  Always read and follow manufacturer directions.

rp:tips#15

Tip: Use a US Nickel as a Calibration Weight

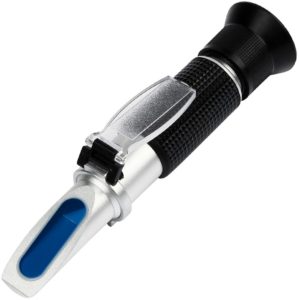
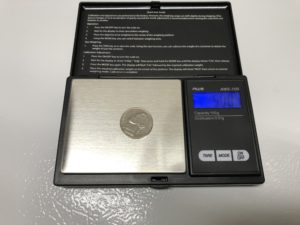
Weighing a US Nickel Using an AWS-100 Digital Gram ScaleHands on Review

Part of Our Homebrew Tips and Tricks Series.  Check out the complete list – Homebrewing Tips, Tricks & Shortcuts!


This post may contain affiliate links. We may make a commission when you use our links. This will never cost you extra. Thank you for supporting Homebrew Finds!

Make sure the components you use are compatible and rated for your intended application.  Contact manufacturer with questions about suitability or a specific application.  Always read and follow manufacturer directions.


rp:tips#22

Homebrew Grain Storage Capacity Rule of Thumb

malt storage capacity

Part of Our Homebrew Tips and Tricks Series.  Check out the complete list – Homebrewing Tips, Tricks & Shortcuts!


Get a Deal on Grain!

deals on sacks of malt

deals on sacks of malt

Storage Options Resource Post!

Vittles Vault Review!

This post may contain affiliate links. We may make a commission when you use our links. This will never cost you extra. Thank you for supporting Homebrew Finds!

Make sure the components you use are compatible and rated for your intended application.  Contact manufacturer with questions about suitability or a specific application.  Always read and follow manufacturer directions. rp:tips#25

Tip: Fix it, Instead of Replacing It

Fix it, Instead of Replacing It

Part of Our Homebrew Tips and Tricks Series.  Check out the complete list – Homebrewing Tips, Tricks & Shortcuts!


This post may contain affiliate links. We may make a commission when you use our links. This will never cost you extra. Thank you for supporting Homebrew Finds!

Make sure the components you use are compatible and rated for your intended application.  Contact manufacturer with questions about suitability or a specific application.  Always read and follow manufacturer directions.

rp:tips#30

Bar5F Heavy Duty Chemical Resistant Spray Bottle + Star San Tips & Tricks

BAR5F Empty Plastic Spray Bottle 32 oz, Chemical Resistant, Professional, Heavy Duty

BAR5F Empty Plastic Spray Bottle 32 oz, Chemical Resistant, Professional, Heavy Duty, Green


From the product description, check product page for current description, price and availability:

  • Trigger Spray Bottle – Fully Adjustable Nozzle – from a fine mist to a jet stream.
  • Chemical resistant bottle and sprayer.
  • All purpose; cleaning, house, kitchen, auto, etc

Related: Star San Tips, Tricks and Guidelines – Using Star San In a Spray Bottle – that details the “spray bottle technique” of easily and effectively sanitizing for pennies a batch.

BAR5F Empty Plastic Spray Bottle 32 oz, Chemical Resistant, Professional, Heavy Duty – affiliate link, note that multiple variations of this product may be available, as such a different version may appear at this link


Also: Search “Star San” on Amazon

This post contains affiliate links. We may make a commission when you use our Amazon links. This will never cost you extra. Thank you for supporting Homebrew Finds!

Make sure the components you use are compatible and rated for your intended application.  Contact manufacturer with questions about suitability or a specific application.  Always read and follow manufacturer directions.

Brother PT-D210 Label Maker – TZe Compatible – [Label Keg Lines, Manifolds, Bins & More]

Brother P-touch, PTD210, Easy-to-Use Label Maker, One-Touch Keys, Multiple Font Styles, 27 User-Friendly Templates, White

Brother P-Touch PT-D210 Label Maker

More Info

From the product description, check product page for current description, price and availability:

  • See how your label will look before you Print
  • One-touch keys: quick access to fonts, frames, symbols and more
  • Useful templates: for file and gift labels, even decorative labels with patterns
  • Easy-access memory: store up to 30 labels for quick reprinting
  • Uses a variety of easy to apply tee tapes: standard, extra-strength, acid-free adhesive, cable and wire, fabric iron-on and more


I’m fond of Brother labeling machines that have the ability to use their TZe style labeling tape.  That line of tapes has an extra strength adhesive version.  The extra strength adhesive versions are designed to work in harsh environments, both indoors and outdoors.  I’ve found them to work well even in slightly moist places like my kegerator.  I use TZe style labels for labeling storage bins, my co2 manifold, keg lines, kegs and more.  Search: tze extra strength on Amazon

Lots of TZe Tape colors and styles are available.  I generally use the 1/2″ Black Print on White Tape – Standard | Extra Strength.

Brother P-touch, PTD210, Easy-to-Use Label Maker, One-Touch Keys, Multiple Font Styles, 27 User-Friendly Templates, White


This post contains affiliate links. We may make a commission when you use our Amazon links. This will never cost you extra. Thank you for supporting Homebrew Finds!

Bar5F Heavy Duty Chemical Resistant Spray Bottle + Star San Tips & Tricks

BAR5F Empty Plastic Spray Bottle 32 oz, Chemical Resistant, Professional, Heavy Duty

BAR5F Empty Plastic Spray Bottle 32 oz, Chemical Resistant, Professional, Heavy Duty, Green


From the product description, check product page for current description, price and availability:

  • Trigger Spray Bottle – Fully Adjustable Nozzle – from a fine mist to a jet stream.
  • Chemical resistant bottle and sprayer.
  • All purpose; cleaning, house, kitchen, auto, etc

Related: Star San Tips, Tricks and Guidelines – Using Star San In a Spray Bottle – that details the “spray bottle technique” of easily and effectively sanitizing for pennies a batch.

BAR5F Empty Plastic Spray Bottle 32 oz, Chemical Resistant, Professional, Heavy Duty – affiliate link, note that multiple variations of this product may be available, as such a different version may appear at this link


Also: Search “Star San” on Amazon

This post contains affiliate links. We may make a commission when you use our Amazon links. This will never cost you extra. Thank you for supporting Homebrew Finds!

Make sure the components you use are compatible and rated for your intended application.  Contact manufacturer with questions about suitability or a specific application.  Always read and follow manufacturer directions.