
Control Your Kegerator Or Fermentation Chamber With Samsung SmartThings!
I have Samsung SmartThings installed in my home. SmartThings requires a central hub. That hub communicates with other… SmartThings. Loads of compatible devices using a number of protocols are available from multiple vendors. Search Amazon for “smartthings” to see what’s out there. After these things are connected, you can program automations or routines that define how they operate under certain conditions. All of this is interoperable with other platforms like Google Home and Alexa.
This post is about using SmartThings to control the temperature of your kegerator or fermentation chamber. To do that, I use three things – A SmartThings Hub, a Multipurpose Sensor and a Kasa Smart Plug. Labels and photos show both kegerator and fermentation chamber scenarios. This concept should work for both applications.
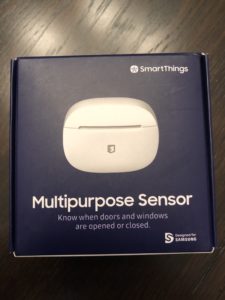 The Multipurpose Sensor can do several things including monitor temperature
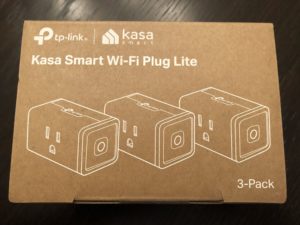 The other piece to the puzzle was a smart plug to tum the kegerator/freezer/fridge off and on as needed. I used a Kasa Smart WiFi Plug by TP-Link. It worked like a champ. I used this because it’s what I had, but wouldn’t necessarily recommend this one. Keep reading for more on that.
Why use a different plug? The Multipurpose Sensor uses a protocol named Zigbee. Zigbee has a bunch of benefits, but two pertinent ones are… generally low energy consumption and mesh networking. The low energy consumption means sensors like these can operate for a relatively long time using small batteries. The mesh network means devices talk to each other to expand and improve coverage in your home. Most (but not all) wired Zigbee devices automatically act as repeaters as part of the mesh network. All that to say… using a Zigbee Smart Plug could help with signal strength, and as a result, battery life on the Multipurpose sensor. If you have a Zigbee Smart Plug that repeats as part of the mesh network, you should have a really strong signal for the Multipurpose sensor. The Kasa Smart Plug isn’t Zigbee enabled and doesn’t do any Zigbee repeating. That being said I had strong signal, with the sensor inside a chest freezer and one floor away from my SmartThings hub. Another potential pitfall of the Kasa plug that I used is the 10 amp rating. I didn’t have a problem, but make sure whatever plug you choose is rated for your application.
TL;DR… The WiFi Smart Plug works just fine, but a Zigbee Smart Plug could give you better signal strength and battery life.
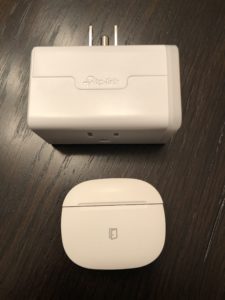 The Multipurpose sensor and Smart Plug. Not pictured, but needed SmartThings Hub and a Wi-Fi Network + corresponding configuration apps.
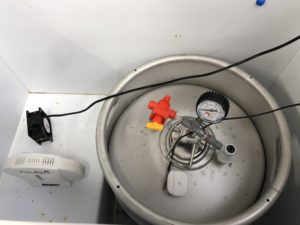 Here’s the proof of concept setup… a 10 gallon Torpedo Keg – Hands on Review – with a BlowTie Spunding Valve – set up as a fermenter. An Eva-Dry – Hands on Review – to handle condensation and a recirculating fan. The Multipurpose Sensor is sitting on top of the keg. The one other wire you’re seeing goes to my Inkbird-ITC 308. I used that to double check and monitor temperatures. My set/goal temp for this whole setup is between 50 and 52 deg F. I aimed for a temp generally in the middle-ish of a fermentation and kegerator application.
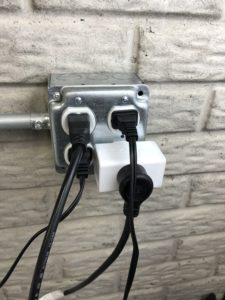 The chest freezer plugs into the Smart Plug and the Smart Plug plugs into an outlet. Never mind the rest of these cords. Lights, re-circulation fan and such.
Configuration
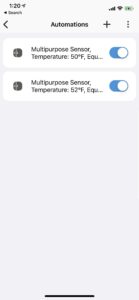 Under Automations in the SmartThings App, I created two Automations. Both read the temperature of the Multipurpose Sensor and change the state of the Smart Plug as required.
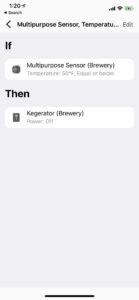 This Automation turns off the plug when the temperature reaches 50 deg F or below
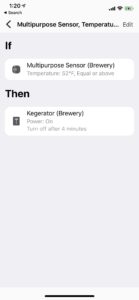 This Automation turns on the plug when the temperature reaches 52 deg F or above. I set one additional setting here, that’s pretty important…
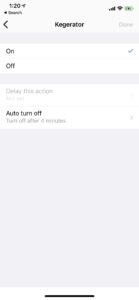 This is a detail sub-screen of the previous Automation. I limited the run time of the outlet to 4 minutes. That does a couple things. First, if the sensor fails, this setting should turn the cooling device off after four minutes. In my opinion, better to have things too warm than frozen solid. The other thing it does is temper the freezer’s cooling capability. More about that soon.
Two Stage Setup? You could get another Smart Plug and do some additional configuration to set up a two stage configuration.
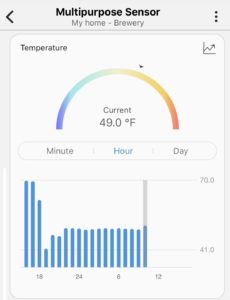
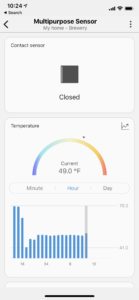 Here’s the detail of the Multipurpose Sensor. The warmer 70 degree-ish temps are at the start of the test. The low point dip is before I limited the freezer to 4 minutes. Everything else after that is a nice steady temperature. More about the 4 minute setting: It seems that the SmartThings hub polls temperature readings about every 10 minutes. That’s a limitation for this application. It means that the cooling device will keep cooling for 10 minutes even if it doesn’t need to. Depending on a number of factors, that could result in wide temperature swings. I found that a four minute limit smoothed things out quickly. Should you choose to do this, that limit will be something you’ll probably need to play with based on your application.
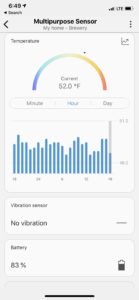 Here’s another look at the temperature after this had run for quite a while. The temperature remained solidly within my set temp range.
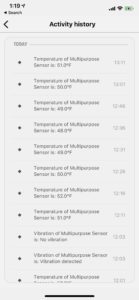 Temperature log, showing a nice steady temp. The vibration detected at 12:03 was me picking up the sensor
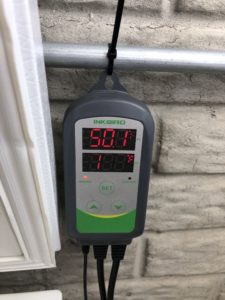 As mentioned previously, I used an ITC-308 – Hands on Review – to double check temps. They were right on the money when I spot checked. The odd display on the bottom screen is due to the photograph. In real life it shows the set temp, which was set very high so it would not cycle on.
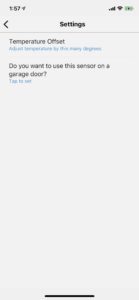 If it had been inaccurate, the Multipurpose sensor can be calibrated via an offset setting in the SmartThings app.
Conclusions
I really enjoyed putting this together. This offers some neat benefits of being able to control your kegerator or homebrew fermentation chamber via SmartThings anywhere you have an Internet connection. The historical graphing feature in the app is super handy for keeping track of what’s going on.
Practically speaking, the best solution for controlling temperature in your kegerator or fermentation chamber is probably a purpose built controller. In my opinion, Inkbird’s ITC-308+WiFI – Hands On Review – deserves a hard look. That’s Wi-Fi and app enabled and purpose built for these sorts of tasks. It also includes more advanced features and settings that are aimed at temp control. A SmartThings implementation may make sense for the fun of it, if you have extra components around, if you need temporary additional capacity or in a pinch as a backup solution.
- Samsung SmartThings Hub
- Samsung SmartThings Multipurpose Sensor
- Search Amazon for “Zigbee Smart Plug”
- Kasa Smart WiFi Plug Lite by TP-Link -10 Amp
- Search Amazon for “smartthings”
Related: Inkbird Controller Deals and Coupons | Hands On Review: Inkbird ITC-308 Dual Stage Temperature Controller +WiFi Version
Part of our “Homebrew Hacks” Series of Posts! Full Lineup…
- Make an E-Paper Tap Handle!
- Adding a Tri-clamp Fitting to a Homebrew Keg Lid!
- Using a Tire Inflator To Check for Keg Leaks
- Monitoring Kegerator or Fermentation Temps With Samsung SmartThings
- Protect and Monitor Your Beer Fridge With Samsung SmartThings!
- Using a Keg as a CO2 Source for Portable Serving!
- Setting Economy Inline Regulators with a Spunding Valve
- Convert Ball Lock and Pin Lock Kegs to Push to Connect
- Adding a Schrader Valve to a Homebrew Keg
- Homebrew Hack: Mimicking Dual Stage Temp Control with a Single Stage Controller
- Mark II Keg and Carboy Washer Mod – Adding a Stainless Steel CIP Spray Ball
- Using the Grainfather to Clean Draft Lines
- Convert Your Mark II Keg & Carboy Washer to a Recirculating Draft Line Cleaning Pump!
- Kegerator Beer Line Temperatures & Reducing Foam with a Recirculating Fan
- Build a Recirculating Draft Line Cleaning Pump
Also: Kegerator Tips & Gear | Keg Repair Part #s | Recent Keg Finds
Our Top Draft Resources
- The Most Difficult Spot to Check for CO2 Leaks
- Keg O-Ring Materials Selection! – EPDM, Silicone and Buna-N?
- Why Do I Have Bubbles in My Beer Line? Diagnosing and Fixing Kegerator Foam Problems
- Five Benefits of Using Corny Kegs As Fermenters
- Rebuilding & Reconditioning Homebrew Kegs!
- Food Safe Replacement Keg O-Rings in Bulk
- Hands on Review: Kegland DuoTight Fittings & EVABarrier Tubing!
- Why Won’t My Homebrew Keg Carbonate? Fixing Draft Beer Carbonation Problems
- What Does a Flow Control Faucet Do?
- Upgrade Your Kegerator – 6 Improvements!
- Serve Homebrew on Any Kegerator & Convert Commercial Kegerator to Homebrew
- Tips and Gear for Growler Filling
- What’s the Difference Between Ball Lock Kegs and Pin Lock Kegs?
- Checking for Draft System CO2 Leaks – Using The Pressure Gauge Method
- Tip: Consider Oetiker Stepless Clamps for Kegerator Gas and Beer Lines
- Hands On Review: Inkbird ITC-308 Dual Stage Temperature Controller +WiFi Version
- Universal Poppets Tips and Tricks!
- Convert Your Mark II Keg & Carboy Washer to a Recirculating Draft Line Cleaning Pump!
- Step by Step: Finding and Fixing Keg CO2 Leaks
- Kegerator Beer Line Temperatures & Reducing Foam with a Recirculating Fan
- Kegging CO2 Use Estimations and Calculations
- Step by Step: Balancing Your Kegerator Draft System
- Building a Simple Ball Lock Draft Line Flushing Setup
- Build a Recirculating Draft Line Cleaning Pump
- Home Brew Keg Roundup – New & Used, 5 and 2.5 Gallon & More!
- Damp Kegerator? Fix Kegerator Condensation
- Portable Draft Beer Serving Options!
- Homebrew Temp Controller Roundup! – Kegerator and Fermentation – concepts, applications and models
- Bulk Keg Orings and Keg Repair Part Numbers
standarddraft pinned
This post may contain affiliate links. We may make a commission when you use our links. This will never cost you extra. Thank you for supporting Homebrew Finds!
greatdeals


Make sure the components you use are compatible and rated for your intended application. Contact manufacturer with questions about suitability or a specific application. Always read and follow manufacturer directions.
toppost:stkegerator tag:tpr