Category Archives: Top Post Updates

Making Wine as a Homebrewer!

Thank you to HBF Contributor Aaron Nord for this hands on review!  Aaron is an advanced award winning brewer, a long time reader and a serial tipster!

Making Wine as a Homebrewer

Background

I can remember when I first considered delving into brewing all grain beer. After gaining experience from doing boxed recipe kits, to then slightly modifying a boxed kit or two followed soon by making my own recipes with partial mash batches, I figured it was time to step up to all grain. The amount of time and research I poured into the endeavor before pulling the trigger was considerable. I was concerned that I would miss a step or need to make a brew-time adjustment without being prepared and be left with gallons of potentially ruined wort. It all ended up working out. Sure, there were some missteps along the way and the inevitable audibles during brew day, but each time I was rewarded with a drinkable beverage that trended upward in the flavor and quality departments with each experience.

When I considered throwing my hat in the ring for making wine, I had the same feelings I had when I made the move to all grain brewing from kits and partial mashes. I was apprehensive. What if I forget something in the process? What if I don’t have the requisite knowledge to be able to make prime time adjustments? What if the wine just doesn’t turn out? While I was overthinking the endeavor, I had another thought that brought be back into reality.

As a kid I remember getting the occasional taste of an adult beverage when we would visit my great grandma at her farmhouse in rural southern Iowa. She was a crafty and capable maker of all the things one needs on a farm and even some that might not be considered a necessity, like wine.
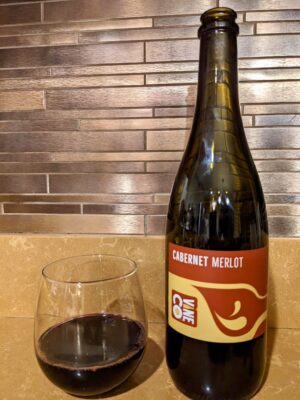

Make Your Own Wine!

Continue reading

How To: Step by Step Making a Magnetic Drip Tray

Update International (DTS-419) 4" x 19" Rectangular Drip Tray, Stainless SteelPictured: Update International (DTS-419) 4″ x 19″ Rectangular Drip Tray, Stainless Steel  – affiliate link, note that multiple variations of this product may be available, as such a different version may appear at this link

Step by Step instructions for making a magnetic drip try for your Kegerator or Keezer.

This is a project that requires materials and tools. Operate power tools carefully. Make sure the components you use are compatible and rated for your intended application.  Contact manufacturer with questions about suitability or a specific application.  Always read and follow manufacturer directions.

By: HBF Reader Andrew Cunje

Materials:

  • Update International (DTS-419) 4″ x 19″ Rectangular Drip Tray, Stainless Steelaffiliate link, note that multiple variations of this product may be available, as such a different version may appear at this link
  • Alternate: DasMarine 19″ Length 4″ Width Rectangular Stainless Steel Beer Surface Mount Drip Tray
  • 4′ of 6x.5 Poplar Wood (actual width is 5.5″)
  • 1’4″ of  6×1 Poplar Wood (actual width is 5.5″) Note: A thicker wood will suffice for this…remember the longer the wood extends down from the joint, the less likely the magnetic bond will break from the leverage applied to the edge of the drip tray.)
  • 4-5ft of Decorative Trim of your choice (Sold in lengths of 8′)
  • MUST BE 1.25-1.5 inch trim. I used 1.5 which I highly recommend.
  • 3/4″ mounting screws (for magnets) or Epoxy/Gorilla Glue
  • 1″ wood screws
  • Brad/Finishing Nails
  • 1 large old school hard drive magnets (Bigger with Mounting Holes than newer drives) (Alternative: rare earth neodymium magnets that are .5″ thick (Approximately 8); these can be stacked if you can only find .25″ magnets)
  • Wood Glue
  • Wood Putty (Optional)
  • Wood Stain (Optional)
  • Tennis Racket Grip Tap (Or an old yellow rubber glove). Anything rubbery and tacky to increase friction against the fridge.

Continue reading

Vacuum Sealing Mylar Bags Using FoodSaver Vacuum Sealers

foodsaver mylar bags

Vacuum sealing with a FoodSaver, Seal-a-Meal or similar is a great way store food, hops, grains, spices and more. Vacuum bags work to seal out oxygen, prevent freezer burn and more.

What Are the Advantages Mylar Bags?

Generally speaking Mylar bags consist of three layers. Two Mylar layers that laminate a center aluminum foil layer. This combination provides strength, flexibility and durability along with an extremely low Oxygen Transmission Rate (OTR). These bags also block potentially damaging light. Combine this with vacuum sealing and you’ve got an outstanding way to store food & more.

Search Amazon for “food grade mylar bags” – to see lots of current offerings

For homebrewer’s… Vacuum sealed Mylar bags are an excellent  way to store hops and other oxygen sensitive materials.  As a testament to this, many hop distributors distribute hops in Mylar bags.  Sometimes those are vacuum sealed and sometimes they are nitrogen flushed.

Do Mylar Bags Work with FoodSaver Vacuum Sealers?

A FoodSaver (or similar) is a standard home suction type vacuum sealer that relies on special bags. We generally call them… vacuum sealer bags. These bags are embossed or textured to create channels on the inside of the bag. Those channels allow a FoodSaver to draw out air and create a vacuum all while the machine is clamped down. When this process is done a heat strip seals the bag locking in the vacuum state.

Mylar bags have smooth walls. Since they don’t have the required special channels they will not work with FoodSaver machines.

Continue reading

Homebrew Storage Options! – Base Grain, Specialty Grain and DME + Limited Time Free Shipping on Malt!

When it comes to storing grain and DME, we’re concerned about keeping ingredients fresh minimizing oxygen and moisture exposure.  We’re also interest in keeping Grain and DME away from possible pests.  Beyond that convenient access and efficient use of space are issues to consider.  This post also includes some tips and general sizing guidelines.

Buckets for Grain Storage – Pros and Cons

Pictured: Food Grade Buckets via Amazon

Buckets are one of the most basic and popular options out there and for good reason.  They are generally easy to source, well made and cheap.  Food safe options are also easy to find.

Search Food Grade Bucket on Amazon

Grain Storage Capacity Estimations

My rule of thumb for grain storage capacity is about 5 lbs per gallon for unmilled malt storage.  That’s a rough estimate, actual storage capacity will vary.  A 5 gallon bucket holds about 25 lbs Two buckets = a 50 lb bag.  Two 6 gallon buckets would comfortably hold a 55 lb bag.

Continue reading

Jester King Brewery Homebrew Recipes – Straight from the Brewery! + Source for Jester King Brewery Culture & More Recipes!

The fine brewers at Jester King based in Austin Texas have released homebrew recipes for 6 of their beers.  Kudos to Jester King for sharing with the homebrewing community!

Recipes include…

  • Biere De Miel, an ale brewed with Texas wildflower honey
  • Das Wunderkind!, a blend of young, fresh ale with mature, barrel-aged ale
  • Gotlandsdricka, an ale brewed with smoked malt, juniper, and sweet gale
  • Kvass, an ale brewed with miche bread
  • Noble King, a hoppy ale
  • Snörkel, an ale brewed with oyster mushrooms and smoked sea salt

Update: Recipes have since been removed from their website after an update.  No fear, we have them archived!  And, we have additional recipes along with a source for Jester King’s Mixed Culture

Continue reading

Adding a Tri-clamp Fitting to a Homebrew Keg Lid

This article is by Homebrew Finds Reader Kris G.  Thank you Kris for your creativity and hard work!

Editors Note: This is an advanced project that requires additional tools, skill and materials. This post outlines the process that Kris took to modify his keg lid with a weldless tri-clamp bulkhead. Product specifications can change over time, double check to make sure that current specifications match your needs.

Adding a Tri-clamp Fitting to a Homebrew Keg Lid

Carboys, conicals, buckets, kegs, etc. There is an ever-growing number of options for fermentation vessels. I recently moved away from carboys to experiment with pressurized fermentation. I didn’t feel like buying anything new, so why not repurpose a corny keg for fermentation? This past year I “right-sized” my batches down to 2.5-3 gallons making a corny the perfect size for fermenting. With a couple modifications (shortened dip tube, hop screen, etc), I had an old 5 gallon corny now as a dedicated fermenter. An added bonus was that it fit perfectly in my temp-controlled chest freezer.

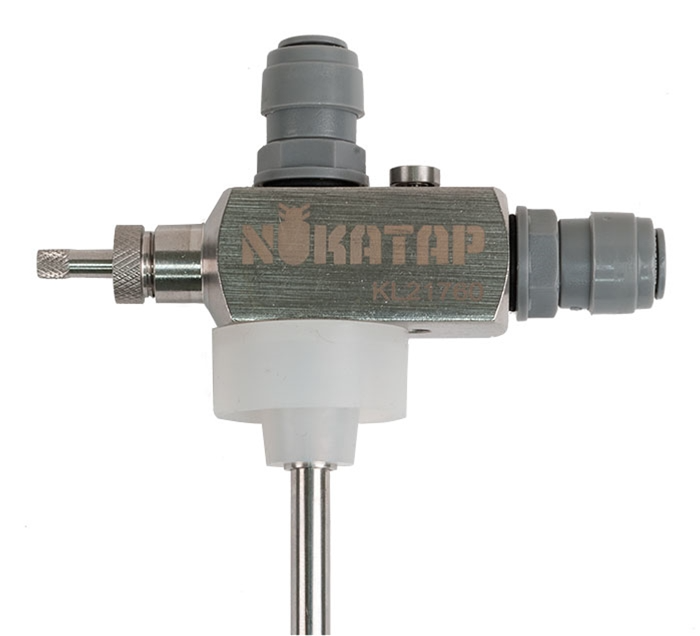
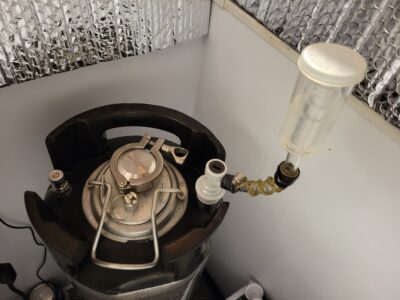
Fermenting in a Keg Using TC Equipped Lid


Related: Fermenting Under Pressure


Commercial Option Now Available, Build Continues Below:

304 stainless steel Cornelius Keg Lid with 1.5" Tri-clamp Ferrule,NEW Corny Beer Keg Lid 60PSI PRV Food Grade Dry Hopper

304 stainless steel Cornelius Keg Lid with 1.5″ Tri-clamp Ferrule,NEW Corny Beer Keg Lid 60PSI PRV Food Grade Dry Hopper – affiliate link, note that multiple variations of this product may be available, as such a different version may appear at this link


This article contains affiliate links. We may make a small percentage if you use our links to make a purchase. You won’t pay more and you’ll be supporting Homebrew Finds and more content like this. Thank you for your support!


I started seeing some other homebrew fermenters with tri-clamp connections on top. Blogs all around showed them used with blowoff tubes, thermowells, carbonation stones, CIP spray balls, etc. It seemed like a great universal connection with a ton of uses. Most importantly to me, I wanted the tri-clamp connection to build an oxygen-free dry hop dropper (that build is an article for another day).

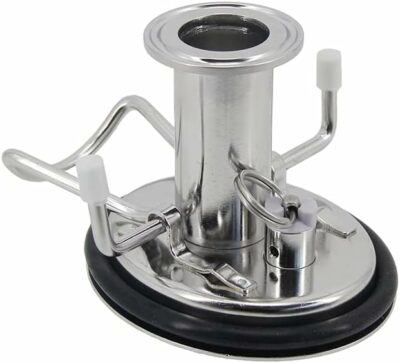
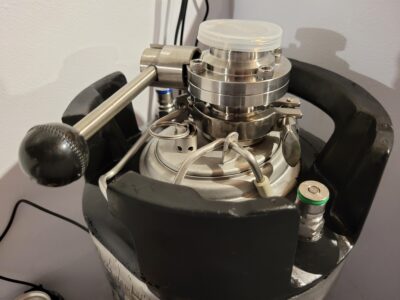
TC Equipped Lid with Butterfly Valve – Also: Color Coded Keg O-Rings

Read on to see my trials and tribulations while adding a TC bulkhead to my corny lid.
Build note: This is a weldless build. If you’ve got the ability/skill/tools to weld stainless, go for it!

Safety Note: Ensure that you are using all tools properly and wearing all the proper PPE. You will be drilling/cutting metal which is both sharp and hot.

PLEASE BE CAREFUL WHEN FOLLOWING THESE INSTRUCTIONS.
HBF is not responsible for your irresponsibility. At time of this writing, I am fully up to date with my tetanus shot. That may or may not be related…

Supplies

Editors Note: Note that multiple variations of these products may be available, as such a different version may appear at these links. Double check sizes and features.

Continue reading

Sourcing a Replacement Pump for Mark’s Keg and Carboy Washer

The purpose built Mark’s Keg and Carboy Washer is… awesome. It saves on cleaning and sanitizing solution, it’s versatile, doesn’t take up a lot of space and it saves me time. It’s one of my favorite homebrew tools and it has been for years.  Check out my in depth Hands on Review.


Mark’s Keg & Carboy Washer can be found at…


Finding a Replacement Pump

The pump on Mark’s Keg and Carboy Washer is, in general, very reliable.  Mine has lasted, for years, with no issues.  According the manufacturer, most pump issues that do arise are resolved by cleaning the pump.  Having said that, it’s possible that a pump needs replacement.  Finding a replacement is a bit difficult.  These are not sold by themselves.  It is possible to get a replacement from the manufacturer, but you usually need to provide proof of purchase and they aren’t cheap.

I put the call out asking HBF Readers [Let’s be friends!] if they had found any third party pumps that work as replacements for the Mark II Keg and Carboy Washer and Adrian got back to me in short order with this recommendation. Thank you Adrian!

Here it is….

Note: This post features the 740 GPH version. Other versions may be available and could show up by default of the 740 GPP version is out of stock. Double check the product page to see what’s available.

LYQILY 740GPH Ultra Quiet 2800L/H 55W Submersible Water Pump with 8.5ft High Lift for Fountains, Hydroponics, Ponds, Aquariums, Fish Tank – affiliate link, note that multiple variations of this product may be available, as such a different version may appear at this link

Note: This write up is about size and fit of this pump I’m making no commentary on materials compatibility of food safety of the materials used in any pump.

Continue reading

Serve Homebrew on Any Kegerator & Convert Commercial Kegerator to Homebrew

convert sanke to homebrew

Homebrew and Commercial Kegerators do the same thing.  They chill beer and allow you to serve it.  Each has lines for gas (typically CO2) and beer.  The only difficult thing about switching back and forth are the fittings and taps.

Commercial kegs use commercial keg couplers or taps.  These taps vary based on the brewery.  A typical style for US kegs is Sanke type D.  Commercial taps typically handle liquid and gas in single unit while homebrew couplers separate these out into gas and liquid quick disconnects.

Continue reading

Oxygen Free Transfer and Cold Crash Using a Spunding Valve!

homebrew oxygen free transfer

What is Cold Crashing?

Cold Crashing is chilling your beer after fermentation is complete.  Typically you want to get as close to freezing as possible, without actually freezing your beer.  These cooler temperatures cause break, yeast and trub matter to drop out of your beer.  This increases clarity, helps to hasten the conditioning process and helps you get a cleaner transfer to your serving vessel.

What is a Spunding Valve?

A Spunding Valve allows you to ferment under pressure, naturally and precisely carbonate in the keg, fix over-carbonated beers and more.  See: Build a Spunding Valve for more info.


Related Gear and Resources, Article Continues Below:

Kegland BlowTie v2

Kegland BlowTie v1

Continue reading

Homebrew Fermentation Heating Sources – Maintaining Fermentation Temps in Colder Weather

cold weather homebrewing

Fermentation temperature has a lot to do with how your finished beer turns out.

As seasons turn, you may need a boost to keep fermentation temperatures up.  Here’s a roundup of some of the available options out there along with some related reviews and resource posts

Continue reading

How Often Should I Clean My Kegerator Beer Lines?

Clean kegerator lines are a key part of serving delicious beer. Bacteria and mineral build in lines can cause off flavors, quick loss of head, under-carbonated beer due to rapid co2 loss and lack of legs forming on the inside of your beer glass.

How Often Should I Clean My Beer Lines?

The Draught Quality Beer Manual says… every two weeks.

That recommendation is for a commercial operation.  What about homebrewers?  We serve far fewer beer on our kegerators, but on the other hand, we can have been on tap and in lines 24 hours a day and 7 days a week.  Considering all of this, my recommendation is to clean home kegerator beer lines every 1 to 2 months.

Line Cleaning Options

Our Line Cleaning Builds:

Continue reading

Building a Dry Hopper for Corny Kegs – Dry Hop Under Pressure!

Thanks to /u/NachoTacocat on r/homebrew for this photo and build info!

Benefits of Fermenting Under Pressure + The Challenges of Dry Hopping Under Pressure

Fermenting under pressure has some great benefits. One of the challenges that using this method presents is… dry hopping. When fermenting under pressure the beer is carbonated. Adding dry hops to a fermented and carbonated beer, especially one at relatively warm fermentation temps equates to a Mentos+Diet Coke sort of situation. The hops provide lots and lots of nucleation points that can cause the beer to erupt expelling foam all over the place in the process denaturing head retaining proteins.

FermZilla fermenters from Kegland have a ready made solution called the Hop Bong. It allows you easily dry hop under pressure. Since the beer and dry hops are under pressure you don’t have foaming problems when dry hopping.

Continue reading

Didn’t Get What You Wanted?? The Homebrewer’s Gift Guide! The 2023 Edition of Our Annual Guide!

THE Homebrewer’s Gift Guide!

Looking for that perfect gift for the Homebrewer or Craft Beer Lover in your life or… for yourself.  Here’s some of our favorite gear!

Need Help?  Got a question or looking for a particular gift for your loved one?  Email me and I’ll do my best to help.

NukaTap Counter Pressure Bottle Filler

Nukatap Counter Pressure Bottle Filler

More Info

From the product description, check product page for current description, price and availability:

Do you having a kegging system with beer faucet, and want to bottle kegged beer? The Nukatap Counter Pressure Bottle Filler is an easy way to fill bottles directly from your beer faucet while preserving carbonation in the bottle. The O ring sealed beer inlet nipple press fits into any beer faucet with 10.0 mm inner diameter spout/nozzle including Nukatap, Intertap, Perlick Forward Seal, and Ventmatic faucets.

For the gas inlet side, a male ball lock fitting is provided, so you can use any ball lock gas connector to attach the C02 purging gas. This gas should be at the same pressure as your kegerator dispensing gas, and should be connected to your kegerator C02 regulator. Not Included: you will need a spare gas line from your regulator kegging system with a female ball lock on it to connect your purging C02 gas.

The integrated counter pressure relief valve gives you control of the counter pressure and thus the filling speed. How fast the bottle can be filled without too much foaming depends on CO2 level, beer temperature and bottle temperature. Keep everything cold for the best results.

Fits all 16 ounce and 32 ounce ‘Grolsch’ style swing top bottles.


This connects directly to your compatible forward sealing faucet (Intertap, Nukatap and more) and allows you to easily counter fill bottles directly from the tap.

This is DuoTight compatible, although you don’t need to use DuoTights throughout your entire tap system to use it.

Nukatap’s Counter Pressure Bottle Filler

Compare: Nukatap Counter Pressure Bottle Filler via MoreBeer

Learn More… Hands on Review Nukatap Counter Pressure Bottle Filler!


A New Hop!

NY Cascade 023™ Hops | Citrus, Tropical, Floral | Ultra High Thiol | T-90 Hop Pellets

NY Cascade 023™ Hops | Citrus, Tropical, Floral | Ultra High Thiol | T-90 Hop Pellets
via MoreBeer

From the hop description, check product page for current description, price and availability:

  • NY Cascade 023™ is a powerhouse of flavors for thiolized beers thanks to the special terroir of New York State
  • With a higher bound thiol precursor count than typical Cascade, 023™ has huge flavor and aroma potential when used in tandem with a thiolized yeast strain
  • Highly recommended for Mash Hopping. Maximize flavor and aromas while minimizing bitterness
  • When used with thiolized yeast, flavors are noted to be tropical, red berry, and melon
  • When not used with thiolized yeast, flavors are noted to be citrus, tropical, and floral

NY Cascade 023™ Hops | Citrus, Tropical, Floral | Ultra High Thiol | T-90 Hop Pellets

Continue reading

It’s Not Too Late… Last Minute Gift Guide for Homebrewers!

Looking for a last minute gift for a home brewer or craft beer lover (or yourself)?  Check out the Last Minute Gift Section of our Homebrewer’s Gift Guide

Also check out the complete guide – Homebrewer’s and Craft Beer Lovers Gift Guide. Each year we look at everything in homebrewing and pick a handful of items that would make amazing gifts.

homebrewer gift guide

Continue reading

LAST MINUTE Gift Guide for Homebrewers!

Looking for a last minute gift for a home brewer or craft beer lover (or yourself)?  Check out the Last Minute Gift Section of our Homebrewer’s Gift Guide

Also check out the complete guide – Homebrewer’s and Craft Beer Lovers Gift Guide. Each year we look at everything in homebrewing and pick a handful of items that would make amazing gifts.

homebrewer gift guide

Continue reading

Still Shopping? The Homebrewer’s Gift Guide! The 2023 Edition of Our Annual Guide!

THE Homebrewer’s Gift Guide!

Looking for that perfect gift for the Homebrewer or Craft Beer Lover in your life or… for yourself.  Here’s some of our favorite gear!

Need Help?  Got a question or looking for a particular gift for your loved one?  Email me and I’ll do my best to help.

NukaTap Counter Pressure Bottle Filler

Nukatap Counter Pressure Bottle Filler

More Info

From the product description, check product page for current description, price and availability:

Do you having a kegging system with beer faucet, and want to bottle kegged beer? The Nukatap Counter Pressure Bottle Filler is an easy way to fill bottles directly from your beer faucet while preserving carbonation in the bottle. The O ring sealed beer inlet nipple press fits into any beer faucet with 10.0 mm inner diameter spout/nozzle including Nukatap, Intertap, Perlick Forward Seal, and Ventmatic faucets.

For the gas inlet side, a male ball lock fitting is provided, so you can use any ball lock gas connector to attach the C02 purging gas. This gas should be at the same pressure as your kegerator dispensing gas, and should be connected to your kegerator C02 regulator. Not Included: you will need a spare gas line from your regulator kegging system with a female ball lock on it to connect your purging C02 gas.

The integrated counter pressure relief valve gives you control of the counter pressure and thus the filling speed. How fast the bottle can be filled without too much foaming depends on CO2 level, beer temperature and bottle temperature. Keep everything cold for the best results.

Fits all 16 ounce and 32 ounce ‘Grolsch’ style swing top bottles.


This connects directly to your compatible forward sealing faucet (Intertap, Nukatap and more) and allows you to easily counter fill bottles directly from the tap.

This is DuoTight compatible, although you don’t need to use DuoTights throughout your entire tap system to use it.

Nukatap’s Counter Pressure Bottle Filler

Compare: Nukatap Counter Pressure Bottle Filler via MoreBeer

Learn More… Hands on Review Nukatap Counter Pressure Bottle Filler!


A New Hop!

NY Cascade 023™ Hops | Citrus, Tropical, Floral | Ultra High Thiol | T-90 Hop Pellets

NY Cascade 023™ Hops | Citrus, Tropical, Floral | Ultra High Thiol | T-90 Hop Pellets
via MoreBeer

From the hop description, check product page for current description, price and availability:

  • NY Cascade 023™ is a powerhouse of flavors for thiolized beers thanks to the special terroir of New York State
  • With a higher bound thiol precursor count than typical Cascade, 023™ has huge flavor and aroma potential when used in tandem with a thiolized yeast strain
  • Highly recommended for Mash Hopping. Maximize flavor and aromas while minimizing bitterness
  • When used with thiolized yeast, flavors are noted to be tropical, red berry, and melon
  • When not used with thiolized yeast, flavors are noted to be citrus, tropical, and floral

NY Cascade 023™ Hops | Citrus, Tropical, Floral | Ultra High Thiol | T-90 Hop Pellets

Continue reading

Universal Poppets Tips and Tricks!

I use universal style poppets exclusively when rebuilding kegs. Finding the right OEM specific replacement poppets can be a chore. Beyond finding the right part number, these can be prohibitively expensive. Paying $10 to $14, or more, for an OEM poppet isn’t fun. In fact, if you really had to pay that, it may not even make sense to keep the keg.

Enter universal poppets.  These can be picked up at a reasonable cost, regularly under $2 each, and fit the vast majority of kegs.

Tip: Immediately Replace Universal Poppet O-Rings

I remove and discard the o-rings that come with universal poppets.  That may sound a little odd, but there are a couple issues. First, I have no idea what these are made of. They are probably okay, but I’m not sure. This is one spot that has a lot of contact with beer. I want to make sure these are food grade.  Second, when it comes time to replace these o-rings I want replacements that won’t change fit.  I’m aware of a single source for bulk food grade o-ring replacements for universal poppets. Size may vary slightly compared to OEM, so I replace these before adjusting for fit so that the replacements won’t change the way these fit. The stainless parts of universal poppets should last a long, long time, having a reliable source for replacements that you know aren’t going to change anything is a big benefit. Beyond that, being sure you’re using food grade materials at this point is worth a few cents.

OR… Universal Poppets – 304 Stainless + Food Grade Silicone! & Reliable O-Ring Replacements

universal poppetsSince this guide was published, Valuebrew has released a 304 Stainless Steel + Food Grade Silicone Universal Poppet option!

I’m excited that there’s finally there’s an option that comes with quality o-rings made from the right materials out of the box!  Beyond that, Valuebrew has pledged to always carry replacement o-rings, so you’ll always have a source when the time comes for replacements.

Universal Poppets – via Valuebrew – These are made of 304 SS and come with food grade silicone o-rings. Valuebrew has committed to always carrying replacements.

Continue reading