Category Archives: Tips

Color Code Keg Posts for Quick Identification

Valuebrew has an exclusive color coded option for keg post o-rings.  Blue and Green.  These are sized for ball lock kegs (although there is a workaround for pin lock kegs, see pin lock section below).  You can use these however you’d like, but the idea is to color code you keg posts for easy identification.  They recommend Blue for Beer and Green for Gas.  I’m quite excited about these.

Continue reading

Trouble Cleaning Your Keezer With a Collar? Use a Mop

Pictured: O-Cedar EasyWring Microfiber Spin Mop & Bucket Floor Cleaning System + 2 Extra Refills affiliate link, note that multiple variations of this product may be available, as such a different version may appear at this link

Part of Our Homebrew Tips and Tricks Series.  Check out the complete list – Homebrewing Tips, Tricks & Shortcuts!

Adding a collar to my chest freezer based kegerator/keezer was a huge upgrade.  It allowed me to switch from messy/drippy picnic taps to forward sealing faucets and a drip tray.  It looks great and it works great.  Beyond that, I don’t have to deal with sticky tubing and cobra style taps.

Continue reading

Use a Carbonation Cap To Assist with Closed Transfer Racking

Thank you to Twitter Follower Josh @beardlywine for this tip! Let’s be Friends! – 8 Ways to Connect

Josh uses carbonator caps to assist with closed transfer racking to kegs.  If you look at the photo he shared, he’s putting a small length of tubing on the cap and then feeding that through the airlock grommet hole of his fermenter.  This same process could be adapted to work with other styles of fermenters.

Carbonator Caps

Continue reading

Removing Keg Labels… A Trick That Makes it Easy

Part of Our Homebrew Tips and Tricks Series.  Check out the complete list – Homebrewing Tips, Tricks & Shortcuts! This is a Top Post! See: All Top Posts

I use a fermentation heat wrap to help remove stubborn keg labels.  The gentle heat helps loosen old adhesive.

Removing Keg Labels… A Trick That Makes it Easy! – a section of our keg rebuild how-to

Continue reading

Shopping Tip: Homebrew Shop Sales Timing and Traffic Patterns

homebrew deals

When is the best time (price-wise) to buy something?  I would say the answer (generally speaking)… is when you don’t want it.  Winter coats are the cheapest when winter is over because nobody wants them.  Holiday decorations are drastically marked down after the holidays.  Retailers make these decisions because demand is low.

Continue reading

Recondition Keg Handles & Bases with Armor All Protectant

I use Armor All Protectant to help rejuvenate keg rubber keg handles and bases. In my experience, it works wonders.  The picture above is from my post on rebuilding kegsJump To: Section on reconditioning handles and bases – If you look through the post you’ll see just how good the keg looks at the end.

Continue reading

Homebrew Propane Tank Tips – Refill vs Swaps and Extra Tanks

propane tank tips

Part of Our Homebrew Tips and Tricks Series.  Check out the complete list – Homebrewing Tips, Tricks & Shortcuts!

Propane Tank Tips


Refill vs swap.  The capacity of the standard 20 lb propane tank is, well.. around 20 lbs.  Several years ago, some swap services started to underfill tanks.  For example, it’s my understanding that Blue Rhino fills to 15 lbs and Heritage Propane fills to 17 lbs.

For me, refilling a tank to 20 lbs is actually less expensive than swapping it out. For the purpose of comparison, let’s say that refilling and swapping are the same… $20 to swap and $20 to refill.  The fill costs you $1/lb.  If you’re refilling with a vendor that fills to 15 lbs, you’re paying $1.33/lb or 33% more.

When you refill your tank – You’re, generally, saving money,  You’re supporting a local business and saving yourself time because you don’t have to get propane as often.

Extra tanks.  I suggest having an extra tank (or two) of propane on hand.  Running out of propane mid brew is a bummer.  It is inconvenient and you can end up with a different beer than you intended because of the delay.  This can also be a money saving thing too if your refiller charges by the tank.  Since you don’t want to run out of propane on brew day, you may be more likely to swap or refill a tank that still have propane left in it.

Search Amazon for “Propane Tank” – offerings vary

More Homebrew Finds!

This post may contain affiliate links. We may make a commission when you use our links. This will never cost you extra. Thank you for supporting Homebrew Finds!


Make sure the components you use are compatible and rated for your intended application.  Contact manufacturer with questions about suitability or a specific application.  Always read and follow manufacturer directions. toppost:propanetips urp:tips4 tag:tpru
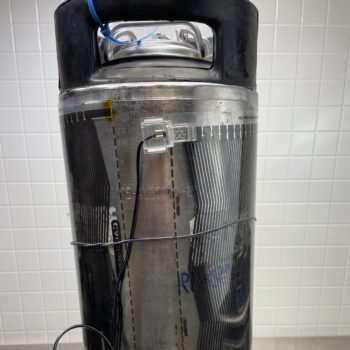
Trouble Cleaning Your Keezer With a Collar? Use a Mop

Pictured: O-Cedar EasyWring Microfiber Spin Mop & Bucket Floor Cleaning System + 2 Extra Refills affiliate link, note that multiple variations of this product may be available, as such a different version may appear at this link

Part of Our Homebrew Tips and Tricks Series.  Check out the complete list – Homebrewing Tips, Tricks & Shortcuts!

Adding a collar to my chest freezer based kegerator/keezer was a huge upgrade.  It allowed me to switch from messy/drippy picnic taps to forward sealing faucets and a drip tray.  It looks great and it works great.  Beyond that, I don’t have to deal with sticky tubing and cobra style taps.

Continue reading

Using Polypropylene Lab Bottles to Rehydrate Yeast

Bel-Art Precisionware Wide-Mouth 500ml (16oz) Autoclavable Polypropylene Bottles; Polypropylene Cap, 53mm Closure (Pack of 12) (F10632-0007)Pictured: (12) 500 mL Polypropylene Jars with 53 mm closures by Bel-Art Products affiliate link, note that multiple variations of this product may be available, as such a different version may appear at this link

Part of Our Homebrew Tips and Tricks Series.  Check out the complete list – Homebrewing Tips, Tricks & Shortcuts!

  • Note: This tip involves handling hot items.  Always use extreme caution when handling hot items to avoid being scalded.
  • In my opinion, Polypropylene is a good material for this.  It is commonly used in lab bottles and has a higher heat resistance when compared to HDPE and LDPE.
  • The pictured bottle is what I personally use.  There are lots of options out there.  Search Amazon for Polypropylene Lab Bottles to see what else may be available,  Some things to look for – proper temp ratings, use of food safe materials and microwaveable.
  • Consult your yeast manufacturer for specific amounts, temperatures and timing recommendations.

Rehydrating Yeast Step by Step

  • Place the appropriate amount of water in the bottle.  Some manufacturers recommend 10 grams of water per 1 gram of yeast.  Most packets are 11 grams.  That’s 110 grams.
  • Use an accurate gram scale to weigh the water.  For a common measurement like 110 grams, I mark my bottle with a Sharpie so I can easily measure out rehydration water without needing to weigh every time.
  • Place the lid on top of the bottle.  Important: Do not thread or tighten the lid!  It will burst if you do that.  You just want the lid setting loosely on top so that it can be sanitized by the steam.
  • Microwave until the water comes to a full boil.
  • Cooling to Temp, Slow Option: Let the bottle sit with cap loosened until it reaches proper hydration temperature.
  • Cooling to Temp, Quick Option: Very carefully tighten the cap down.  Run cool water over the bottle to reach proper rehydration temp.  This is going to be hot, be very careful!  I use heat resistant gloves for this.  The cooling will most likely cause the container to collapse on itself and could slightly misform it.
  • I use an Infrared thermometer to check temp as cooling commences.  Note that I do not open the bottle to check temp.  Just aim the IR thermometer at the mass of water inside the bottle.  I’m usually aiming for around 95 deg F.
  • Sprinkle the dry yeast in the container and place the lid on back on the bottle.  Let this sit for 10 to 15 minutes.
  • Gently swirl bottle to ensure the yeast is thoroughly mixed.
  • Pitch when you’re ready.
  • This method ensures a sanitary process.  The initial container and water are sanitized and there is no touching of the water with thermometers or stirring devices.
  • You could use a similar method to produce yeast washing water.
  • Search Amazon for “Polypropylene Lab Bottles” – Some things to look for – proper temp ratings, use of food safe materials and microwaveable.
  • Search Amazon for “digital gram scale”
  • Search Amazon for “infrared thermometer”
  • Search Amazon for “heat resistant kitchen gloves”
  • Review: Hands On: American Weigh 100g x 0.01g Digital Scale
  • Related Categories: YeastScales, Infrared Thermometers

Make sure the components you use are compatible and rated for your intended application.  Contact manufacturer with questions about suitability or a specific application.  Always read and follow manufacturer directions.

This post may contain affiliate links. We may make a commission when you use our links. This will never cost you extra. Thank you for supporting Homebrew Finds!

rp:tips1

Tip: Lodge Pan Scrapers for Cleaning Fermenters

Lodge Pan Scrapers. Handheld Polycarbonate Cast Iron Pan Cleaners. (2-Pack. Red/Black)

Part of Our Homebrew Tips and Tricks Series.  Check out the complete list – Homebrewing Tips, Tricks & Shortcuts!

Credit for this idea goes to Drew Beechum.   Drew is the author of Experimental Brewing, Homebrew All Stars and lots more.  Check out his Author Page at Amazon to learn more about Drew

Drew Says… “An absolutely underrated tool – particularly for getting stubborn Krausen off of stainless without scratching!”

Lodge Pan Scrapers. Handheld Polycarbonate Cast Iron Pan Cleaners. (2-Pack. Red/Black) – affiliate link, note that multiple variations of this product may be available, as such a different version may appear at this link

This post may contain affiliate links. We may make a commission when you use our links. This will never cost you extra. Thank you for supporting Homebrew Finds!

Make sure the components you use are compatible and rated for your intended application.  Contact manufacturer with questions about suitability or a specific application.  Always read and follow manufacturer directions.

rp:tips#40

Tip: Use Deli Containers To Store Your Yeast Cake

Deli Food Storage Containers with Lids, 16 Ounce (48 Count)Pictured: Deli Food Storage Containers with Lids, 16 Ounce affiliate link, note that multiple variations of this product may be available, as such a different version may appear at this link

Part of Our Homebrew Tips and Tricks Series.  Check out the complete list – Homebrewing Tips, Tricks & Shortcuts!


  • Note: This tip involves handling hot items.  Always use extreme caution when handling hot items to avoid being scalded.
  • These containers are generally food safe and microwave safe.
  • They also, generally, have tight lids.  Lids are either not quite airtight – That’s perfect for storing a yeast cake for your next batch as, the yeast may need to off-gas – Or airtight – That’s okay too as popping a lid off one of these isn’t usually a huge deal.
  • You can sanitize these by microwaving some water in them.  Place the lid loosely on top so that it can get sanitized by steam.  Be very careful around boiling water and steam, you can get hurt.  Or, sanitize with your favorite food grade homebrew sanitizer.
  • These type of containers are also handy for general storage, rehydrating yeast, sample collection and lots more.  Non-brewing related bonus… these are great for giving food-stuffs away as they are economical enough that you don’t need to worry about getting your container back.
  • There are many offerings for these types of containers and they can change quickly.  Search Amazon for “pint deli containers” to see what’s out there.  Some things to look for – food safe materials, microwave safe and tight fitting lids.
  • Credit for this tip goes to Denny Conn!
  • Related Categories: Fermentation, Yeast

This post may contain affiliate links. We may make a commission when you use our links. This will never cost you extra. Thank you for supporting Homebrew Finds!

Make sure the components you use are compatible and rated for your intended application.  Contact manufacturer with questions about suitability or a specific application.  Always read and follow manufacturer directions. tag:lnksfxd  rp:tips#35

Tips for Fighting Homebrew Boil-Overs!

Thanks to HBF Reader Case for this photo!  [8 Ways to Connect with HBF]

Part of Our Homebrew Tips and Tricks Series.  Check out the complete list – Homebrewing Tips, Tricks & Shortcuts!


  • Start with a well-sized kettle.  Having some margin, gives you a better chance to fight the dreaded boil-over.
  • Be alert!  When your wort hits hot-break temperatures, boil-overs can happen quickly.
  • Adding hops is another potential boil-over inducing event that should be ready for.
  • Stir the Foam!  If you’re fighting a boil-over… stir the foam.  No need to stir the entire batch, just stir the very top to break up the foam more quickly.
  • A spray bottle of water (set to a moderate mist) works well to combat foam
  • A wooden spoon placed over the top of your brew kettle can help break up foam.  Personally I would not use this as primary defense.
  • FermCap-S Foam Control – This is designed to control foam.  It settles out during fermentation and actually helps increase head retention.
  • Search Amazon for “food safe spray bottle”
  • Search Amazon for “24 stainless whisk”
  • Related Review: Hands On: 24″ Stainless Steel Whisk – Extract, All Grain and Whirlpooling
  • Related Categories: StirringMash PaddlesPropane BurnersKettles

This post may contain affiliate links. We may make a commission when you use our links. This will never cost you extra. Thank you for supporting Homebrew Finds!

Make sure the components you use are compatible and rated for your intended application.  Contact manufacturer with questions about suitability or a specific application.  Always read and follow manufacturer directions.

rp:tips#23

Tip: Use High Quality Pitchers on Brew Day and Beyond

Rubbermaid Commercial Products FG321800CLR 4-Quart Bouncer Measuring CupPictured: Rubbermaid Commercial Products Bouncer Measuring Cup, 4-Quart, Clear, FG321800CLR via Amazon – Hands On Review

Part of Our Homebrew Tips and Tricks Series.  Check out the complete list – Homebrewing Tips, Tricks & Shortcuts!


  • I recommend keeping a couple high quality pitchers around to use for measuring, mash recirculation, utensil storage, water and wort transfer, help cleaning and sanitizing smaller items and more.
  • Why having quality pitchers is great… There are several equipment purchases that I look back on and say… I’m really glad I got that, it’s made a big difference.  This pitcher, is one of those.  I went from a mish-mash of too small plastic pitchers, found around the house, that bent under the weight of wort, dripped and leached who knows what into my beer to two of these babies!  What a difference.
  • The FG321800CLR is designed for food service, food safe, high temp capable – up to 212 deg F, has volume markers, has an easy to use handle and is sturdy.
  • Shop Around, Search Amazon for “4 quart measuring pitcher” – look for food safe materials and temperature ratings within your required range.  Aluminum pitchers can work too, although a word of warning that Star San and aluminium do not place well together.  Not a deal breaker, just something to keep in mind as you use your new pitcher.
  • Review: Hands On: Rubbermaid Commercial Product 1 Gallon Bouncer Pitcher
  • Related Categories: All Grain, Brew Day, Pitchers

This post may contain affiliate links. We may make a commission when you use our links. This will never cost you extra. Thank you for supporting Homebrew Finds!


Make sure the components you use are compatible and rated for your intended application.  Contact manufacturer with questions about suitability or a specific application.  Always read and follow manufacturer directions.

rp:tips6

Tip: Use Two Scales if You’re an All Grain Brewer

UltraShip 55 lb. Digital Postal Shipping & Kitchen ScalePictured: Ultraship Ultra-55 affiliate link, note that multiple variations of this product may be available, as such a different version may appear at this link – Hands On Review

Part of Our Homebrew Tips and Tricks Series.  Check out the complete list – Homebrewing Tips, Tricks & Shortcuts!

  • As all grain brewers we are generally weighing things in two categories.  Moderately large amounts of things – like grain – and smaller amounts of things – like hops and water salts.
  • Although weighing both types of things involve a scale, they are really wildly different activities.

But Why?

  • I’ll take the Ultraship Ultra-55 [Hands On Review] as an example.  That has been my go-to grain scale for years and years.  It has a large 55 lb capacity, the tare feature and the face removes so that you can weigh large items (like buckets of grain) and still easily read the display.
  • The Ultraship Ultra-55 has a resolution of 2 grams when weighing up to 1 kg (about 2.2 lbs).  From 2 lbs to 50 lbs it has a resolution of .5 oz.  If we’re weighing 20 lbs of 2 row, this works great.  If you’re 2 grams or a half an ounce off either way, it really doesn’t matter.  How about hops?  A 2 gram resolution would work in a pinch, but I don’t think most brewers would be happy with that.  Weighing water salts are completely of the question with this sort of precision/resolution.  But.. it’s a great grain scale.
  • Second example… American Weigh 100g x 0.01g Digital Scale [Hands on Review].  That scale has an outstanding 1/100th gram resolution.  That’s great for weighing hops accurately AND weighing water salts.  How about for your all grain grist bill?  It should be awesome right?  No.  100 grams equates to about .22 lbs.

The right tool for the job: As scale capacity goes up, resolution, precision and accuracy generally go down.  Very accurate scales with higher capacities do exist, but they’re very expensive.  If you’re looking for something like this or just want to see prices, try this search on Amazon.  It searches “high capacity lab scale” in the Industrial & Scientific category sorting from high to low price.

  • Recommendation: Use one larger capacity scale for measuring grain.  Important features to consider: Tare (allows you to subtract the weight of the container that’s being used), Pounds/Kilograms Display, Digital Readout, Either Auto Hold or a Removable Face (this allows you to weigh large objects like a bucket of grain.  An AC Adapter is also nice to have.  This Ultraship scale is what I use.  I’ve used it for years and have been very happy with it.  It features a removable face to easily weigh larger objects.
  • Recommendation: Use one smaller, more accurate scale for weighing hops, spices and water salts.  Tare, Pounds/Kilograms and Digital Readout are important for this one.  You’ll want something that measures to an accuracy of 1/10th of a gram.  You’ll be using grams for water salts and you should consider using grams for hops.  Consider the AWS-100

What about Extract Brewers?

If you’re an extract brewer or you can only keep one scale because of budget or space, look for something in the middle, something with an 11 to 15 lb capacity and a 1 gram resolution – something like this.  You can use that to weigh out grain bills – you may need to split your grain bill up into a couple batches to get under the capacity and 1 gram will work for hops.

Make sure the components you use are compatible and rated for your intended application.  Contact manufacturer with questions about suitability or a specific application.  Always read and follow manufacturer directions.

This post may contain affiliate links. We may make a commission when you use our links. This will never cost you extra. Thank you for supporting Homebrew Finds!

rp:tips2

Tip: Straighten Homebrew Tubing

Part of Our Homebrew Tips and Tricks Series.  Check out the complete list – Homebrewing Tips, Tricks & Shortcuts!


  • If you have a length of tubing that is difficult to roll up correctly or otherwise sits incorrectly, try soaking it it warm or hot water (be very careful!) and then bend the tubing how you want it and let it cool.
  • Don’t exceed the maximum temp rating for your tubing
  • Search Amazon for “food safe tubing”
  • Related Top Post: Tips: Cleaning, Drying & Storing Tubing
  • Related Categories: Tubing

https://www.homebrewfinds.com/2017/02/cleaning-drying-storing-tubing.html

This post may contain affiliate links. We may make a commission when you use our links. This will never cost you extra. Thank you for supporting Homebrew Finds!

Make sure the components you use are compatible and rated for your intended application.  Contact manufacturer with questions about suitability or a specific application.  Always read and follow manufacturer directions.

rp:tips#29

Tip: Using Undiluted PBW to Help with Bottle Label Removal

beer bottle label removal

Part of Our Homebrew Tips and Tricks Series.  Check out the complete list – Homebrewing Tips, Tricks & Shortcuts!


  • Soaking your bottles in hot PBW is not a new technique.  It works well and I would venture a guess that a lot of homebrewers do this.
  • Here’s the tip… If you have a label or bits of adhesive that are being stubborn,   Put a little bit of PBW right on a label or adhesive that’s giving you problems and scrub.  The grittiness of the PBW combined with it’s full strength application generally dissolves the label and adhesive in short order.
  • PBW can be rough on your hands when diluted.  That’s even more true when it’s undiluted.  I recommend using protective gloves when dealing with PBW.
  • Search Amazon for “elbow length cleaning gloves”
  • Search Amazon for “PBW Cleaner”
  • Search Amazon for “scrub pads”
  • Search MoreBeer for “PBW”
  • Related Categories: BottlingCleaning

My PBW Quick Pick!

This post may contain affiliate links. We may make a commission when you use our links. This will never cost you extra. Thank you for supporting Homebrew Finds!

Make sure the components you use are compatible and rated for your intended application.  Contact manufacturer with questions about suitability or a specific application.  Always read and follow manufacturer directions. rp:tips#24

Using Polypropylene Lab Bottles to Rehydrate Yeast

Bel-Art Precisionware Wide-Mouth 500ml (16oz) Autoclavable Polypropylene Bottles; Polypropylene Cap, 53mm Closure (Pack of 12) (F10632-0007)Pictured: (12) 500 mL Polypropylene Jars with 53 mm closures by Bel-Art Products affiliate link, note that multiple variations of this product may be available, as such a different version may appear at this link

Part of Our Homebrew Tips and Tricks Series.  Check out the complete list – Homebrewing Tips, Tricks & Shortcuts!

  • Note: This tip involves handling hot items.  Always use extreme caution when handling hot items to avoid being scalded.
  • In my opinion, Polypropylene is a good material for this.  It is commonly used in lab bottles and has a higher heat resistance when compared to HDPE and LDPE.
  • The pictured bottle is what I personally use.  There are lots of options out there.  Search Amazon for Polypropylene Lab Bottles to see what else may be available,  Some things to look for – proper temp ratings, use of food safe materials and microwaveable.
  • Consult your yeast manufacturer for specific amounts, temperatures and timing recommendations.

Rehydrating Yeast Step by Step

  • Place the appropriate amount of water in the bottle.  Some manufacturers recommend 10 grams of water per 1 gram of yeast.  Most packets are 11 grams.  That’s 110 grams.
  • Use an accurate gram scale to weigh the water.  For a common measurement like 110 grams, I mark my bottle with a Sharpie so I can easily measure out rehydration water without needing to weigh every time.
  • Place the lid on top of the bottle.  Important: Do not thread or tighten the lid!  It will burst if you do that.  You just want the lid setting loosely on top so that it can be sanitized by the steam.
  • Microwave until the water comes to a full boil.
  • Cooling to Temp, Slow Option: Let the bottle sit with cap loosened until it reaches proper hydration temperature.
  • Cooling to Temp, Quick Option: Very carefully tighten the cap down.  Run cool water over the bottle to reach proper rehydration temp.  This is going to be hot, be very careful!  I use heat resistant gloves for this.  The cooling will most likely cause the container to collapse on itself and could slightly misform it.
  • I use an Infrared thermometer to check temp as cooling commences.  Note that I do not open the bottle to check temp.  Just aim the IR thermometer at the mass of water inside the bottle.  I’m usually aiming for around 95 deg F.
  • Sprinkle the dry yeast in the container and place the lid on back on the bottle.  Let this sit for 10 to 15 minutes.
  • Gently swirl bottle to ensure the yeast is thoroughly mixed.
  • Pitch when you’re ready.
  • This method ensures a sanitary process.  The initial container and water are sanitized and there is no touching of the water with thermometers or stirring devices.
  • You could use a similar method to produce yeast washing water.
  • Search Amazon for “Polypropylene Lab Bottles” – Some things to look for – proper temp ratings, use of food safe materials and microwaveable.
  • Search Amazon for “digital gram scale”
  • Search Amazon for “infrared thermometer”
  • Search Amazon for “heat resistant kitchen gloves”
  • Review: Hands On: American Weigh 100g x 0.01g Digital Scale
  • Related Categories: YeastScales, Infrared Thermometers

Make sure the components you use are compatible and rated for your intended application.  Contact manufacturer with questions about suitability or a specific application.  Always read and follow manufacturer directions.

This post may contain affiliate links. We may make a commission when you use our links. This will never cost you extra. Thank you for supporting Homebrew Finds!

rp:tips1

Tip: Get a Refractometer – Save Beer & Breakage!

Anpro Brix Refractometer for Homebrew, Beer Wort Refractometer Dual Scale Specific Gravity 1.000-1.120 and Automatic Temperature Compensation 0-32% Replaces Homebrew Hydrometer, MPictured: Anpro Brix Refractometer for Homebrew, Beer Wort Refractometer Dual Scale Specific Gravity 1.000-1.120 and Automatic Temperature Compensation 0-32% via Amazon

Part of Our Homebrew Tips and Tricks Series.  Check out the complete list – Homebrewing Tips, Tricks & Shortcuts!


  • If you haven’t realized it yet… hydrometers are made out of breakable glass that can… break.  They also require a healthy sample size.
  • With a refractometer you need a sample size of just a couple drops.  That’s a lot of saved beer compared to a hydrometer.  So much so that a refractometer may very well pay for itself over time.
  • For me, getting a refractometer was one of those small, inexpensive upgrades that made a huge difference.
  • An quick estimation of unfermented wort gravity is easy to calculate.  OG is around 4 times the Brix reading obtained from your refractometer.  That becomes more and more inaccurate as gravities increase.
  • Refractometers can also be used to measure gravity throughout the fermentation process.  Just plug your numbers into a calculator for correction after fermentation begins.  See: Sean Terrill’s Refractometer Calculator
  • If you have a refractometer AND a hydrometer you can estimate ABV without a starting gravity.  See Tip 10 for more information on that.
  • Some shopping tips… Look for a dual scale (Brix and Gravity) model.  ATC/Automatic Temperature Correction is another important feature.  That automatically accounts for changes due to temperature within a certain range.
  • There are many offerings and they can change quickly.  Shop Around, Search Amazon for “dual scale refractometer” to compare prices and see what models are currently available.
  • If you have a higher budget, consider a digital model.  Generally speaking, those are not available with dual scale capabilities, but you get a digital readout of gravity readings.  That’s a nice feature.  Shop Around, Search Amazon for “digital brix refractometer” to compare prices and see what models are currently available.
  • Related Categories: Fermentation, Refractometers

Make sure the components you use are compatible and rated for your intended application.  Contact manufacturer with questions about suitability or a specific application.  Always read and follow manufacturer directions.


This post may contain affiliate links. We may make a commission when you use our links. This will never cost you extra. Thank you for supporting Homebrew Finds!

rp:tips9