Category Archives: Brew Hardware

The SpinCycle Whirlpool Returns from Brew Hardware!

spincycle whirlpool return

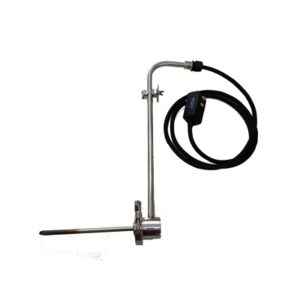
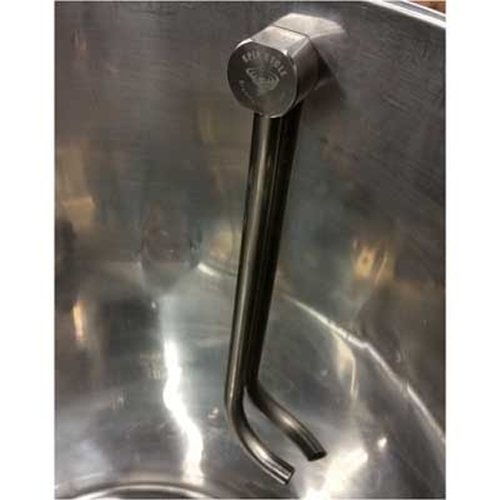
Recirculating wort back into the kettle to whirlpool the wort makes for much faster cooling and will also make a concentrated pile of trub and hop particles in the center of the kettle bottom. This whirlpool port assembly installs high up on your kettle wall above the typical wort level and then extends down before curving to the side to force the recirculated liquid towards the sidewall.

The BrewHardware purpose-built unit called the Spin Cycle starts with a weldless bulkhead design with captured O-ring and extended male threads and has the 1/2″ drop tube fully welded in. The result is a compact way to whirlpool without the need to put a ball valve on the port (the port is meant to be installed well above the max liquid level). It includes the base unit with the welded drop tube, the captured high temp silicone oring, a thin SS washer and a 1/2″ NPS locknut to hold it all together.

This post may contain affiliate links. We may make a commission when you use our links. This will never cost you extra. Thank you for supporting Homebrew Finds!

Price, promotions and availability can change quickly. Check the product page for current price, description and availability. prod:spincycle

The Steam Slayer from Brew Hardware! – Kettle Steam Condenser Assembly – eliminates need to vent from your brewing room

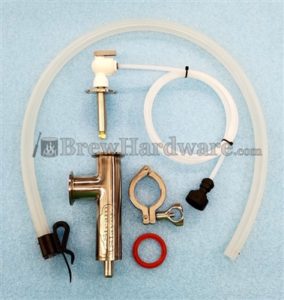
STEAM SLAYER - KETTLE BOIL STEAM CONDENSER ASSEMBLY

The Steam Slayer via Brew Hardware is designed to eliminate the need to vent steam from your brewing room.

More Info

From the product description, check product page for current description, price and availability:

The Steam Slayer(tm) is a brand new product that eliminates the need to vent steam from your brewing room. More and more people are converting over to electric brewing systems allowing brewing indoors and even in quite confined spaces. The rude awakening occurs when you evaporate a gallon or more water into the air and your walls and ceiling drips with condensation. In some cases it is impossible or unreasonable to install fan-based exhaust systems to vent that steam. Enter the Steam Slayer!

Condensing boil steam is a relatively common practice in large scale industry and some breweries. Homebrewtalk.com user “Brundog” did a lot of experimentation and documentation and many folks built clone systems in turn. When it came time to install one on the shop brewing kettle, we couldn’t leave well enough alone with off the shelf parts.

How It Works:
You will install a 1.5″ TC port in the upper sidewall of your electric powered boil kettle, typically as high as you can get it without interfering with the closure of the kettle’s lid. The unit is equipped with a fine mist sprayer that fits inside the main body and is fed with cold tap water. When you reach a boil in your kettle, you will put the lid on and start the flow of cold water into the unit. Steam will enter the tee and encounter the spray turning the steam back into water. The waste water runs out the bottom of the unit into the included silicone hose which you will position over a catch bucket. Depending on your tap water pressure, and the selected sprayer option, you will typically consume 6-10 gallons of water in a 60 minute boil. This water can be discarded or saved for cleaning your equipment afterwards.

What’s Included:

  • Main Body Tee with 1.5″ TC top and side flanges and welded 5/8″ hose barb on the bottom.
  • 1.5″ TC sprayer adapter with your choice of 6 or 9 gallon per hour sprayer tip. The GPH ratings are at 40 PSI. We find the 6GPM works great on 45 PSI on a 7 gallon boil. If you have low pressure, you may need the 9GPM sprayer. If you are doing 10 or 15 gallon batches, you may need the 9 GPH. We are still trying to figure out better guidelines.
  • Right angle water shut off valve with push in connection five feet of 1/4″ poly supply line (5ft is standard, select longer runs in the dropdown selection above.
  • Water supply connection fitting with push in connection: Your choice of 3/4″ Female Garden Hose or In-Line faucet connection valve (select in the drop down above). More about this in the instructions below.
  • 3 feet of 1/2″ ID silicone hose for waste water drain. The tubing must reach from the bottom of the steam slayer body to the TOP of your catch bucket. If you need more tubing, it can be purchased by the foot and we can combine the added length onto the standard 3′ if you direct us to.
  • Hose holder clip to keep drain hose positioned at the inside top of your collection bucket.

* Note that the clamp and gasket to attach the unit to the kettle is not included, nor is the hardware to install the actual TC port in the kettle. See the list of available accessories if you need any of those parts.

Instructions:
First, keep in mind that this is a new process for small scale homebrewing and we’re all learning the best practices. When you buy this unit, consider yourself a part of a beta test. These instructions will evolve.

  1. Clamp the main unit to the existing kettle port and the sprayer TC to the top of the unit. The integrated hose barb should be facing down towards the floor.
  2. Install your water source fitting. If you selected the Garden Hose fitting, attach it to your garden hose bib, a garden hose, a slop sink faucet, or a washing machine supply port. If you selected the inline faucet supply fitting, shut off the cold water valve under your sink, remove the hose feeding your faucet and install the inline fitting. Replace the faucet hose on top and turn the water back on to check for leaks. The inline faucet fitting is shown on the right. Just below that we show where it would install under a sink or toilet.
  3. Connect the 1/4″ Poly line to your source water fitting and the shutoff valve on the top of the Steam Slayer. Making sure the ends are cut cleanly, simply push the tubing into the fittings all the way and install the C-shaped retaining clips.
  4. Install the silicone waste tubing on the unit’s barb and attach the holder clip to the end. We include a 5/8″ OD stainless steel ring that should be inserted into the end of the silicone to expand the tubing large enough to fit the holder clip tightly. The waste tubing should be trimmed so that it only extends into your catch bucket/vessel by 1-2 inches. The open end of this tubing must never be submergedor the steam slayer will not work properly.
  5. Once your boil begins, turn on the cooling water and place your kettle lid on the kettle. Since the condensing action creates a mild vacuum, the lid does not need a gasket. If you notice steam leaking out of the lid, make sure it is not warped creating extra spaces.
  6. Adjust your boil intensity to approximately HALF of what you’re used to using and plan for about half as much boil off. For a typical example, we used to run our 5500 watt element at 65% when the kettle is full of 7 gallons and the lid off. We experienced 1.5 gallons per hour of boil off. With the Steam Slayer installed, we run at 32% and experience .75 gallons of boil off per hour. In other words, to use the Steam Slayer, your electric kettle must be equipped with a power controller.

Frequently Asked Questions:

1. Can I go through the lid?

Yes. In order to through the lid, you will need to install a 1.5″ TC port towards the edge and then clamp on a 1.5″ TC 90 degree elbow. From there the Steam Slayer gets clamped on as noted above. You may need to place a counterweight on top of the lid, opposite the TC port to keep it firmly seated on the kettle.

2. I use the BIAB method and I’m concerned that a side mount TC port will reduce my kettle capacity.

You can put a TC blank cover over the port during the mash and then fit the Steam Slayer after you pull the grain bag.

3. How do I run the hot waste water directly to a plumbing drain.

We don’t know for sure. We do know that you want the water to freely drain out. Even in cases where the output hose bends into a loop where water collects in the hose is enough to stop the vacuum on the kettle. You may get steam to escape via the lid if there is any back pressure on the drain hose. If your sewer pipe is well below your brewing location, you can run a horizontal drain line over to the kettle, install a P-trap and then end in an oversized vertical entrance pipe. Treat this like the catch bucket and run the silicone drain hose to it using the holder clip to hold it to the upper lip of the pipe.

About, from Brew Hardware: “Sometimes we have a grand plan for a given fitting. This time we’re just spit balling to see what sticks. We took the profile of a ball lock keg post and replaced the poppit and spring with just two large bored out holes. The other end is a generous 3/8″ OD hose barb that will work with 3/8′ ID silicone, 5/16″ Racking tubing, or whatever.”


  • Since Brew Hardware introduced this, availability has been an issue.
  • As of this posting, it’s in stock at $129.99.  That can change quickly.
  • We keep a close eye on the Steam Slayer.  If it’s sold out again – connect with us – and we’ll give you a heads up when it’s back.

STEAM SLAYER – KETTLE BOIL STEAM CONDENSER ASSEMBLY

More: Recent Great Deals

Make sure the components you use are compatible and rated for your intended application.  Contact manufacturer with questions about suitability or a specific application.  Always read and follow manufacturer directions. prod:bwsslay

Brew Hardware 10 Gallon Cooler to Mash Tun Conversion Kit – $68! + Hands on Review

cooler conversion kit

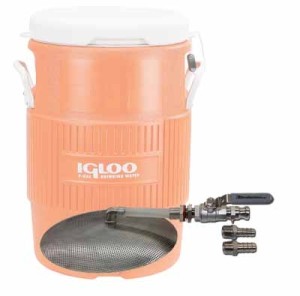
This Brew Hardware Mash Tun Conversion Kit includes everything you need to convert a 10 gallon Igloo or Home Depot Rubbermaid Cooler to a Mash Tun.  Note that it does not includes a cooler.

More Info

From the product description, check product page for current description, price and availability:

  • 12″ stainless steel domed false bottom with upgraded large ID connection elbow
  • One piece (Brew Hardware custom designed) machined bulkhead with interior barb
  • 2 piece stainless ball valve – can be upgraded to 3 piece
  • Required length of high temp silicone tubing
  • Does not include cooler or barb/camlock.  Barb and camlock fitting options are available under accessories on the right side of the screen.

What makes our kit different than the competition? Ugh, now we have to brag just a little. The bulkhead we include in this kit is custom machined out of hex bar stock to our exact specifications making it extremely simple to install and leak free from day one. It’s not a bunch of off the shelf parts made with half a roll of teflon tape. We also use a high flow elbow connector at the false bottom which also features a custom made smooth bore retainer. Long story short, we’ve held off on offering cooler false bottom kits for a long time until we had all the high end components described here.


Options are available both for an Igloo 10 gallon cooler and for Home Depot’s 10 gallon cooler.   A complete converted option is also available.  That includes the cooler along with your choice of connection fittings.  In my experience it’s cheaper to grab the conversion kit from Brew Hardware and source the cooler separately.  See some links to compatible coolers below.

This is the conversion kit I use and it’s… awesome.   tn_img_0322-300x225Check out my Hands on Review.

  • This has been sold out for quite some time.
  • As of this posting a limited number are back in stock at $68.
  • Pricing and, especially, availability can vary.  Check Brew Hardware for current, description, price and availability.

COOLER TO MASH TUN CONVERSION KIT

Related:

This post may contain affiliate links. We may make a commission when you use our links. This will never cost you extra. Thank you for supporting Homebrew Finds!

Price, promotions and availability can change quickly.  Please note that product prices and availability are subject to change. Prices and availability were accurate at the time this post was published; however, they may differ from those you see when you visit the product page.  Check the product page for current price, description and availability rp:bhconversion

The Steam Slayer from Brew Hardware! – Kettle Steam Condenser Assembly – eliminates need to vent from your brewing room

STEAM SLAYER - KETTLE BOIL STEAM CONDENSER ASSEMBLY

The Steam Slayer via Brew Hardware is designed to eliminate the need to vent steam from your brewing room.

More Info

From the product description, check product page for current description, price and availability:

The Steam Slayer(tm) is a brand new product that eliminates the need to vent steam from your brewing room. More and more people are converting over to electric brewing systems allowing brewing indoors and even in quite confined spaces. The rude awakening occurs when you evaporate a gallon or more water into the air and your walls and ceiling drips with condensation. In some cases it is impossible or unreasonable to install fan-based exhaust systems to vent that steam. Enter the Steam Slayer!

Condensing boil steam is a relatively common practice in large scale industry and some breweries. Homebrewtalk.com user “Brundog” did a lot of experimentation and documentation and many folks built clone systems in turn. When it came time to install one on the shop brewing kettle, we couldn’t leave well enough alone with off the shelf parts.

How It Works:
You will install a 1.5″ TC port in the upper sidewall of your electric powered boil kettle, typically as high as you can get it without interfering with the closure of the kettle’s lid. The unit is equipped with a fine mist sprayer that fits inside the main body and is fed with cold tap water. When you reach a boil in your kettle, you will put the lid on and start the flow of cold water into the unit. Steam will enter the tee and encounter the spray turning the steam back into water. The waste water runs out the bottom of the unit into the included silicone hose which you will position over a catch bucket. Depending on your tap water pressure, and the selected sprayer option, you will typically consume 6-10 gallons of water in a 60 minute boil. This water can be discarded or saved for cleaning your equipment afterwards.

What’s Included:

  • Main Body Tee with 1.5″ TC top and side flanges and welded 5/8″ hose barb on the bottom.
  • 1.5″ TC sprayer adapter with your choice of 6 or 9 gallon per hour sprayer tip. The GPH ratings are at 40 PSI. We find the 6GPM works great on 45 PSI on a 7 gallon boil. If you have low pressure, you may need the 9GPM sprayer. If you are doing 10 or 15 gallon batches, you may need the 9 GPH. We are still trying to figure out better guidelines.
  • Right angle water shut off valve with push in connection five feet of 1/4″ poly supply line (5ft is standard, select longer runs in the dropdown selection above.
  • Water supply connection fitting with push in connection: Your choice of 3/4″ Female Garden Hose or In-Line faucet connection valve (select in the drop down above). More about this in the instructions below.
  • 3 feet of 1/2″ ID silicone hose for waste water drain. The tubing must reach from the bottom of the steam slayer body to the TOP of your catch bucket. If you need more tubing, it can be purchased by the foot and we can combine the added length onto the standard 3′ if you direct us to.
  • Hose holder clip to keep drain hose positioned at the inside top of your collection bucket.

* Note that the clamp and gasket to attach the unit to the kettle is not included, nor is the hardware to install the actual TC port in the kettle. See the list of available accessories if you need any of those parts.

Instructions:
First, keep in mind that this is a new process for small scale homebrewing and we’re all learning the best practices. When you buy this unit, consider yourself a part of a beta test. These instructions will evolve.

  1. Clamp the main unit to the existing kettle port and the sprayer TC to the top of the unit. The integrated hose barb should be facing down towards the floor.
  2. Install your water source fitting. If you selected the Garden Hose fitting, attach it to your garden hose bib, a garden hose, a slop sink faucet, or a washing machine supply port. If you selected the inline faucet supply fitting, shut off the cold water valve under your sink, remove the hose feeding your faucet and install the inline fitting. Replace the faucet hose on top and turn the water back on to check for leaks. The inline faucet fitting is shown on the right. Just below that we show where it would install under a sink or toilet.
  3. Connect the 1/4″ Poly line to your source water fitting and the shutoff valve on the top of the Steam Slayer. Making sure the ends are cut cleanly, simply push the tubing into the fittings all the way and install the C-shaped retaining clips.
  4. Install the silicone waste tubing on the unit’s barb and attach the holder clip to the end. We include a 5/8″ OD stainless steel ring that should be inserted into the end of the silicone to expand the tubing large enough to fit the holder clip tightly. The waste tubing should be trimmed so that it only extends into your catch bucket/vessel by 1-2 inches. The open end of this tubing must never be submergedor the steam slayer will not work properly.
  5. Once your boil begins, turn on the cooling water and place your kettle lid on the kettle. Since the condensing action creates a mild vacuum, the lid does not need a gasket. If you notice steam leaking out of the lid, make sure it is not warped creating extra spaces.
  6. Adjust your boil intensity to approximately HALF of what you’re used to using and plan for about half as much boil off. For a typical example, we used to run our 5500 watt element at 65% when the kettle is full of 7 gallons and the lid off. We experienced 1.5 gallons per hour of boil off. With the Steam Slayer installed, we run at 32% and experience .75 gallons of boil off per hour. In other words, to use the Steam Slayer, your electric kettle must be equipped with a power controller.

Frequently Asked Questions:

1. Can I go through the lid?

Yes. In order to through the lid, you will need to install a 1.5″ TC port towards the edge and then clamp on a 1.5″ TC 90 degree elbow. From there the Steam Slayer gets clamped on as noted above. You may need to place a counterweight on top of the lid, opposite the TC port to keep it firmly seated on the kettle.

2. I use the BIAB method and I’m concerned that a side mount TC port will reduce my kettle capacity.

You can put a TC blank cover over the port during the mash and then fit the Steam Slayer after you pull the grain bag.

3. How do I run the hot waste water directly to a plumbing drain.

We don’t know for sure. We do know that you want the water to freely drain out. Even in cases where the output hose bends into a loop where water collects in the hose is enough to stop the vacuum on the kettle. You may get steam to escape via the lid if there is any back pressure on the drain hose. If your sewer pipe is well below your brewing location, you can run a horizontal drain line over to the kettle, install a P-trap and then end in an oversized vertical entrance pipe. Treat this like the catch bucket and run the silicone drain hose to it using the holder clip to hold it to the upper lip of the pipe.

About, from Brew Hardware: “Sometimes we have a grand plan for a given fitting. This time we’re just spit balling to see what sticks. We took the profile of a ball lock keg post and replaced the poppit and spring with just two large bored out holes. The other end is a generous 3/8″ OD hose barb that will work with 3/8′ ID silicone, 5/16″ Racking tubing, or whatever.”


  • Since Brew Hardware introduced this, availability has been an issue.
  • As of this posting, it’s in stock at $129.99.  That can change quickly.
  • We keep a close eye on the Steam Slayer.  If it’s sold out again – connect with us – and we’ll give you a heads up when it’s back.

STEAM SLAYER – KETTLE BOIL STEAM CONDENSER ASSEMBLY

More: Recent Great Deals

Make sure the components you use are compatible and rated for your intended application.  Contact manufacturer with questions about suitability or a specific application.  Always read and follow manufacturer directions. prod:bwsslay
Hands on Review: Brew Hardware Cold Crash Guardian

Thank you to HBF Contributor Aaron Nord for this hands on review!  Aaron is an advanced award winning brewer, a long time reader and a serial tipster!

What is Cold Crashing?

The concept of cold crashing first came across my radar when I was researching the benefits of conical fermenters. The idea of rapidly bringing a fermentation vessel down to near freezing temperatures after fermentation is complete is known in the brewing world as cold crashing. The closer to freezing without freezing the beer the better.


Benefits of Cold Crashing

The reasons that attracted me to the practice are mainly two-fold: to enable nearly full harvest of the yeast and to promote a clearer finished beer. The act of bringing the temperature down promotes the dropping of particulates in the beer, be it yeast, trub, or hop debris, which, in a conical fermenter, settles down into the bottom cone. This can then be dropped out into a sanitized vessel to enable rinsing and reusing of the yeast. Then when the beer is packaged it is done so without a lot of the yeast and other particulate material that may not be desirable in the finished product. This allows for a much brighter beer in the end.

Continue reading

Brew Hardware 10 Gallon Cooler to Mash Tun Conversion Kit – $68! + Hands on Review

cooler conversion kit

This Brew Hardware Mash Tun Conversion Kit includes everything you need to convert a 10 gallon Igloo or Home Depot Rubbermaid Cooler to a Mash Tun.  Note that it does not includes a cooler.

More Info

From the product description, check product page for current description, price and availability:

  • 12″ stainless steel domed false bottom with upgraded large ID connection elbow
  • One piece (Brew Hardware custom designed) machined bulkhead with interior barb
  • 2 piece stainless ball valve – can be upgraded to 3 piece
  • Required length of high temp silicone tubing
  • Does not include cooler or barb/camlock.  Barb and camlock fitting options are available under accessories on the right side of the screen.

What makes our kit different than the competition? Ugh, now we have to brag just a little. The bulkhead we include in this kit is custom machined out of hex bar stock to our exact specifications making it extremely simple to install and leak free from day one. It’s not a bunch of off the shelf parts made with half a roll of teflon tape. We also use a high flow elbow connector at the false bottom which also features a custom made smooth bore retainer. Long story short, we’ve held off on offering cooler false bottom kits for a long time until we had all the high end components described here.


Options are available both for an Igloo 10 gallon cooler and for Home Depot’s 10 gallon cooler.   A complete converted option is also available.  That includes the cooler along with your choice of connection fittings.  In my experience it’s cheaper to grab the conversion kit from Brew Hardware and source the cooler separately.  See some links to compatible coolers below.

This is the conversion kit I use and it’s… awesome.   tn_img_0322-300x225Check out my Hands on Review.

  • Pricing and, especially, availability can vary.  Check Brew Hardware for current, description, price and availability.

COOLER TO MASH TUN CONVERSION KIT

Check sale or product page for current availability & pricing

Related:

This post may contain affiliate links. We may make a commission when you use our links. This will never cost you extra. Thank you for supporting Homebrew Finds!

Price, promotions and availability can change quickly.  Please note that product prices and availability are subject to change. Prices and availability were accurate at the time this post was published; however, they may differ from those you see when you visit the product page.  Check the product page for current price, description and availability rp:bhconversion

The SpinCycle Whirlpool Returns from Brew Hardware!

spincycle whirlpool return

Recirculating wort back into the kettle to whirlpool the wort makes for much faster cooling and will also make a concentrated pile of trub and hop particles in the center of the kettle bottom. This whirlpool port assembly installs high up on your kettle wall above the typical wort level and then extends down before curving to the side to force the recirculated liquid towards the sidewall.

The BrewHardware purpose-built unit called the Spin Cycle starts with a weldless bulkhead design with captured O-ring and extended male threads and has the 1/2″ drop tube fully welded in. The result is a compact way to whirlpool without the need to put a ball valve on the port (the port is meant to be installed well above the max liquid level). It includes the base unit with the welded drop tube, the captured high temp silicone oring, a thin SS washer and a 1/2″ NPS locknut to hold it all together.

This post may contain affiliate links. We may make a commission when you use our links. This will never cost you extra. Thank you for supporting Homebrew Finds!

Price, promotions and availability can change quickly. Check the product page for current price, description and availability. prod:spincycle

Brew Hardware 10 Gallon Cooler to Mash Tun Conversion Kit – $68 + Hands on Review

cooler conversion kit

This Brew Hardware Mash Tun Conversion Kit includes everything you need to convert a 10 gallon Igloo or Home Depot Rubbermaid Cooler to a Mash Tun.  Note that it does not includes a cooler.

More Info

From the product description, check product page for current description, price and availability:

  • 12″ stainless steel domed false bottom with upgraded large ID connection elbow
  • One piece (Brew Hardware custom designed) machined bulkhead with interior barb
  • 2 piece stainless ball valve – can be upgraded to 3 piece
  • Required length of high temp silicone tubing
  • Does not include cooler or barb/camlock.  Barb and camlock fitting options are available under accessories on the right side of the screen.

What makes our kit different than the competition? Ugh, now we have to brag just a little. The bulkhead we include in this kit is custom machined out of hex bar stock to our exact specifications making it extremely simple to install and leak free from day one. It’s not a bunch of off the shelf parts made with half a roll of teflon tape. We also use a high flow elbow connector at the false bottom which also features a custom made smooth bore retainer. Long story short, we’ve held off on offering cooler false bottom kits for a long time until we had all the high end components described here.


Options are available both for an Igloo 10 gallon cooler and for Home Depot’s 10 gallon cooler.   A complete converted option is also available.  That includes the cooler along with your choice of connection fittings.  In my experience it’s cheaper to grab the conversion kit from Brew Hardware and source the cooler separately.  See some links to compatible coolers below.

This is the conversion kit I use and it’s… awesome.   tn_img_0322-300x225Check out my Hands on Review.

  • Pricing and, especially, availability can vary.  Check Brew Hardware for current, description, price and availability.

COOLER TO MASH TUN CONVERSION KIT

Check sale or product page for current availability & pricing

Related:

This post may contain affiliate links. We may make a commission when you use our links. This will never cost you extra. Thank you for supporting Homebrew Finds!

Price, promotions and availability can change quickly.  Please note that product prices and availability are subject to change. Prices and availability were accurate at the time this post was published; however, they may differ from those you see when you visit the product page.  Check the product page for current price, description and availability rp:bhconversion

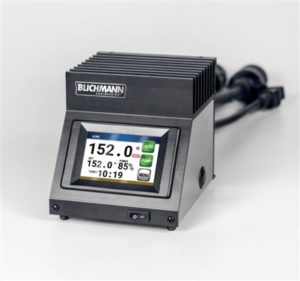
Convert Blichmann BrewCommander to Wall Mount + BrewCommander Hands on Review

Looking to get a wall Mount Blichmann Brew Commander?  Brew Hardware has you covered.  Check Brew Hardware for current pricing and availability.

Brew Commander at Brew Hardware

Brew Commander Hands on Review:

Hands on Review: Blichmann BrewCommander Controller!

More: Recent Great Deals

Prices, shipping and availability can change quickly. Please note that product prices and availability are subject to change. Prices and availability were accurate at the time this post was published; however, they may differ from those you see when you visit the product page. Check the product page for current price, description and availability. rp:wmbc

Vinyl Vessel Decals “WATER, MASH, BOIL” – from $3.75

VINYL VESSEL DECALS "WATER, MASH, BOIL"

Vinyl vessel decals from Brew Hardware

More Info

From the product description, check product page for current description, price and availability:

Every time we build a three vessel system for someone here in the shop, we put these vessel labels on the front just as a nice extra touch of class. Until now, it hadn’t occurred to us that a lot of you would also appreciate the ability to DIY.

These labels are made from black 7-year outdoor rated vinyl so they can stand up to the heat and repeated washings.

You have a choice of either the bold or stylish fonts as seen in the picture. The letters are about 1.5″ high.


These are $3 each.  If you buy 4, you’ll automatically receive a 25% discounting making them $3.75 each.  Details on that promotion can be found on the Vinyl Decals landing page.

.VINYL VESSEL DECALS “WATER, MASH, BOIL”

Also Consider – CARBOY CALIBRATION DECALS | Complete Lineup of Vinyl Decals

More: Recent Great Deals

Prices, shipping and availability can change quickly. Please note that product prices and availability are subject to change. Prices and availability were accurate at the time this post was published; however, they may differ from those you see when you visit the product page. Check the product page for current price, description and availability. rp:vesseldecals

The SpinCycle Whirlpool Returns from Brew Hardware!

spincycle whirlpool return

Recirculating wort back into the kettle to whirlpool the wort makes for much faster cooling and will also make a concentrated pile of trub and hop particles in the center of the kettle bottom. This whirlpool port assembly installs high up on your kettle wall above the typical wort level and then extends down before curving to the side to force the recirculated liquid towards the sidewall.

The BrewHardware purpose-built unit called the Spin Cycle starts with a weldless bulkhead design with captured O-ring and extended male threads and has the 1/2″ drop tube fully welded in. The result is a compact way to whirlpool without the need to put a ball valve on the port (the port is meant to be installed well above the max liquid level). It includes the base unit with the welded drop tube, the captured high temp silicone oring, a thin SS washer and a 1/2″ NPS locknut to hold it all together.

This post may contain affiliate links. We may make a commission when you use our links. This will never cost you extra. Thank you for supporting Homebrew Finds!

Price, promotions and availability can change quickly. Check the product page for current price, description and availability. prod:spincycle

BeerSmith 3 Gold Membership – 1 Year – $10.95, Save 27%

beersmith deal

BEERSMITH 3 GOLD MEMBERSHIP 1 YEAR

More Info

From the product description, check product page for current description, price and availability:

This is the option where you get one year of gold membership which includes the following:

  • Gold Cloud Membership
  • All Major and Minor Updates
  • Cloud Space: 125 Recipes
  • Activate Two Computers
  • Archiving of Cloud Recipes
  • BeerSmith 3 Desktop
  • Personal Use License
  • Upcoming online features
  • Subscription or 1 Year


As of this posting, this is on sale for $10.95.  That’s a 27% savings.  Check page for current price and availability.

BEERSMITH 3 GOLD MEMBERSHIP 1 YEAR

Also Consider:

Check sale or product page for current availability & pricing

Price, promotions and availability can change quickly.  Please note that product prices and availability are subject to change. Prices and availability were accurate at the time this post was published; however, they may differ from those you see when you visit the product page.  Check the product page for current price, description and availability

More: Recent Great Deals

rp:bhbs3gold

The SpinCycle Whirlpool Returns from Brew Hardware!

spincycle whirlpool return

Recirculating wort back into the kettle to whirlpool the wort makes for much faster cooling and will also make a concentrated pile of trub and hop particles in the center of the kettle bottom. This whirlpool port assembly installs high up on your kettle wall above the typical wort level and then extends down before curving to the side to force the recirculated liquid towards the sidewall.

The BrewHardware purpose-built unit called the Spin Cycle starts with a weldless bulkhead design with captured O-ring and extended male threads and has the 1/2″ drop tube fully welded in. The result is a compact way to whirlpool without the need to put a ball valve on the port (the port is meant to be installed well above the max liquid level). It includes the base unit with the welded drop tube, the captured high temp silicone oring, a thin SS washer and a 1/2″ NPS locknut to hold it all together.

This post may contain affiliate links. We may make a commission when you use our links. This will never cost you extra. Thank you for supporting Homebrew Finds!

Price, promotions and availability can change quickly. Check the product page for current price, description and availability. prod:spincycle

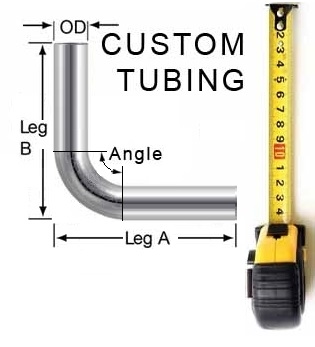
Custom Stainless Steel Tubing – choose diameter, lengths, bend angles, multiple bends

Customized stainless steel tubing created just for you to your specifications from Brew Hardware for your brew system, brew stand and more.

From Brew Hardware: “We get calls every day to create pieces of stainless tubing with certain dimensions and bends. Until now, everything had to be quoted case by case. We hope this configuration tool helps automate the process a bit. First, we have 304 welded tubing in sizes ranging from 1/4″ OD all the way up to 5/8″ OD and we have the ability make clean bends up to 180 degrees.”

Prices vary based on the options you choose.  Check out Brew Hardware for options and explanations on how to enter your order.

CUSTOM STAINLESS TUBING WITH OPTIONAL BENDS

More: Recent Great Deals

Prices, shipping and availability can change quickly. Please note that product prices and availability are subject to change. Prices and availability were accurate at the time this post was published; however, they may differ from those you see when you visit the product page. Check the product page for current price, description and availability. rp:customsstubing

Hot Rod Heat Sticks from Brew Hardware! – ready made electric homebrew heat sticks via brewhardware.com

Hot Rod Heat Sticks via Brew Hardware

More Info

From the product description, check product page for current description, price and availability:

You can buy this as a bare-bones kit elsewhere on the site and add whatever wire length and element you want. This particular item is a ready to plug in heat source that is fully prewired for you with the features most commonly requested.

It includes the bare bones hotrod hardware, an element (choice in dropdown), 9 feet of 14/3 SJEOOW cable (or 12/3 if you choose the 2200 watt option), and a plug (choice in dropdown). Note that approximately 2 feet of the cable length is consumed by the drop conduit and internal wiring so from the cable grip to the plug measures an actual 9 feet.

*Please note that if you plan to use a temperature controller of any kind that will interrupt power to the hot rod, you should use a standard plug on the Hot Rod and plug the controller into a GFCI protected outlet. It his not recommended to constantly make and break power *through* a GFCI plug.

If you would like to add additional footage of the 14/3 cable, add it as a separate line item and note in comments to add that additional length to the hotrod. If you select the 2200 watt element, please note that any additional cable must be the 12/3 type.

Options:
Vertical conduit bend options: Left straight, you get about 28″ of overall height. This option only needs to used if you have a very deep pot. The most common option is the 90 degree bend. This allows for less strain on the cord but the max pot depth (if you want it to nearly sit on the bottom) is 23″. Finally, if your pot is only about 19″ tall, you can opt for the 170 degree bend which will loop you over the pot wall like a Sheppard’s hook and make the wire drop straight down. If you are using this in addition to a flame under your pot, the 90 degree bend gives you the best clearance to keep the wire away.
Plug type: Standard plug is just a 15 amp 3-prong plug that will fit any standard outlet. If you choose this option, we HIGHLY recommend that you confirm that the outlet you will use regularly is GFCI protected (the ones with the test/reset buttons). The other option is to purchase our GFCI adapter found in the accessory list on the right. This will protect you from potential shock regardless of the outlet type you plug into.
Element wattage. You have a choice between a ULWD 1650 watt element, which will run on a typical 120 volt / 15 amp household circuit and a LWD 2200 watt element but keep in mind if you select this, you must select the 20 amp plug in the “plug type” dropdown menu. This option requires that you already have a 120 volt / 20 amp circuit available that it already have a GFCI protected receptacle installed. Be sure you know what you have to work with before purchasing this option.
The minimum pot width for this unit is 11.5″. It WILL fit the Grainfather, Mash N Boil, etc.

GRAINFATHER, Mash N Boil, Robobrew USER FAQ:

1. Have you heard of anyone using this on a grainfather?
Grainfather users are my top customer base for the hot rod. The 90 degree bend works great.

2. How much faster will the water heat?
The stock 1600watt heater in the GF takes 60 minutes to take 7 gallons of water from 70f to 158F. With the addition of the 1500 watt Hot Rods, it will reduce it to 30 minutes.
Similarly, when you pull the grain and start ramping to a boil, the ramp will take 18 minutes instead of 35.
3. How do I control the boil?
Once you hit boil, instead of running the grainfather on the higher 1600 watt setting, it’s best to let the hotrod run at full power and then switch the GF into mash mode which only adds 500 watts but the combined 2000 is about right for a decent rolling boil.

4. Can I plug the Hot Rod into the same outlet as the Grainfather?
Absolutely not. The GF and Hot Rod both require a 15 amp circuit that is not already being used for other appliances at the same time. Plugging them both in to the same circuit will trip your circuit breaker almost immediately. The easiest way to figure out if two receptacles are on the same circuit is to plug a radio in to your intended location, turn it up loud and then flip breakers off until the sound stops. Then go hunting to find the nearest receptacle that is still on.


A real issue with these and a lot of other stuff that Brew Hardware carries is availability.  They seem to struggle.  Along with that offerings can change quickly.

bulkhead deal

This post may contain affiliate links. We may make a commission when you use our links. This will never cost you extra. Thank you for supporting Homebrew Finds!

Price, promotions and availability can change quickly. Check the product page for current price, description and availability. pst:bhhotrod

Carboy Volume Calibration Decals – from $2.25

carboy decals

Vinyl decals for marking volumes on your glass or plastic carboy or bucket fermenter

More Info

From the product description, check product page for current description, price and availability:

Inspired by the calibration numbers for the sight glass kits, these larger numbers allow you to calibrate carboys (including Better Bottles) up the the larger 6.5 gallon size. The full gallon marks from 1 to 6 are a full 1″ tall and 1″ wide including the pointer triangles. Six additional 1/2″ tall triangles are and four 1/4″ tall triangles are included if marking 1/2 and 1/4 gallon increments is desired at the upper limits of the range.

These are premium cut vinyl with clear top masking for easy application. The vinyl has an OUTDOOR rating of at least 7 years with a permanent waterproof adhesive. These will stand up to repeated washing and even occasional soaking in water baths. They can be added to any other hardware order for no additional shipping charge or can be purchased alone for the price of a USPS first class shipping.

These decals are available in white or black vinyl. We’ve found that the white is more appropriate for clear carboys since they are contrasted well on light or dark beer. If you are calibrating HDPE natural buckets, the black version would be better. Although the graphic shows the white vinyl on a black background, there is no black in the white vinyl decal. The pictures below are more representative of what the final install will look like.


These are $3 each.  If you buy 4, you’ll automatically receive a 25% discounting making them $2.25 each.  Details on that promotion can be found on the Vinyl Decals landing page.

CARBOY CALIBRATION DECALS | Complete Lineup of Vinyl Decals

More: Recent Great Deals

Prices, shipping and availability can change quickly. Please note that product prices and availability are subject to change. Prices and availability were accurate at the time this post was published; however, they may differ from those you see when you visit the product page. Check the product page for current price, description and availability.  rp:bhcarboydecals

The SpinCycle Whirlpool Returns from Brew Hardware!

spincycle whirlpool return

Recirculating wort back into the kettle to whirlpool the wort makes for much faster cooling and will also make a concentrated pile of trub and hop particles in the center of the kettle bottom. This whirlpool port assembly installs high up on your kettle wall above the typical wort level and then extends down before curving to the side to force the recirculated liquid towards the sidewall.

The BrewHardware purpose-built unit called the Spin Cycle starts with a weldless bulkhead design with captured O-ring and extended male threads and has the 1/2″ drop tube fully welded in. The result is a compact way to whirlpool without the need to put a ball valve on the port (the port is meant to be installed well above the max liquid level). It includes the base unit with the welded drop tube, the captured high temp silicone oring, a thin SS washer and a 1/2″ NPS locknut to hold it all together.

This post may contain affiliate links. We may make a commission when you use our links. This will never cost you extra. Thank you for supporting Homebrew Finds!

Price, promotions and availability can change quickly. Check the product page for current price, description and availability. prod:spincycle

Keg Replacement O-Ring Set, Includes w/QUAD Seal Dip Tube Gaskets – $4

quad seal cornelius homebrew keg orings

Keg O-Ring Kit via Brew Hardware.

More Info

From the product description, check product page for current description, price and availability:

Replace all the O-rings on your corny kegs with this kit. Includes a silicone lid seal, a pair of OEM style quad seal diptube orings, and a pair of silicone rings for the gas and beer posts. This kit works for either ball lock or pinlock style kegs.


A complete set of replacement keg gaskets including a silicone lid o-ring and silicone post o-rings.  This set also includes OEM style Quad Seal Dip Tube o-rings.

Related Resource Post: Keg Repair Part #s ·

This is the only offering that I’m aware of that includes quad seals.  I think it’s been largely forgotten but quad seal style o-rings are what originally came on Cornelius soda kegs years ago.  These seal more easily than standard gaskets.  For whatever reason quad seals are hard to find.

As of this posting Brew Hardware has these for $4.  Check the product page for current availability and price.

KEG ORING KIT

Also: Kegerator Tips & Gear | Keg Repair Part #s | Recent Keg Finds

Our Top Draft Resources!

More: Recent Great Deals

Tips and Gear For Your Kegerator

Prices, shipping and availability can change quickly. Please note that product prices and availability are subject to change. Prices and availability were accurate at the time this post was published; however, they may differ from those you see when you visit the product page. Check the product page for current price, description and availability.  rp:bhqsor