
Balancing Your Kegerator Draft System
I had the pleasure of attending the HomebrewCon held in Grand Rapids, Michigan several years ago. If you didn’t have the chance to go, or even if you did, the AHA provides seminar recordings for that conference. In fact they provide recordings going all the way back to 2012’s conference. This is a member’s only benefit. If you’re not a member of the AHA, I think you should consider joining. Access to conference materials is only one of many benefits. Join now – Looking for a deal?
One of the sessions I attended was Tom Schmidlin’s “Draft System Design and Maintenance”. Having built several kegerators over the years, clarification – several iterations of the same kegerator, I feel like a know a fair bit about putting together a system. Many things were re-affirmations of lessons I’ve learned. I did pick up a few new tips. Thank you to Tom Schmidlin for putting on this great presentation!
Why Balance Your Kegerator?
Balancing your kegerator helps eliminate excessive foam, gets you your desired carbonation level and saves time, effort and frustration. A non-balanced system may produce foamy beers and may require manual changes. It’s not uncommon for a non-balanced system to require turning down pressure for serving. Balancing your draft kegerator correctly means walking up to your kegerator at your leisure and pouring a beer at your desired carbonation level without lots of foam.
On to setting your temperatures and pressures and balancing your system…
Step 1: Figure Your Desired Temperature and Pressure
The carbonation level of your beer is a function of CO2 PSI and your kegerator temperature. The colder your kegerator, the more CO2 your beer will absorb. You need to decide two things: How cold do I want my beer? and what carbonation level do I want to serve it at?
1. Carbonation Level. Typically expressed in volumes of dissolved CO2. Check out the BJCP’s style guidelines for a starting point. The guidelines give general terms like low, moderately low, high, very high, etc. Other more specific charts and tools are also available. Most recipe formulation tools have guidelines or tools on the subject.
Consider Brewfather: Brewfather offers a free full feature trial. After the trial period, you’ll still have access via a limited, non-expiring account. See: Hands on Review: Brewfather App – Recipe Formulation, Calculators & Brew Day Tools – Brewfather has style specific carbonation range recommendations as well as a CO2 calculator.
2. Temperature. Most bars serve between 34 and 38 deg F. Of course, this is a personal preference.
Use a Carbonation Chart
After you have determined carbonation level and temperature you can use a carbonation chart or calculator to determine what pressure you need to store your beer at.
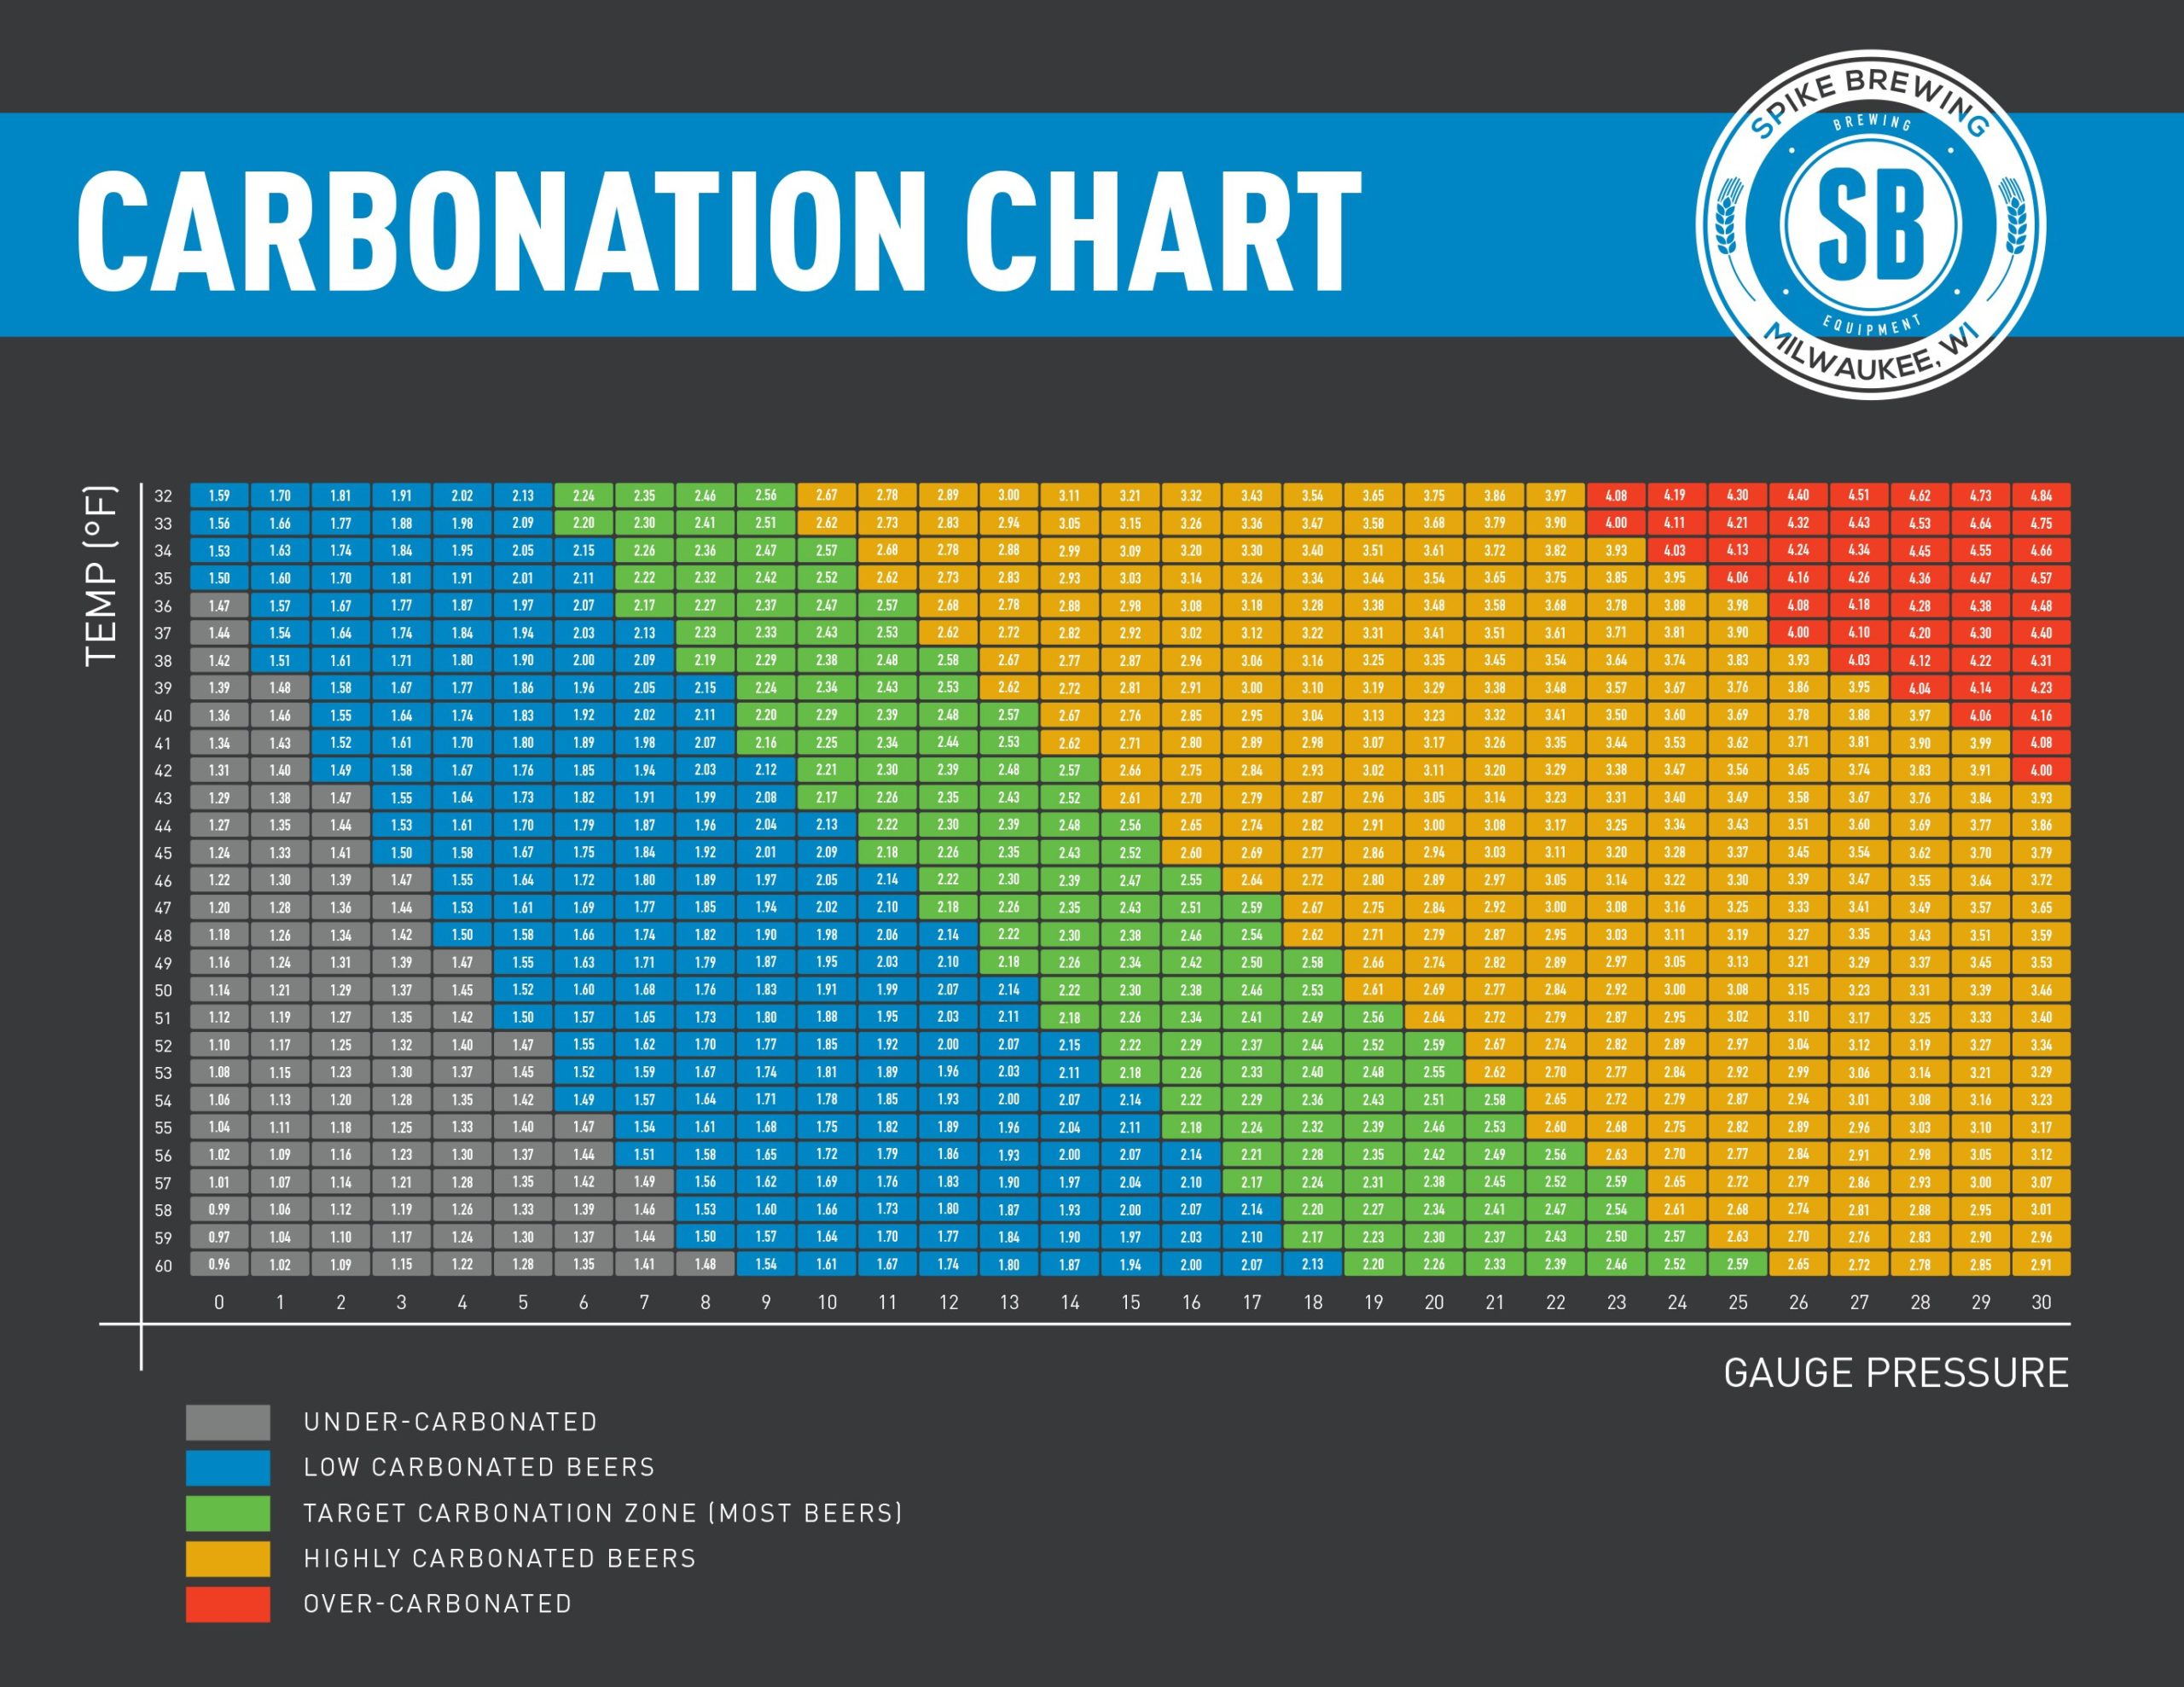 Click to enlarge – thank you to Spike Brewing Equipment for this resource!
Or, Use an App To Figure Pressure
Most Brewing software will have a utility to help you figure carbonation. Consider Brewfather: Brewfather offers a free full feature trial. After the trial period, you’ll still have access via a limited, non-expiring account. See: Hands on Review: Brewfather App – Recipe Formulation, Calculators & Brew Day Tools – Brewfather has style specific carbonation range recommendations as well as a CO2 calculator.
Example: Kegerator Balancing – Temperature and Pressure
If you’d like your beer to be 38 degrees and you want 2.4 volumes of CO2, you would find 38 degrees on the far left hand column and then follow it over to the right until you find something similar to 2.4. In this case, 2.38. After you have located that, follow that column down and you’ll find your required storage and serving PSI. In this case, 10 PSI.
Step 2: Figure Resistance/Restriction
Pressure and Temperature help you get the right carbonation level. This next step helps you dispense your beer at the proper speed and without excessive foam.
Goal: Dispense Rate
A common goal is 1 gallon per minute or about 2 ounces per second. That’s accomplished by balancing your system.
Balancing your kegerator is an equation of sorts. You have storing and serving pressure on one side and resistance on the other. Essentially, you want to offset most of the pressure (all but about 1 PSI) that is required to store and carbonate your beer with resistance in your system. Everything on the liquid side of your system counts toward this resistance.
Standard Tubing Resistance Estimations
- Vinyl 3/16” ID 3.00 lbs/ft
- Vinyl 1/4” ID 0.85 lbs/ft
- Vinyl 5/16” ID 0.40 lbs/ft
- Vinyl 3/8” ID 0.20 lbs/ft
- Vinyl 1/2” ID 0.025 lbs/ft
- Barrier 1/4” ID 0.30 lbs/
- Barrier 5/16” ID 0.10 lbs/ft
- Barrier 3/8” ID 0.06 lbs/ft
- Stainless 1/4” OD 1.20 lbs/ft
- Stainless 5/16” OD 0.30 lbs/ft
- Stainless 3/8” OD 0.12 lbs/ft
Credit goes to the Draught Quality Manual for these figures
EVABarrier Tubing Resistance Estimations
- 5mm (13/64″) ID x 8mm (5/16″) OD – William’s Brewing – MoreBeer – approx 1 lb/ft
- 4mm (5/32″) ID x 8mm (5/16″ OD) – William’s Brewing – MoreBeer – approx 2.9 lbs/ft
- 6.0mm (15/64″) ID x 9.5mm (3/8″ OD) – William’s Brewing – MoreBeer – less than 1 lb/ft
Related: Hands on Review: Kegland DuoTight Fittings & EVABarrier Tubing
Credit for EVABarrier resistance goes to William’s Brewing
Related: EVABarrier Review

EJ Beverage Ultra Barrier Resistance Estimation
- 3/16″ ID x 7/16″ OD – 2.2 lbs/ft
- 1/4″ ID x 1/2″ OD – .65 lbs/ft
Credit for Ultra Barrier resistance goes to MoreBeer. There are lots EJ Beverage Ultra Barrier options available. MoreBeer includes restriction estimations on many of those.
What Tubing Should You Use?
Given it’s general cost, features and flexibility, I think EVABarrier Tubing deserves a hard look
Homebrewer Problems vs Commercial Problems.
Because of generally short runs, most homebrewers are trying to increase restriction to control foam. Commercial installations usually have the opposite problem. With generally long runs, they are trying to reduce resistance to move the beer longer distances.
Restriction Estimations for Other Gear and Conditions in Your Setup
- Standard Faucet and Shank – .5 lbs
- Picnic or Cobra Faucet – .5 lbs
- Rise in elevation – .5lbs/ft of rise, measured from the center of the keg
Step 3: Bringing it All Together – Estimating Resistance and Tubing Lengths
Continuing our previous example, we had our pressure set to 10 PSI. Everything on the liquid side of the system counts toward the system’s resistance. Let’s say you’re using a picnic tap and 3/16″ ID Tubing.
Picnic Tap = .5 lbs
Estimated Rise from Center of Keg = 2 ft = 1 lb
Total = 1.5 lbs of resistance
That leaves us 7.5 lbs that we need to use up. We’re using 3/16″ ID Tubing (3 lbs/ft). We’ll need a total of 2.5 ft of tubing to offset the required pressure.
The total system looks like this…
Picnic Tap = .5 lbs
Estimated Rise from Center of Keg = 2 ft = 1 lb
2.5 ft of 3/16″ ID Tubing = 7.5 lbs
Total = 9 lbs of resistance
Remaining = 1 PSI to serve beer
Now Double Your Tubing Length…
You should double the length of the tubing. Why you ask?…
What I learned about Draft Dispensing at NHC #1 – “Estimates aren’t always right”
Estimations for the resistance of vinyl tubing per foot are… wrong. Practically I’ve know this for years. Some time ago I tried to serve a Hefeweizen at traditional carbonation levels (3.6 to 4.5 volumes of CO2) using these figures. Didn’t work. Tom’s suggestion: Double the amount of vinyl tubing called for and trim until you get an acceptable flow rate of about 1 gallon per hour and a good pour. Along those lines, Tom also suggested buying your tubing in bulk.
One more thing…
What I learned about Draft Dispensing at NHC #2 – “Longer Shank = Less Foam”
A longer shank means… a colder faucet. More mass inside your kegerator or keezer keeps your faucet colder and reduces foam. Related: Kegerator Foam Problems? – Fight the First Foamy Pint!
Serving Beers with Multiple Carbonation Levels + A Game Changer:
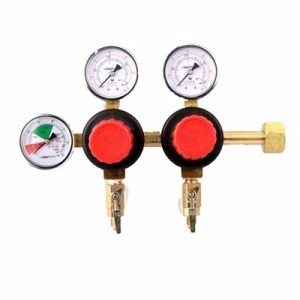
Each carbonation level = a different pressure. If you want to serve beers at different pressures you’ll need multiple regulators. This could be in the form of a primary regulator with multiple bodies or a primary regulator + secondary regulators.
 Taprite Regulators at kegconnection.com – Keg Connection is so confident in these regulators that they include an additional extended warranty. If you buy one of these from Keg Connection for homebrew use you’ll get a total of two years. Check out the details on any Taprite regulator product page.
A double body primary regulator is pictured. It allows you to serve at two carbonation levels. I currently use a double bodied regulator. I feed a manifold off one regulator with what I’ll call my standard or house carbonation level – and have a single line going off the other regulator for beers that I want to serve at a different carbonation level or for force carbing a keg at a higher pressure.
 Secondary Regulators at kegconnection.com
This is a secondary regulator meaning that it has no high pressure gauge or connection. This hooks on to your existing primary regulator and allows you to serve additional pressures. You get one pressure per secondary regulator body.
Related: Build a Draft Line Cleaner
Tip: You can get one additional pressure out of a primary/secondary regulator setup. Set your primary regulator to your highest desired pressure level, put in a T or manifold on the primary outlet and feed the secondary from there.
Game Changer… Kegland Inline Secondary Regulator!
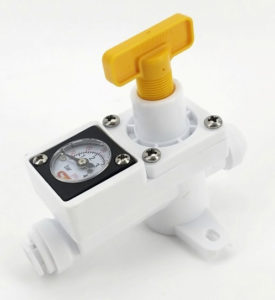
Kegland’s DuoTight Inline Secondary is a game changer, in my opinion. It allows you to set each keg line independently. It’s DuoTight compatible, which is awesome and features and built in gauge. It’s also relatively inexpensive.
Hands on Review: Kegland Inline Secondary Regulator!
- Kegland DuoTight Compatible Inline Secondary CO2 Regulator with Gauge << The Model Featured in This Review
- via MoreBeer
- via William’s Brewing
- via Amazon
- Duotight In-Line Regulator D1046 – DuoTight Compatible, No Gauge
- Inline Secondary CO2 Regulator – This is the original version, what I’d call v1. It has no gauge and is not DuoTight compatible
- In-Line Secondary CO2 Regulator D1045 – via MoreBeer
- In-Line Secondary CO2 Regulator – via Amazon
Related: Hands on Review: DuoTight Fittings & EVABarrier Tubing
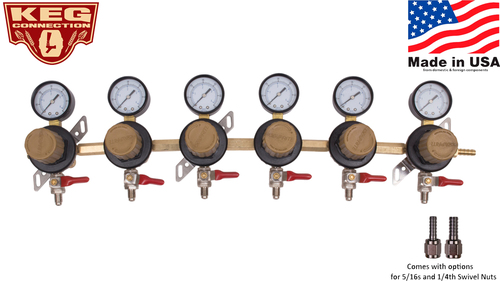
Multiple Kegs, Same Pressure… A Manifold Works
If you simply want to split one of your pressures for use in multiple kegs, a manifold will do the trick. These give you multiple tubing runs, have integrated check valves to prevent cross contamination and have valves to control each link. The list of things that grow with you in homebrewing is… short. You can’t add on two gallons to your brew kettle. This expandable manifold system from MoreBeer is one thing that will actually grow with you. Check out my Hands on Review of this great system.
Related Resources – Foam Control & Kegerator Balancing
- What Does a Flow Control Faucet Do?
- Step by Step Balancing Your Kegerator Draft System
- Kegerator Beer Line Temperatures & Reducing Foam with a Recirculating Fan
- Kegerator Foam Problems? – Fight the First Foamy Pint!
- Why Do I Have Bubbles in My Beer Line?
Related: Why Do I Have Bubbles in My Beer Line?
This article contains affiliate links. We may make a small percentage if you use our links to make a purchase. You won’t pay more and you’ll be supporting Homebrew Finds and more content like this. Thank you for your support!
Additional Resources and Related Products:
- Search Amazon for “CO2 Regulator”
- Recent Keg Finds – our most recent keg deals
- Kegs at Adventures in Homebrewing – a generally reliable spot for keg deals
- Our Top Draft and Kegerator Resource Pages
- Upgrade Your Kegerator
- Home Brew Keg Roundup – New & Used, 5 and 2.5 Gallon & More!
- What’s the Difference Between Ball Lock Kegs and Pin Lock Kegs?
- Tips & Gear for Your Kegerator Resource Page – a collection of tips and gear for putting together your kegerator
- Portable Draft Serving Options
- The Draught Quality Manual
- Review: Inkbird Dual Stage Temp Controller
- Bulk Keg Orings and Keg Repair Part Numbers
- Review: Mark’s Keg and Carboy Washer
- Step by Step: Finding and Fixing Keg CO2 Leaks
- Checking for Draft System CO2 Leaks – Using The Pressure Gauge Method
- Build A Recirculating Draft Line Cleaning Pump
- Mark II Keg & Carboy Cleaner… As a Recirculating Draft Line Cleaning Pump
- The BJCP’s Style Guidelines
- Eva-dry E-500 for Kegerator Condensation – Hands On Review
- Tips and Gear for Growler Filling
Another Carbonation Chart
 Click To Enlarge. This graphic is found all around the web. I believe that credit goes to the great John Palmer of How to Brew fame although I’m not 100% certain.
Rebuild Your Kegs!
Keg Deals!
Related: Three Top Tips for Keezer Conversions!
Everything For Your Kegerator!

Also: Kegerator Tips & Gear | Keg Repair Part #s | Recent Keg Finds
Our Top Draft Resources!
- The Most Difficult Spot to Check for CO2 Leaks
- Keg O-Ring Materials Selection! – EPDM, Silicone and Buna-N?
- Why Do I Have Bubbles in My Beer Line? Diagnosing and Fixing Kegerator Foam Problems
- Five Benefits of Using Corny Kegs As Fermenters
- Rebuilding & Reconditioning Homebrew Kegs!
- Food Safe Replacement Keg O-Rings in Bulk
- Hands on Review: Kegland DuoTight Fittings & EVABarrier Tubing!
- Why Won’t My Homebrew Keg Carbonate? Fixing Draft Beer Carbonation Problems
- What Does a Flow Control Faucet Do?
- Upgrade Your Kegerator – 6 Improvements!
- Serve Homebrew on Any Kegerator & Convert Commercial Kegerator to Homebrew
- Tips and Gear for Growler Filling
- What’s the Difference Between Ball Lock Kegs and Pin Lock Kegs?
- Checking for Draft System CO2 Leaks – Using The Pressure Gauge Method
- Tip: Consider Oetiker Stepless Clamps for Kegerator Gas and Beer Lines
- Hands On Review: Inkbird ITC-308 Dual Stage Temperature Controller +WiFi Version
- Universal Poppets Tips and Tricks!
- Convert Your Mark II Keg & Carboy Washer to a Recirculating Draft Line Cleaning Pump!
- Step by Step: Finding and Fixing Keg CO2 Leaks
- Kegerator Beer Line Temperatures & Reducing Foam with a Recirculating Fan
- Kegging CO2 Use Estimations and Calculations
- Step by Step: Balancing Your Kegerator Draft System
- Building a Simple Ball Lock Draft Line Flushing Setup
- Build a Recirculating Draft Line Cleaning Pump
- Home Brew Keg Roundup – New & Used, 5 and 2.5 Gallon & More!
- Damp Kegerator? Fix Kegerator Condensation
- Portable Draft Beer Serving Options!
- Homebrew Temp Controller Roundup! – Kegerator and Fermentation – concepts, applications and models
- Bulk Keg Orings and Keg Repair Part Numbers
More Homebrew Finds!
- Last 50 Finds!
- Top Deals – a curated list of the best deals
- Homebrew Reviews – one of the largest libraries of homebrew reviews in existence!
- Our Top Posts – tips, how-tos, resources posts and more
This post may contain affiliate links. We may make a commission when you use our links. This will never cost you extra. Thank you for supporting Homebrew Finds!
Make sure the components you use are compatible and rated for your intended application. Contact manufacturer with questions about suitability or a specific application. Always read and follow manufacturer directions. tag:lnksfxd toppost:balancingyourdraftsystem rs:7 tag:tpr
can we PLEASE stop equating force and pressure? Tubing resistance should not be cited in force/length if you are directly comparing it to the serving pressure *total length of resistance in your system. This is flat out wrong, 9 lbs is not equal to 9 psi. Yes, i know everybody does it but it’s still wrong. Either tell tubing folks to have resistance numbers in psi/ft if you’re balancing method is to just have appropriate length.
CO2 risk is small unless you have a tiny basement. From my Chemical Engineering knowledge: 20 lb of CO2 is 9,071,850 mg. My basement is 28 x 38 x 7 = 7448 cu ft = 210,897 liters
ppm is mg/l = 9071850/210897 = 43 ppm. 2000 ppm is hazardous. Don’t panic
A dangerous level of CO2 is 2000 ppm
I always turn my tank off after every serve. I have had my 20 lb. tank in my basement for 11 years.
You can save some time, by… not turning it off.
The CO2 tank advice really freaked me out. I, too, have a 20lb tank in my basement.
Great article, we’re currently in the process of building a keezer and this turn out to be a really good read.
Wow . Got to say that I did not think of co2 flooding the basement. Have 20lb co2 tank and will probably move out of basement to garage
Great summary of the talk. I was there also and these things learned were what I took away too. Now I just need to get the rest of my set up done.