
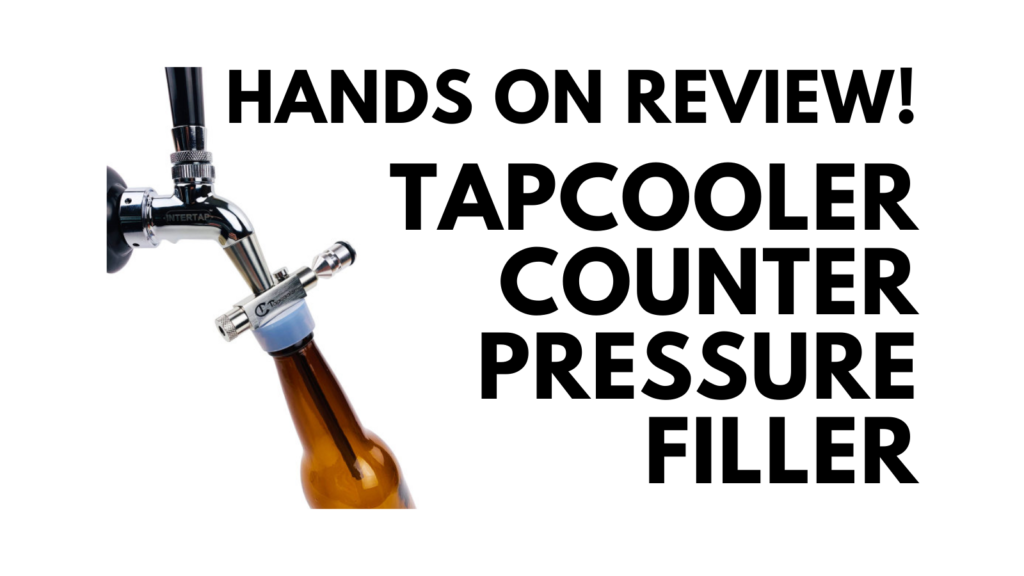
Hands on Review: Tapcooler Counter Pressure Bottle Filler for Forward Sealing Faucets
 This review is by Homebrew Finds Contributor Brad Probert. Brad is an engineer, expert homebrewer and experienced reviewer. Grab a link to Brad’s website at the end of this review.
Rare Deal on Tapcooler…
Deals on Tapcooler are rare, why? This is a MAP item. MAP = Minimum Advertised Price. It’s an agreement between sellers and manufacturer’s not to sell an item below a certain price. This gear generally sells for about the same price no matter where you purchase it from and is rarely discounted.
- Adventures in Homebrewing’s Rewards program typically offers about 5% back. Each qualifying item earns 1 point per dollar. 200 points gets you a $10 discount code.
- My contact at AIH says this works on EVERYTHING excluding gift cards.
- Note: In order to earn rewards points, you must log in to your AIH account.
- See: Rewards Program Complete Details
This is a loophole or sorts that gets you a rare, de facto discount on Tapcooler
- Stacks With Free Shipping: Adventures in Homebrewing is offering free shipping on most orders of $99 or more to addresses in the contiguous US.
- Need a Filler to get to $99? Sale Items – sorted low to high AND sorted most popular first, Yeast, Cleaning/Sanitizing Supplies, Clearance Items
Tapcooler Counter Pressure Bottle Filler – Complete Lineup Including Accessories
Tapcooler Bottle Filler
Sometimes it’s possible to go in a circle, but still be moving forward. For me, that’s occurred with bottling. Like most, I started homebrewing by bottling everything. But I got tired of peeling labels, washing bottles, and the overall chore of bottling 5 gallons of beer from a bucket with a gravity fed bottle filler. So I switched, and have been kegging ever since. The one drawback is it’s not as easily shared with others. I’ve got a few great pressurized growlers that solve my problem for bringing some along to a party, but I didn’t have a good solution for passing on a couple pints to friends or neighbors.

Check Current Pricing and View Available Accessories, Review Continues Below
- Tapcooler Counter Pressure Bottle Filler for Forward Sealing Faucets + All Tapcooler Accessories via Adventures in Homebrewing
- Tapcooler Counter Pressure Bottle Filler for Forward Sealing Faucets + All Tapcooler Accessories via MoreBeer
- Tapcooler Counter Pressure Bottle Filler for Forward Sealing Faucets + All Tapcooler Accessories via at Great Fermentations
- Tapcooler Counter Pressure Bottle Filler for Forward Sealing Faucets via Amazon
Great Fermentations has put together a setup for homebrew-canners…
Get a Deal on Tapcooler:
Deals on Tapcooler are rare, why? This is a MAP item. MAP = Minimum Advertised Price. It’s an agreement between sellers and manufacturer’s not to sell an item below a certain price. This gear generally sells for about the same price no matter where you purchase it from and is rarely discounted.
- Adventures in Homebrewing’s Rewards program typically offers about 5% back. Each qualifying item earns 1 point per dollar. 200 points gets you a $10 discount code.
- My contact at AIH says this works on EVERYTHING excluding gift cards.
- Note: In order to earn rewards points, you must log in to your AIH account.
- See: Rewards Program Complete Details
This is a loophole or sorts that gets you a rare, de facto discount on Tapcooler
Tapcooler Counter Pressure Bottle Filler for Forward Sealing Faucets + All Tapcooler Accessories via Adventures in Homebrewing
A small company in Norway (just 2 people), called Tapcooler, has created a product that is specifically designed for homebrewers that keg their beer, but want to be able to share it in bottles. They improved upon a similar design on the market by adding the functionality of CO2 purging to a counterpressure bottle filler. Their product was met with great feedback from homebrewers in Norway, and now they export it globally. You can use it to save the last few pints when a keg is getting low and you need space, want to share beer with a friend, or want to send in beer to a homebrew competition. Their bottle filler is different than your typical beer gun, in that it’s specifically designed to connect to your tap, and it’s also designed to fill with back pressure in the bottle so you don’t lose most of your CO2 when filling.
Tapcooler’s bottle filling equipment has several different accessories that go with the main unit. The main body is a simple machined stainless steel manifold with 4 openings. Connected to this manifold are: 1) Inlet for the beer from your tap, 2) Outlet for the beer going into the bottle, 3) Pressure relief valve for the air/CO2 that gets pushed out of the bottle as it fills with beer, and 4) CO2 Inlet for bottle purging. I’ll break these 4 parts down separately.
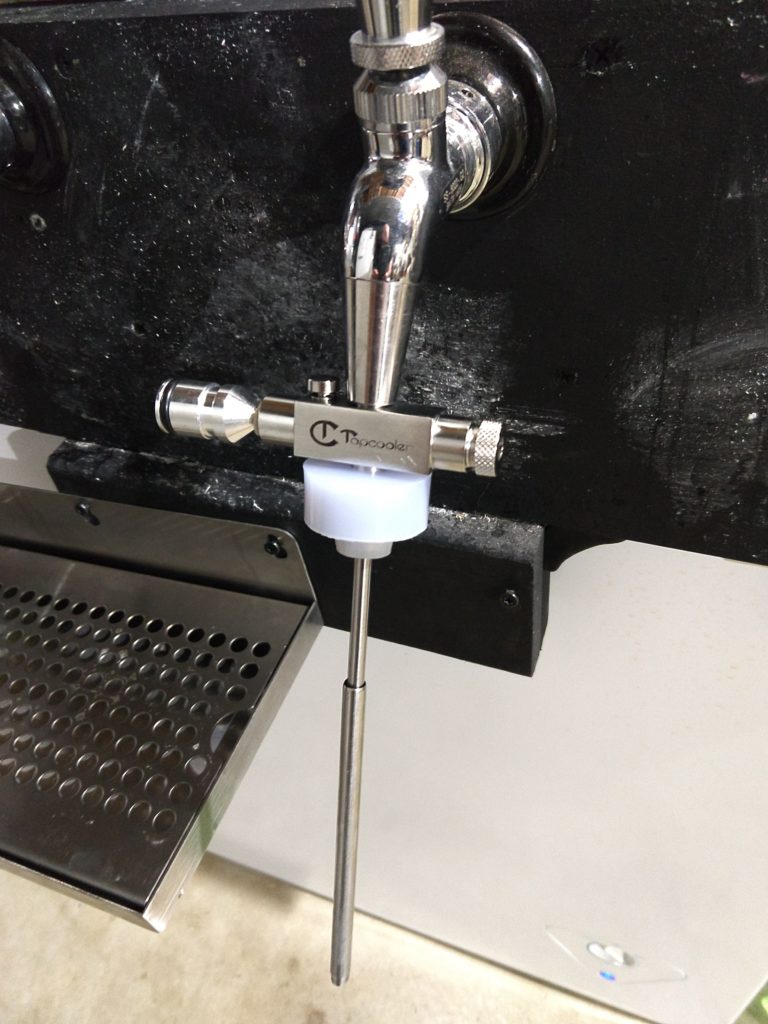
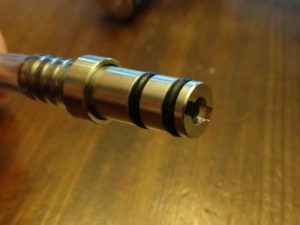
The inlet is a small stainless steel pipe with two o-rings on the outside to seal inside your tap spigot. Note this is made to work with forward sealing taps (Perlick, Intertap (Hands on Review), etc.), not with the piston/slider taps. If you use a tap other than forward sealing, you will get beer leaking and spraying out the front of your tap since it isn’t sealed fully. You push the short o-ringed pipe into your tap spigot and it stays seated during your filling, making it hands-free. They also have an optional extension accessory that is a length of flexible tubing and threaded fitting so you can move your filling point somewhere more convenient if directly next to your tap doesn’t work. You have the option of 11”, 39”, and 78” lengths (which make more sense in metric units).
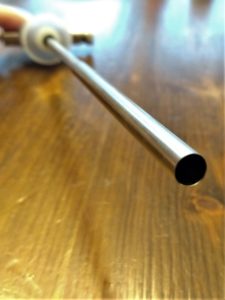
The outlet going into the bottle is connected to a stainless telescoping tube that’s like a metal straw. This adjustable length allows you to fill bottles as short as 4.5” or as tall as 12.5”. There’s a silicone topper on this end so the metal straw goes into your bottle to reach to the bottom, and then this silicone “cap” pushes over the top of your bottle to seal it off. The silicone is rigid enough to make a good airtight fit, but flexible enough to accommodate slight angles or minor variations on the standard bottle top.
The pressure relief valve has a knurled grip and turns very easily so you can make very tiny changes in bottle backpressure easily while filling. The beauty of this valve, paired with the silicone sealing cap is that you can keep the carbonation in suspension in your beer. You dispense the beer out of your kegerator/keezer at your normal pressure settings, and the backpressure in the bottle keeps your beer from foaming up. By adjusting the pressure relief valve, you control the fill speed of the bottle and ensure the minimal amount of CO2 loss out of suspension. Tapcooler sells an add-on attachment of a long vent hose that can plug in to the relief valve. During some fills, you can get a small amount of foam to come out. The vent hose allows you to direct that into a bucket or sink so you don’t have to wipe it up from a table afterwards.
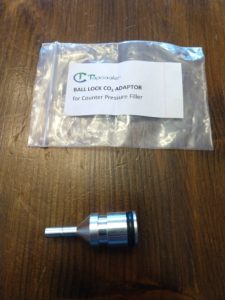 Optional CO2 Ball Lock Fitting
The last connection port is the CO2 inlet. It has a push to fit hose barb included that you can connect a CO2 line to. And what I’d almost call a must-have option is a small machined aluminum ball lock fitting that can be used instead of the barb. With that, you can connect your standard gas ball lock disconnect to supply the CO2. CO2 is dispensed into the unit by the push of a small trigger button on the main body. CO2 Is used at the start of bottle fill, where you can purge air from your bottle with 2-3 seconds of CO2 coming down through the metal outlet straw sitting in your bottle. You come back to the CO2 again after you’ve finished filling the bottle with beer. You pull the outlet straw out of the liquid and can purge the remaining head space with a quick shot of CO2 before capping the bottle.
 Tapcooler Outlet
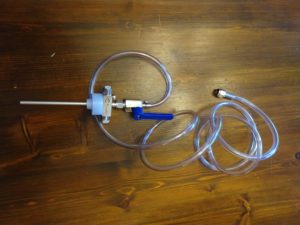 Line Connected to Main Body and Swivel Nut on Other End
Other accessories available include an alternate inlet connection with a 78” length of tubing with a swivel nut on one side and an open/close ball valve fitting on the other. The swivel nut connects to a threaded liquid disconnect, so you can pop it on your keg post. The ball valve attaches to the main Tapcooler unit, and you use the lever to open/close just like you would a tap handle on your forward sealing tap. You can then use this if you have a keg that isn’t connected to a tap, or if you don’t have forward sealing taps.
Tapcooler Hands on Review

I had just recently used a Blichmann beer gun, filling some cans to seal up in my Cannular (Hands on Review). To get that dialed in to get a good fill volume, I had to decrease pressure on the beer, super-chill it to 32F, and keep the keg in an insulated bag with ice packs while filling cans. And then after that, I had to deal with the mess/clean-up from spinning cans with foam running down the side. It made me wish there was an easier way. So going into this trial, I had a specific need I wanted met.
 Just insert this into your compatible faucet
On my first runs, I had to do a few experiments to figure out the exact sequence of steps and adjustments. This of course involved a couple unintended beer fountains, until I learned the valuable lesson of turning off the tap before removing the silicone cap from the bottle. Which in hindsight is a no-brainer, but right out of the box, it seemed a bit daunting with all the different inlets and outlets that have a different function at different times in the process. But that was definitely just the beginning, and I got the hang of it after about 30 minutes. There’s a couple decent YouTube videos out there that are about 5 minutes long that helped me a lot.
I used the 11” extension hose because there wasn’t enough room for a bottle between my drip tray and the tap with the Tapcooler unit plugged into it. That worked well, but it was a bit tight and I found I really could’ve used more flexibility of the 39” extension. One huge benefit of counterpressure fillers over beer guns is the fact that you keep the bottle head space pressurized as you’re filling. The result is, you can fill with your keg set at your normal carbonation/serving pressure, and don’t have all the CO2 foaming out of suspension because it’s suddenly in an open air environment.
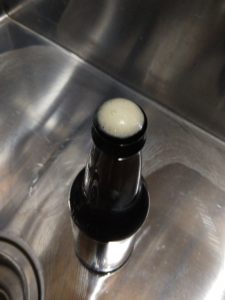 Bottle After CO2 Topped into Headspace
The pressure relief valve worked perfectly. I could easily turn this to adjust the backpressure in the bottle while filling. I started out with a slow fill, sped up in the middle, and then slowed down as the beer started to fill up the neck of the bottle. It was amazing how little foam head there was while filling the bottle- probably only about 1/8” thick. I tried out the overflow tube plugged into the pressure relief valve, but found I didn’t really need it. Keeping an eye on bottle fill progress, and adjusting the release pressure accordingly, there was hardly any foam coming out the vent.
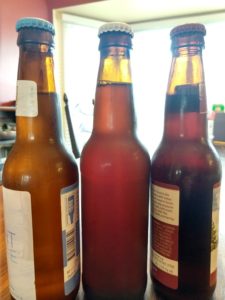 Comparing Fill Level of Tapcooler (Center) vs Commercial Brewery Fill
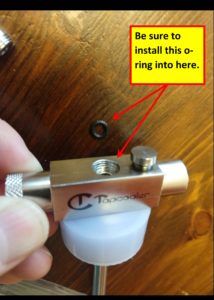 Proper O-ring Location
Here are a couple tips from my experience. First is to be sure to put an o-ring between the stainless pipe that goes in your tap, and the main body of the Tapcooler. If you’re using the extension hose, you need one of these on each end of the hose where it screws into the mating parts, otherwise you’ll get a constant drip while the beer is flowing. The set-up comes with several extra o-rings, but I had lost track when cleaning things of where they needed to be installed. The second tip is after closing the tap when your bottle is full, do the CO2 top-off in the head space. I didn’t at first because it seemed dubious that spraying a little CO2 there would do anything other than waste CO2. But once I tried it, the benefit was obvious as it made the top of the beer foam up slightly and puff out just above the bottle level. Perfect for the “cap on foam” advice that’s always given.
 How Extension Tube Connects to Main Unit
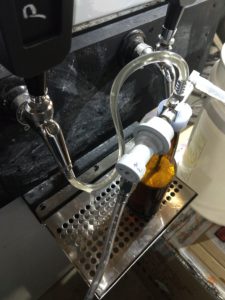 Filling Bottle Using Extension
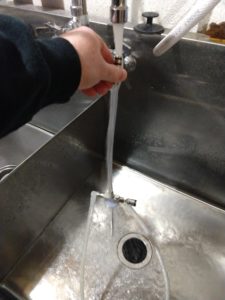
The set up and clean up was just my style- not too many steps, and not too much time. Recycling bottles is obviously cheapest, but requires the pain of cleaning. New bottles can be bought by the case at about $0.50/each, which is about the same price you pay for empty cans when you buy them by the 300-pc case. So I started with new/clean bottles and submerged them in a bucket of cold-water Star San, which was super simple to set up. And the cold water doubled as a way to chill the bottles so I didn’t have to plan ahead and stick them in the fridge or anything. The simple Tapcooler manifold and hose were easy to clean when done, and I just put them in the StarSan bucket for a bit before starting as well. The bottle filling process was amazingly clean, and contained to just the drip tray under my taps, so no special pan/bucket/etc. needed to catch drips. And of course capping is a simple process that doesn’t leave beer flung all over your walls like I had to deal with on my canner.
 Super Simple Clean up
Conclusions
Overall, the features the Tapcooler bottle filler provides seem unparalleled. This feels like “Homebrew Bottling 2.0” for those that have graduated from bottles to kegs. It’s the next phase in the evolution that you can take advantage of all that kegging brings you, but have a super easy way to bottle a few to share. The process was so easy, that I turned to it during these times of Social Distancing where I couldn’t have neighbors over to try my latest brew. Once my keg was ready, I spent an hour bottling up a case of beer, then delivered 6-packs to their front porches. This has totally obsoleted my canner, as it provides such a better product with the counterpressure, takes so little prep time, and is so easy to clean up after.
Check Current Pricing and View Available Accessories
- Tapcooler Counter Pressure Bottle Filler for Forward Sealing Faucets + All Tapcooler Accessories via Adventures in Homebrewing
- Tapcooler Counter Pressure Bottle Filler for Forward Sealing Faucets + All Tapcooler Accessories via MoreBeer
- Tapcooler Counter Pressure Bottle Filler for Forward Sealing Faucets + All Tapcooler Accessories via at Great Fermentations
- Tapcooler Counter Pressure Bottle Filler for Forward Sealing Faucets via Amazon
Also: Nano Canner Canning System:
TAPCOOLER NANOCANNER™ COUNTER PRESSURE CAN FILLER COMPLETE KIT
Homebrew Canning System Reviews!
- Hands on Review: Kegland Cannular Bench Top Can Seamer – Can Your Homebrew
- Hands on Review: Oktober Design SL1 Can Seamer – Can Your Homebrew!
Also Consider – Nukatap Counter Pressure Filler:
- Nukatap Counter Pressure Bottle Filler at MoreBeer
- Nukatap Counter Pressure Bottle Filler at William’s Brewing
Related Reviews
- Hands on Review: Nukatap Counter Pressure Bottle Filler!
- Hands on Review: Blichmann Engineering Beer Gun
- Hands on Review: Tapcooler Counter Pressure Bottle Filler for Forward Sealing Faucets
- Nukatap Faucet Hands on Review
- Intertap Hands on Review
- Hands on Review: NukaTap FLOW CONTROL Faucets
- Hands on Review: Kegland Cannular Bench Top Can Seamer – Can Your Homebrew
More Photos
 Unit in Tap with 22 oz Bomber
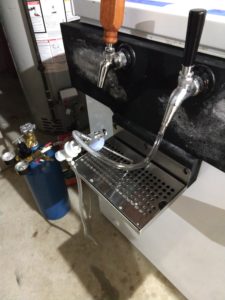 Bottle Filler Resting in Drip Tray in Between Bottle Fills
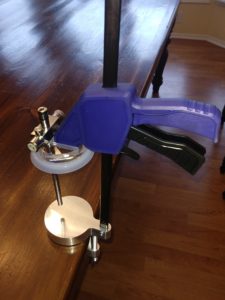 Can Filler Kit
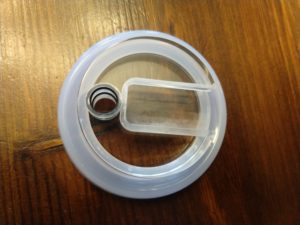 Can Filler Top
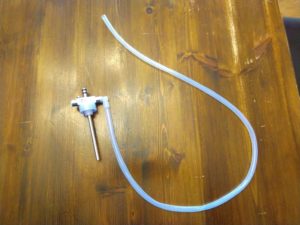 Overflow Tube Connected to Relief Valve
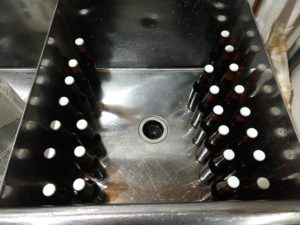 Finished Result, 1 hour of counter-pressure bottle filling using the Tapcooler
More Homebrew Finds!
- Last 50 Finds!
- Top Deals – a curated list of the best deals
- Homebrew Reviews – one of the largest libraries of homebrew reviews in existence!
- Our Top Posts – tips, how-tos, resources posts and more
- Let’s be Friends!
Recent Deals!

10 Most Recent Homebrew Resource Posts & How-To’s!

We are Homebrew Review HQ! Our 10 Most Recent Reviews

Rebuild Your Kegs!
Everything for Your Kegerator!
Also: Kegerator Tips & Gear | Keg Repair Part #s | Recent Keg Finds
Our Top Draft Resources!
- The Most Difficult Spot to Check for CO2 Leaks
- Keg O-Ring Materials Selection! – EPDM, Silicone and Buna-N?
- Why Do I Have Bubbles in My Beer Line? Diagnosing and Fixing Kegerator Foam Problems
- Five Benefits of Using Corny Kegs As Fermenters
- Rebuilding & Reconditioning Homebrew Kegs!
- Food Safe Replacement Keg O-Rings in Bulk
- Hands on Review: Kegland DuoTight Fittings & EVABarrier Tubing!
- Why Won’t My Homebrew Keg Carbonate? Fixing Draft Beer Carbonation Problems
- What Does a Flow Control Faucet Do?
- Upgrade Your Kegerator – 6 Improvements!
- Serve Homebrew on Any Kegerator & Convert Commercial Kegerator to Homebrew
- Tips and Gear for Growler Filling
- What’s the Difference Between Ball Lock Kegs and Pin Lock Kegs?
- Checking for Draft System CO2 Leaks – Using The Pressure Gauge Method
- Tip: Consider Oetiker Stepless Clamps for Kegerator Gas and Beer Lines
- Hands On Review: Inkbird ITC-308 Dual Stage Temperature Controller +WiFi Version
- Universal Poppets Tips and Tricks!
- Convert Your Mark II Keg & Carboy Washer to a Recirculating Draft Line Cleaning Pump!
- Step by Step: Finding and Fixing Keg CO2 Leaks
- Kegerator Beer Line Temperatures & Reducing Foam with a Recirculating Fan
- Kegging CO2 Use Estimations and Calculations
- Step by Step: Balancing Your Kegerator Draft System
- Building a Simple Ball Lock Draft Line Flushing Setup
- Build a Recirculating Draft Line Cleaning Pump
- Home Brew Keg Roundup – New & Used, 5 and 2.5 Gallon & More!
- Damp Kegerator? Fix Kegerator Condensation
- Portable Draft Beer Serving Options!
- Homebrew Temp Controller Roundup! – Kegerator and Fermentation – concepts, applications and models
- Bulk Keg Orings and Keg Repair Part Numbers
Special Thanks to Great Fermentations for providing the unit used for evaluation in this review.
By Brad Probert. Check out Brad’s website – beersnobby.com
This post may contain affiliate links. We may make a commission when you use our links. This will never cost you extra. Thank you for supporting Homebrew Finds!
Price, promotions and availability can change quickly. Check the product page for current price, description and availability. tag:lnksfxd review:tapcooler rs:7 #tag:tpr
Just used mine for the first time. A little messy but successful at bottling a case of bottles. Biggest problem I had was with the self closing taps.
Hello, and thanks for the review.
I just purchased the Tapcooler and actually I am switching from Blichmann Beer Gun as I don’t like the results I achieved – I found how to fill bottles without a lot of foam, but then when I opened the bottle it is low carbonated…especially if it is in a few days after bottling. If it is in a couple of weeks some carbonation is built up, but still it is far way of the desired level.
Do you think that I will improve carbonation level with the Tapcooler?
In my opinion, the Blichmann Beer Gun is losing too much pressure during filling as at that time the bottle is not sealed and then you have the time to cap it, while with Tapcooler it seems the only time bottle is not sealed is while capping,.