
Hands on Review: iSpindel Digital WiFi Hydrometer!
Thank you to HBF Contributor Aaron Nord for this hands on review! Aaron is an advanced award winning brewer, a long time reader and a serial tipster!
iSpindel
Having the ability to precisely control fermentation temperatures was the change to my brewing setup I credit with one of the largest improvements in my finished beer quality. Being able to dial in specific temperatures for lagers, perform diacetyl rests for both ales and lagers, and cold crash a finished beer helped me to better control what was happening inside my fermenter. One of the data inputs that informed when to change the fermenter temperature was the gravity of the fermenting wort. At various times through the fermentation, I would test a sample to know where the wort was on its journey to become beer. Taking multiple samples was time consuming and it resulted in a loss, albeit a small loss, of the finished product due to the number of samples I was taking.
Enter the electronic, submersible hydrometer – a tool that can read out not only the gravity of a fermenting liquid, but also its temperature all from inside the fermenter, relieving the need to take numerous samples throughout the fermentation process. In addition, many of these devices could connect to an external source and log the data for the user to read in real-time. The brewer and technologist in me were both excited to see what one of these tools had to offer.
The iSpindel is one of a few offerings to homebrewers today in the category of an electronic, submersible hydrometer which also include the Tilt and Float products (I do have experience with the Tilt, which I will discuss later, but will focus on the iSpindel primarily in this review). All products rely on a sensor that can measure the angle of the device in order to calculate the gravity of the liquid. The iSpindel was born out of a desire to make a more cost-effective version of an electronic tilt measurement-based hydrometer, according to the creator, as the other offerings on the market are typically above the $100 mark.
I purchased my iSpindel on eBay from a seller in Canada for roughly half the price of the other devices available:
https://www.ebay.com/usr/wilbrod45
Also:
- iSpindel WiFi Hydrometer << This shows all seller’s items in case this ends and is re-listed
- Search eBay for iSpindel
I am not aware of any other place than eBay from which to purchase them, however, for the more industrious and ambitious brewer, the creator of the iSpindel has generously made the project open source and maintains a website with details on how to build one piece by piece.
The website is actively maintained and comprehensive in content, covering everything from how to build an iSpindel to how it works and how to calibrate it. The creator has put a lot of effort into making this a tool that is accessible to homebrewers in every way.
Purchasing the device from eBay was straightforward with the only curveball being the conversion between Canadian and US dollars, making it appear pricier for those of us in the States than it is (at least as of the time of writing this). After ordering, it was processed and shipped in quick succession, arriving within a week. It was well packaged and arrived fully assembled and in perfect condition.
Hands on Review
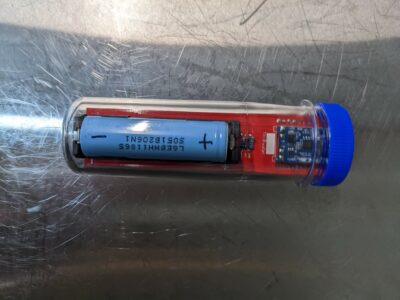
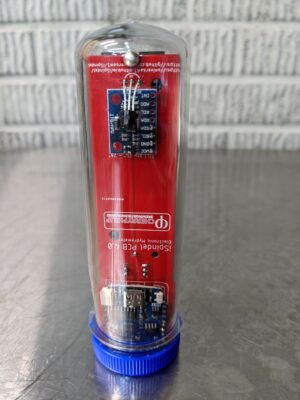
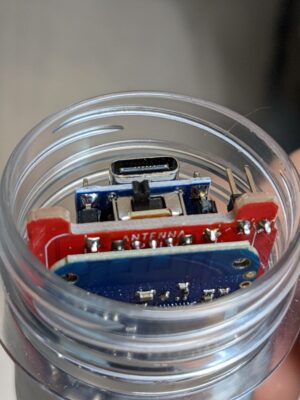
The construction of the iSpindel I purchased is notable. The quality of the plastic used for the pill container seems to be of a high grade, with the screw-on cap being made of a slightly less quality material but still decent. The main circuit board and the mounted components all fit together quite nicely, and the solder joints appear to be expertly made. The battery is of an odd size looking like a double A battery on steroids. I removed the cap and found the on/off switch at the top of the circuit board, directly under the cap, next to a USB-C charging port. Once I switched the device on, the power indicator light flashed as expected, showing the device was charged before it was shipped.
iSpindel Components:
- CherryPhillip PCB
- Wemos D1 Mini Wi-Fi board
- MPU-6050 Gyro & Acceleration Sensor
- Temperature Sensor
- 3.7v 18650 Battery
- PET Container with cap
iSpindel Dimensions:
- 5.25 in/13.25 cm long
- 1.7 in/4.3 cm wide

After inspecting the device and powering it on, I moved on to configuring it, following the instructions detailed on the creator’s website. The steps outlined there were straightforward and involved creating an account on a separate site called ubidots.com in order to create an authentication token which allows connection to the iSpindel device. From there one can simply log to the Ubidots site and set up monitoring there. I wanted to be able to connect to my Brewfather account which would allow me to actively monitor a fermentation from that application. Thankfully, Brewfather has concise instructions on their site detailing this aspect of setup, which I followed without issue, and quickly had my iSpindel added as a device in my Brewfather account.
More About Brewfather
Hands on Review: Brewfather App – Recipe Formulation, Calculators & Brew Day Tools

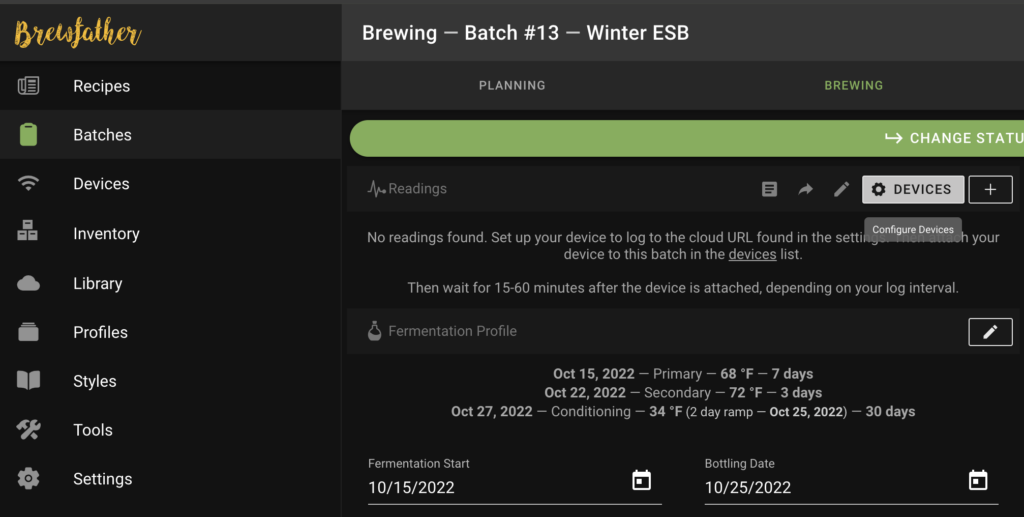 Brewfather – Configure Devices
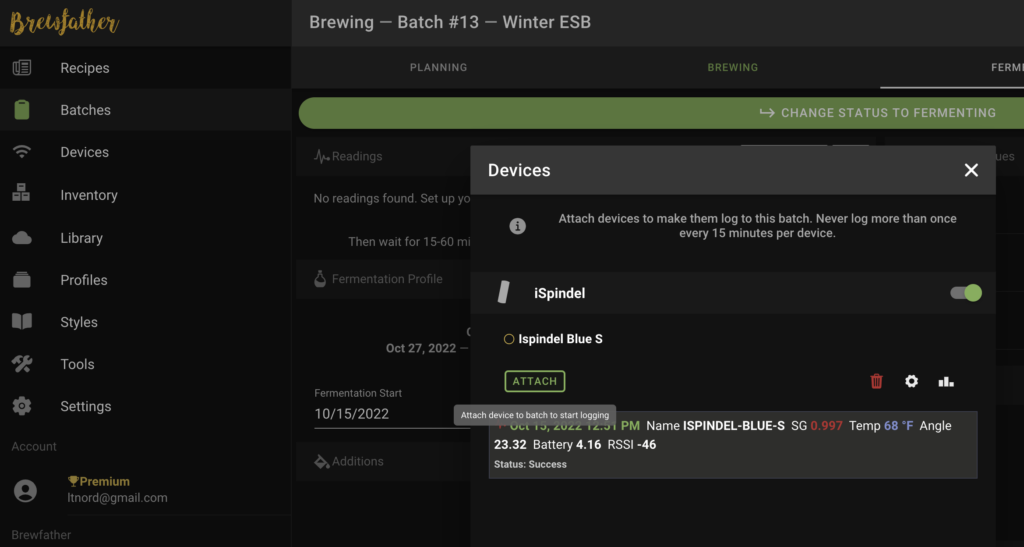 Brewfather – Attach Device
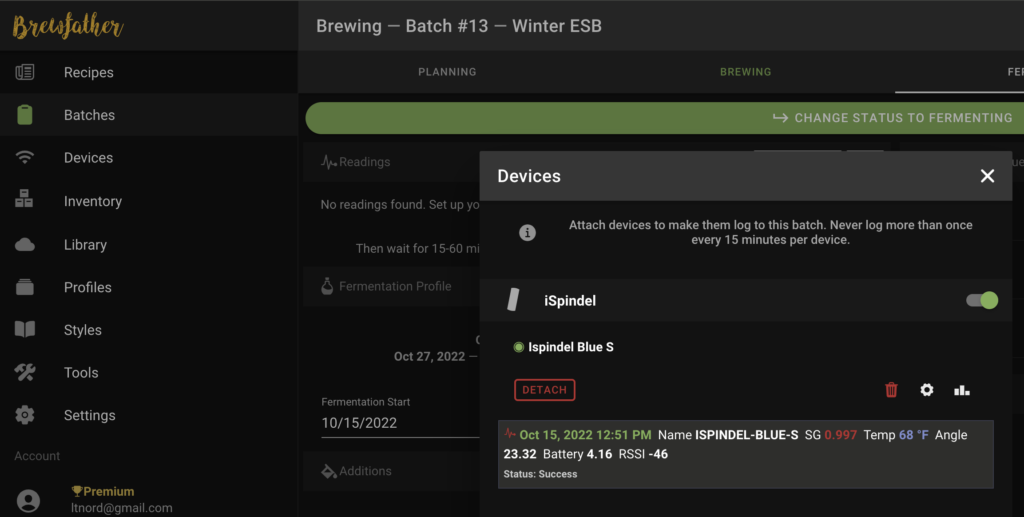 Brewfather – Device Attached
For those brewers not using Brewfather, there are other integration options out there including Brewer’s Friend, Grainfather and Brewspy which is a separate, stand-alone app to track fermentation with iSpindel or Tilt.
Having the device set up in Brewfather made it available to use for a given batch’s fermentation. For those not familiar with Brewfather, the app allows a brewer to create a recipe and use that recipe in a batch (i.e. brew session for a given recipe). The batch has several phases with fermentation being the last phase. In this phase, one can log a gravity reading manually or connect the fermentation to a device.
On brew day, I brewed as usual, took manual gravity readings with my refractometer and hydrometer then placed my iSpindel, previously sanitized with StarSan, into my fermenter. Since my iSpindel device was already added to my Brewfather account I was able to easily connect the device to the fermentation in the app. Within an hour I had my first reading from the iSpindel, reported directly to Brewfather in a visually pleasing chart in the app. The reason it took an hour for the first reading is that I configured the device to only report once an hour, changed from the default of every fifteen minutes in order to conserve the battery life.
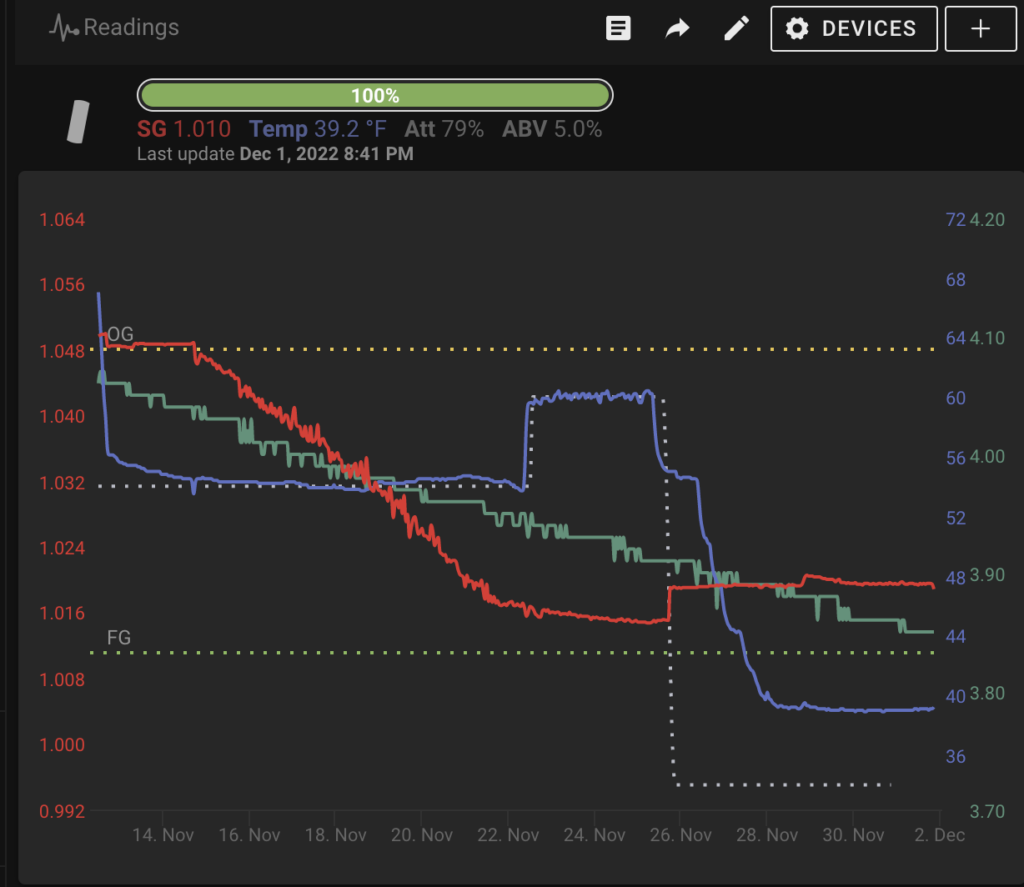 Brewfather – Pilsner Complete Fermentation Chart
I noticed right away that the gravity reading was quite a bit different from the hydrometer reading I had taken earlier – 13 specific gravity points. I had purposely not tested the iSpindel before placing it into the fermenter because the seller noted that it came pre-calibrated. The main reason for this is due to my laziness; the calibration process detailed on the creator’s site involves many steps of taking measurements with several sugar-water solutions with various specific gravities. Fortunately, it was an easy correction within the Brewfather app which allows a gravity offset setting on a device (there is also an option to enter a temperature correction offset). I entered an offset of 13 then reviewed the reading at the next hour and noticed that the gravity was now 26 points higher than I expected. This was due to my error using 13 as the offset instead of -13. I made the correction and checked back and hour later to find that the gravity reading was now the same as the reading I had taken with my hydrometer and refractometer.
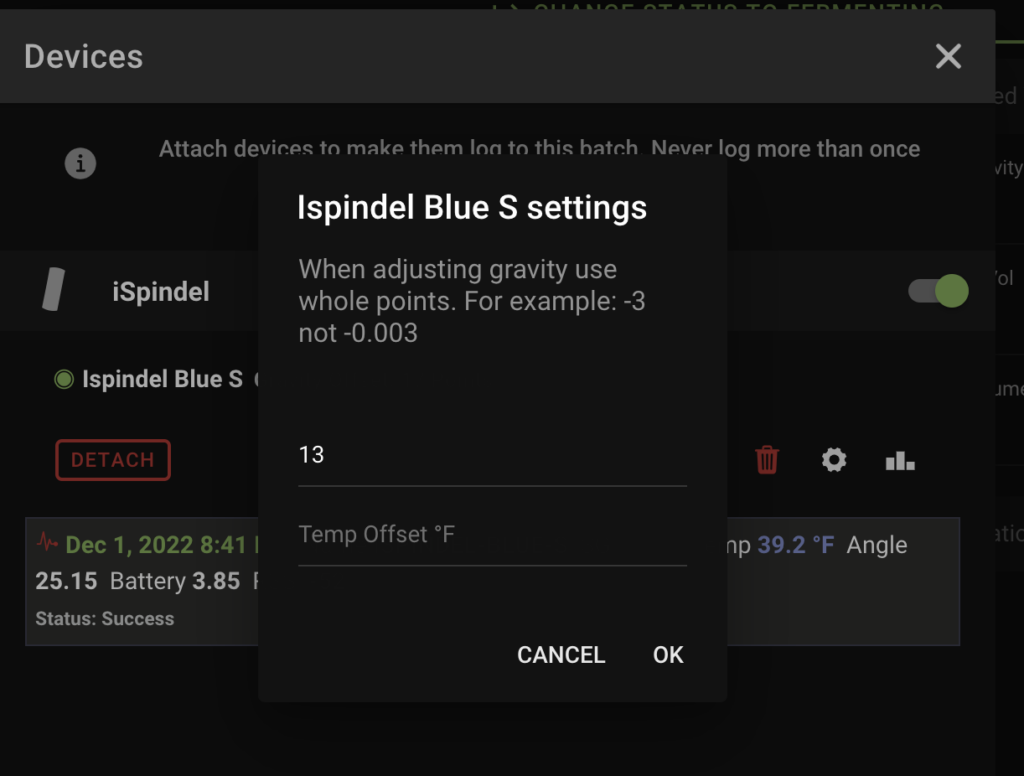 Brewfather – Gravity Offset
Now having some wildly different gravity reading within the first few hours of my fermentation, my graph looked a little funky. Fortunately, Brewfather allows users to either edit those reading or delete them entirely. I deleted the entries to allow the fermentation reading to start from a clean slate.
It was so satisfying to be able to track my fermentation from anywhere I had internet access. All I had to do was open my Brewfather app and go to the current batch’s fermentation tab to see the gravity and temperature of the fermenting wort as well as a battery voltage reading of the iSpindel device, all within the same graph. The graph that is presented is interactive, allowing one to inspect any point on the graph to read the detailed gravity, temperature, and voltage measurements. With this data at hand, I was able to know when to increase the pressure setting on my spunding valve and when to raise the temperature to begin my diacetyl reset. I could know when my cold crash brought the temperature down low enough to add my clarifying agents, and I could get all this information without even being near my fermentation vessel.
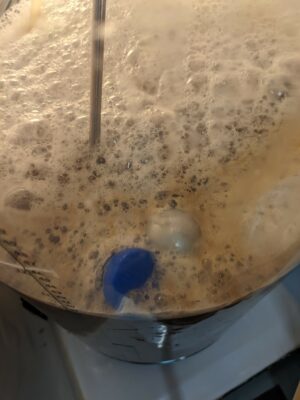
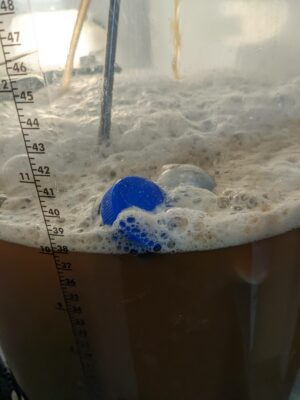 Floating – Early Fermentation in FermZilla All Rounder
At the end of the second fermentation, I noticed the gravity start to plateau just above where I expected it to finish. I gave it a couple of days before I took a reading with my final gravity hydrometer. I found that the iSpindel was reporting 1.015 while the hydrometer was at 1.011, the latter being my intended final gravity. At that point I decided to cold crash. Having already set the offset for the gravity correction, I expected this value to match the hydrometer and was a little disappointed that it didn’t. I may go through the more rigorous exercise of calibrating the device in the future, but for my purposes, being able to see the trends of the gravity and know when it starts to plateau that it is probably close to terminal gravity are the important factors for me.
I have yet to charge my iSpindel. It has been used to monitor two fermentations, from initial yeast pitch to the end of cold crash, with one duration being 12 days and another 18 days. Logging once an hour that equals out to about 720 calls. During this time, I noticed the battery voltage change from its initial reading of 4.16 volts to 3.85 volts. I plan on using it for one or two more batches before needing to charge it. When it comes time to do so it will be simple enough to take off the cap and connect a USB-C charger to it to feed it enough juice to get back up to the 4+ volts of a full charge.
 On Button and Charging Port
Comparing iSpindel to TILT
Before I wrap up, I will add a few notes on the Tilt. It has been some time since I have used that device. I was in the habit of using it for each fermentation for about a year and then at one point liquid somehow made its way into the device, causing it to not work properly, and I have yet to revisit the device. When I was using it, I did not yet have a Brewfather account and simply logged the readings to a Google Sheet, something that was simple enough to set up using Tilt’s instructions. One advantage the iSpindel has to the Tilt is that the iSpindel uses Wi-Fi whereas the Tilt was only connectable via Bluetooth. For this reason, I always kept an old smartphone near the fermenter so the Tilt could connect to it via Bluetooth and log reading to that phone which acted as a server. The phone then logged to the Google Sheet which I could access anywhere. The Tilt may edge the iSpindel out on the exterior quality. The pills seem to be about the same grade of plastic, but the caps are different. Where the iSpindel cap is like one found on a plastic water bottle, the one on the Tilt is recessed in the pill body leaving a flat edge where the iSpindel cap leaves an overhang. Where this seamless contour seems like an advantage for the Tilt, perhaps this clever design is what led to the leak I experience though, as it is not as solidly tested of a design aimed at keeping liquid in or out. Were I to resurrect my Tilt, I would look into connecting it to my Brewfather account after seeing what the app has to offer in that regard.
Conclusions
As a technologist and a beer nerd the iSpindel checks a lot of boxes for me. It is a cool piece of gear that provides a geek like me near real-time data about an actively fermenting creation of mine which helps me ensure the finished beer ends up being its best version of itself. The iSpindel is approachable enough for someone who isn’t tech savvy, but also has configurable options for those who are and want to take it one step further. One of its most attractive attributes is its price as it is considerably less expensive than its competitors without sacrificing much, if anything at all. The fact that it integrates so seamlessly with my favorite brewing software is a big feature which allows me to have all my brewing information in one tidy place. Additionally, being able to access this information from my phone from anywhere in the house (or the world for that matter) was especially appealing. The only thing I regret about the iSpindel is that I didn’t get one sooner.
Find iSpindel
- https://www.ebay.com/usr/wilbrod45
- iSpindel WiFi Hydrometer << This shows all seller’s items in case this ends and is re-listed
- Search eBay for iSpindel
Related:
- How-To: iSpindel Brew Temperature Control – Using Smart Life, IFTTT and Ubidots
- Brewfather Hands on Review – Sign up for a free trial!
- Hands on Review TILT Bluetooth Hydrometer
- Hands on Review: FermZilla All Rounder Fermenter
- RAPT Pill Digital Hydrometer from Kegland
More Photos
 Floating – Active Fermentation
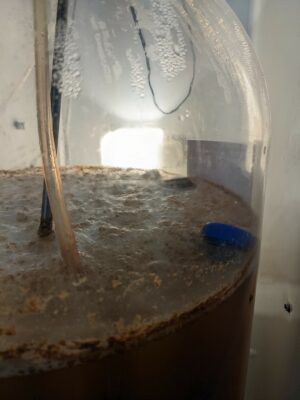 Floating – Near End of Fermentation
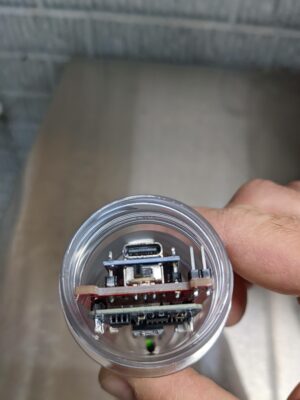 On Button and Charging Port
 Side View
TILT Hands on Review!
Compare iSpindel to TILT
- Hands on Review: Tilt Bluetooth Fermentation Hydrometer!
- The Tilt Works with Brewfather App! Sign up for a free trial! – check out our Hands on Review of Brewfather
Build Your Own iSpindel
More Homebrew Finds!
- Last 50 Finds!
- Top Deals – a curated list of the best deals
- Homebrew Reviews – one of the largest libraries of homebrew reviews in existence!
- Our Top Posts – tips, how-tos, resources posts and more
- Let’s be Friends!
Recent Deals!

10 Most Recent Homebrew Resource Posts & How-To’s!

We are Homebrew Review HQ! Our 10 Most Recent Reviews

Fermenter Reviews!

More Homebrew Finds!
- Last 50 Finds!
- Top Deals – a curated list of the best deals
- Homebrew Reviews – one of the largest libraries of homebrew reviews in existence!
- Our Top Posts – tips, how-tos, resources posts and more
More Fermentation Related!
pinned
This post may contain affiliate links. We may make a commission when you use our links. This will never cost you extra. Thank you for supporting Homebrew Finds!
greatdealsNote that this review is of a pre-built version of a DIY project. If you choose to purchase a pre-built iSpindel yours may feature different components.
Price, promotions and availability can change quickly. Check the product page for current price, description and availability. review:ispindel tag:tpr