
Hands on Review: Brewer’s Edge Mash & Boil Electric Brewery
This review is by Homebrew Finds Contributor Brad Probert. Brad is an engineer, expert homebrewer and experienced reviewer. Grab a link to Brad’s website at the end of this review.
Brewer’s Edge Mash & Boil
I reviewed a number of electric all-in-one brewing systems a little over a year ago. As a collective group, these systems offer a lot to the homebrewer. They provide the flexibility and control of brewing process of all-grain, and the equipment simplicity of brew-in-a-bag. The fact that they’re electric gives you the ability to brew inside and convenience of not having to chase propane tank fill-ups. The electric systems also have the ability to set a target temperature and control to it, giving you better control of your brew day. All of these combine to create a more streamlined and less stressful brew day.

Each system has its own strengths and they all span a wide price range. The units I tried last year ranged from $470 at the low end to $2,500 at the high end. When I saw the Brewer’s Edge Mash & Boil coming in at $300, I was intrigued to see how this unit would work and if you really could go all-grain with an electric system at such an affordable price point.
General Function
The Mash & Boil (M&B) runs on 120V power, so you have wide flexibility on where you can use it. 240V is definitely faster to heat and has a stronger boil, but it limits your possible brew locations. The M&B has two heating elements, allowing you 3 different levels of heat at 600W, 1000W, or 1600W. Different than the other all-in-one units, the M&B does not have a pump for recirculating wort. This is one obvious difference from the others, but by skipping the pump, there are less parts to clean and it keeps the price lower. The unit does have an easy to operate spigot valve at the bottom that allows you to transfer wort, or manually recirculate your mash using a pitcher.
Limited Time DEAL:

- William’s Brewing is discounting orders by up to $120 based on total purchase.
- See graphic above for coupon codes.
- Shipping is free or reasonably priced flat rate to addresses in the contiguous US depending on your order size for most items.
William’s Brewing Buy More Save More Sale!
This promo applies to Mash and Boil systems!
- Mash and Boil at William’s Brewing
Compare Prices, Review Continues Below:
- Mash and Boil at William’s Brewing
- Search Amazon for “Brewer’s Edge Mash and Boil” – offerings vary
- Brewers Edge Brewer’s Edge SERIES 2 MASH AND BOIL With Pump V2 Programmable Electric All-In-One Brewing Kettle 110V – affiliate link, note that multiple variations of this product may be available, as such a different version may appear at this link
- Brewer’s Edge Mash and Boil – affiliate link, note that multiple variations of this product may be available, as such a different version may appear at this link
- Brewer’s Edge Mash and Boil with Pump | All Grain Home Brewing System 7.5 Gallon –
- affiliate link, note that multiple variations of this product may be available, as such a different version may appear at this link
- Brewer’s Edge Series 2 Mash & Boil With Pump – Adventures in Homebrewing
- Brewer’s Edge Mash & Boil with Pump Series 2 – Austin Homebrew Supply
Note that different versions may be available and that features and specifications may vary
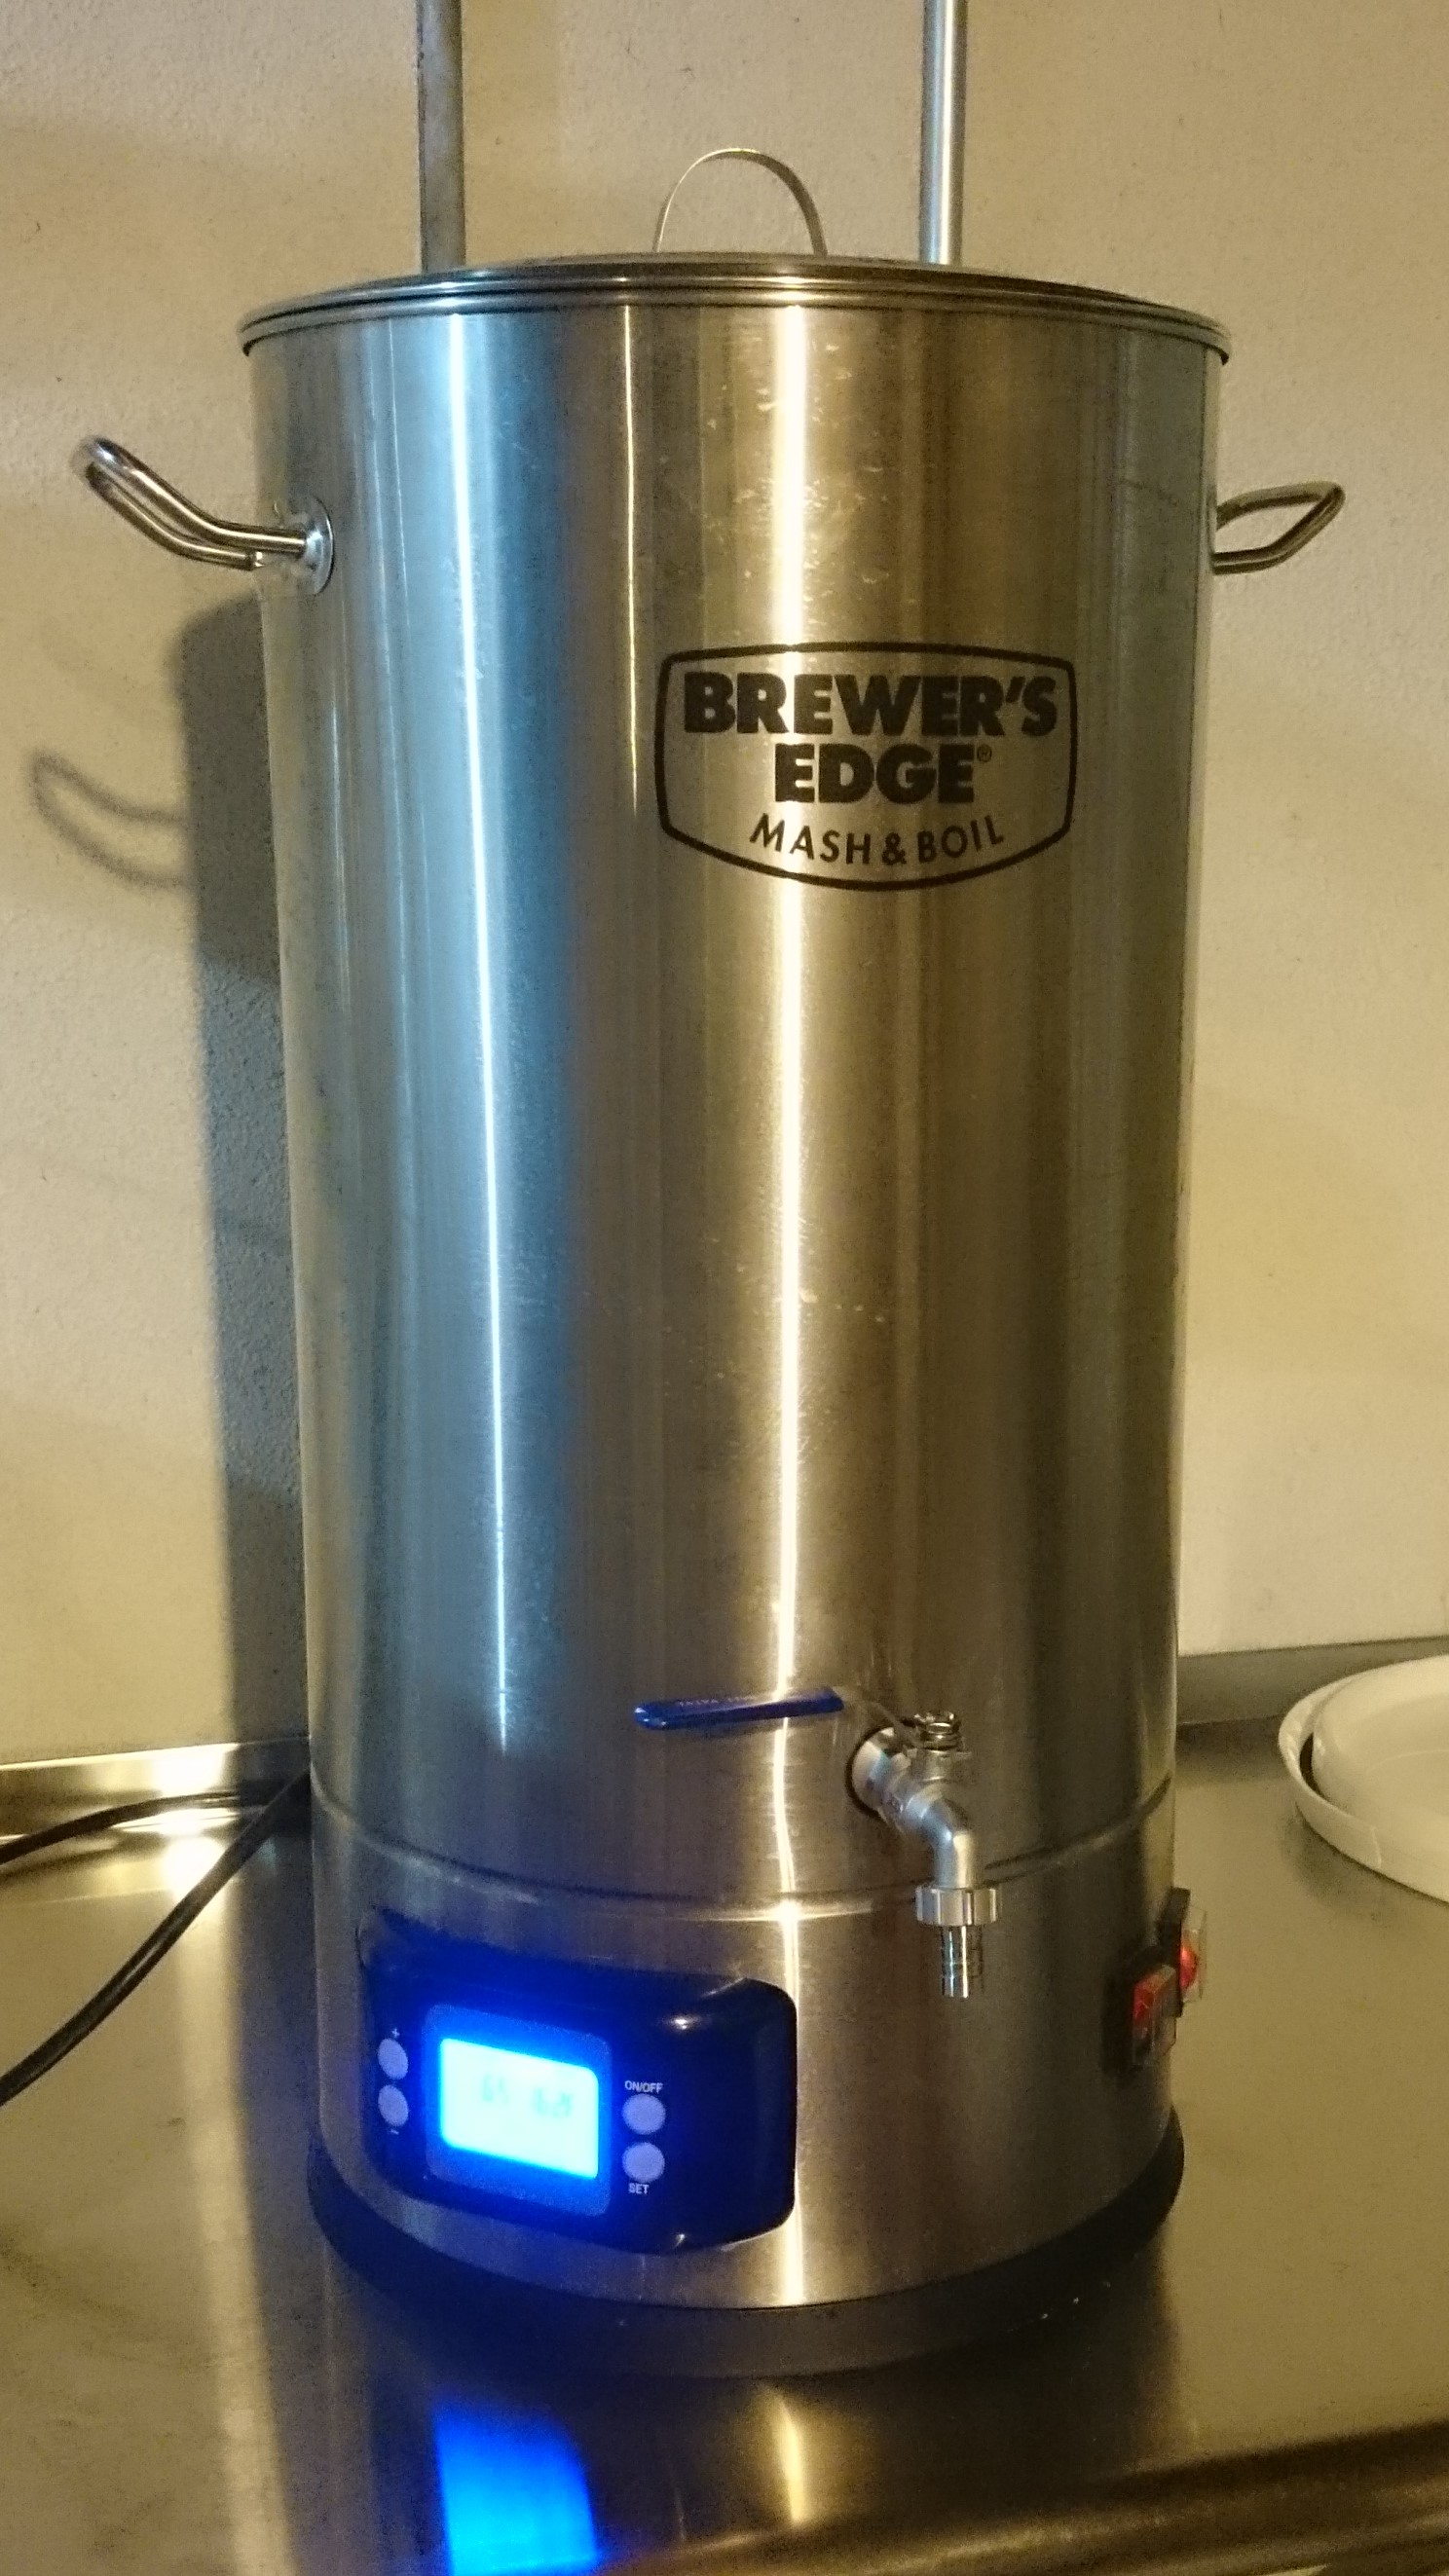
There is a malt pipe that sits inside like a big sleeve, with a steel false bottom built into it. This makes it a Brew In A Bag (BIAB) set-up where you pour your crushed grains into this malt pipe for mashing, and then simply raise it up out of the wort for sparging. Built-in feet free up your hands for pouring sparge water through it.
Most impressive is the double-walled main unit body. The double wall serves many purposes like keeping your mash at a good steady temperature without requiring continuous heat addition, supporting a good rolling boil with lower power heating elements, and making your brewing area a bit safer by preventing inadvertent burns when you touch the outside of the unit. It also helps give the unit some robustness and strength. And unlike some other all-in one brewing units, it comes with welded-on handles to make transportation much easier. Sometimes the little things make a big difference.
The build quality on the M&B really is notable. In most scenarios in life, you get what you pay for. You find something cheap, and it’s typically poorly made. The M&B proves that you can’t always judge quality by the price tag. The fit & finish of all of the parts is top notch. Things fit together well, there are design features and manufacturing processes added to ensure no sharp metal edges at seams. Welds are clean and neat. Metal gauges are all sufficient to keep things sturdy where needed and not suffer bending and flexing.
Electric Controller
The M&B has a simple controller. It has + / – buttons to change the set temperature, and a very cool feature of being able to set a timer for when you want it to come on- up to 24 hours in advance. The delay timer brings in great options of getting your strike water to temperature while you’re coming home from work, or overnight so you can jump right in when you get up in the morning. And everyone who brews can appreciate time-saving features that shorten your brew day!
The temperature sensor for the controller is at the bottom of the unit. This makes it prone to reading differently than the average mash temperature, and I actually found it reading a few degrees low (more on this later). However, there are drawbacks with almost anywhere you put the sensor, and this tendency to read low can be counteracted by circulating mash water/wort- either by stirring with a spoon, using a pitcher and the built-in spigot, or hooking up a wort pump and a length of hose.
Hands on Trials
The more years that I brew, some parts of my beer-making process get more complicated and need more equipment, and others I strive to simplify. Water salt additions and multi-step mash temperature profiles- count me in. Brewing equipment that’s complicated to clean, or requires extra trips of hauling stuff to my brew area- you’re killing me. The M&B fits within this “brewing profile” nicely. The simplicity of the whole brew session being contained in one piece of equipment is great- both when it comes to number of trips lugging stuff around and to the clean-up at the end.
I did run into 2 problems during my brew trials. One I was able to overcome with some research/trials, and the other was a user-induced error that I plan to not make again. First I’ll cover the user error. One brew session I was plagued by an ER4 error code that shut me down by kicking off the heating elements and not letting them come back on. One of the reasons the temperature sensor is on the bottom is to avoid someone leaving their heating elements on but with the unit dry. I wasn’t running dry, but I did spill some grains out of the malt tube during my mash. These ended up getting stuck at the bottom and scorching there (since that’s where the heating element is). This created a local hotspot that the sensor picked up on and shut down the coils. I had to transfer the batch to another vessel to finish it off, but that error wouldn’t clear until I cleaned up my mess. So I learned a valuable lesson to be careful with my grains during mash.
The other issue I had that I was able to overcome was also related to the temperature sensor being on the bottom. During my first brew session, I monitored the temperature of my strike water and mash with my own thermometer and compared to the LED readout on the controller. I found the LED was reading 3 – 5 degrees low. For me, a digital read-out and the ability to set the temperature on the controller meant just that- I wanted to control the temperature to the degree of accuracy shown on the LED.
I did some temperature trials simulating heating strike water, both in a smaller volume and larger volume, representing a 2.5 gallon batch and a 5 gallon batch of beer. I found the same temperature error high like I did on my brew day, so I went about collecting data at different temperature points, to make a temperature adjustment line. Knowing that there can be significant temperature variations in standing water, I stirred it up well while I was taking readings with my manual thermometer. I found that just by doing this, I was able to keep the water circulating by the temperature sensor in the bottom and the LED readout came in to match my thermometer within 1-2 degrees.
So I concluded I could either use my adjustment line to just set my controller lower by the 3 – 5 degrees, or I could circulate the water. The simplest way of course is just with a mash spoon. Another is by drawing off liquid through the spigot and pouring it in up top. Since I own a wort pump, I tried a 3rd method, which was to hook up my pump to the spigot with a length of high-temp hose, and then send the output in on top of the grain bed. The pump worked pretty slick for me and I plan to go that route next time. Since I already use a pump when I use my counterflow chiller at end of brew day, it doesn’t increase my burden of either stuff to clean or stuff to haul around.
 3.8 Gallon Strike Water Trial
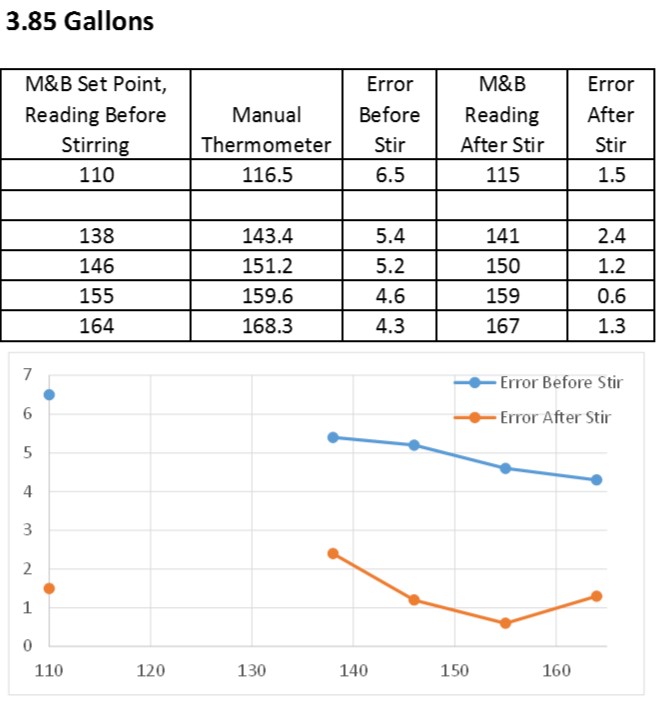 3.85 Gallon Strike Water Trial
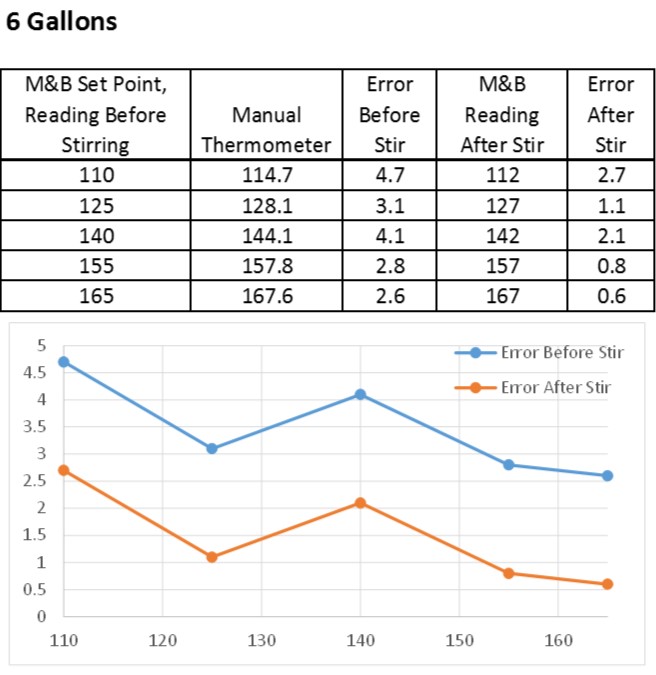 6 Gallon Strike Water Trial

Conclusions
My overall impression of the M&B is that it is a great unit. At the price point of $300, you literally can’t beat it with what’s on the market today. And although the creator (Bill Moore) told me that it was targeted to the new brewer to make an affordable entry step to all-grain brewing, I think they’ve got something with a much broader appeal. It definitely hits the mark for new brewers to go all-grain without buying extra kettles, coolers, false bottoms, etc. But this unit is great even for more advanced brewers that want to apply their extra resources to fiddling with mash pH rather than extra hours being a dishwasher at the end of their brew day.
Compare Prices:
- Mash and Boil at William’s Brewing
- Brewer’s Edge Mash and Boil affiliate link, note that multiple variations of this product may be available, as such a different version may appear at this link
- Brewers Edge Brewer’s Edge SERIES 2 MASH AND BOIL With Pump V2 Programmable Electric All-In-One Brewing Kettle 110V affiliate link, note that multiple variations of this product may be available, as such a different version may appear at this link
- Brewer’s Edge Series 2 Mash & Boil With Pump – Adventures in Homebrewing
- Brewer’s Edge Mash & Boil with Pump Series 2 – Austin Homebrew Supply
- Search Amazon for “Brewer’s Edge Mash and Boil” – offerings vary
Note that different versions may be available and that features and specifications may vary
More Homebrew Finds!
- Last 50 Finds!
- Top Deals – a curated list of the best deals
- Homebrew Reviews – one of the largest libraries of homebrew reviews in existence!
- Our Top Posts – tips, how-tos, resources posts and more
- Let’s be Friends!
Recent Deals!

10 Most Recent Homebrew Resource Posts & How-To’s!

We are Homebrew Review HQ! Our 10 Most Recent Reviews

This post may contain affiliate links. We may make a commission when you use our links. This will never cost you extra. Thank you for supporting Homebrew Finds!
Check out Brad’s website – beersnobby.com
Thank you to BrewCraft USA for generously providing a unit for evaluation.
Note that this is a review of version 1. Features and specifications may vary on other models.
Price, promotions and availability can change quickly. Check the product page for current price, description and availability. tag:lnksfxd review:bpmandboil rs:7 tag:tpr
I wasn’t sure if you knew that there is a reset button located on the bottom of the M&B. The unit will not reset until it has cooled below the pre-set safety limit, but you do not have to let it get to room temperature. That being said, it is extremely dangerous to try and get to the button when there is any hot liquid in the vessel. Best practice is to drain off you wort or hot liquor to a temperature safe vessel (pot) before cleaning the inside bottom of the M&B to resolve the overheating and then resetting with the underside button. (Or you could have your friend Mongo hold the entire M&B in the air while you grope for the button underneath. Again, this is not recommended.) I hope this saves someone some time, but please be safe.
Enjoyed your article, thanks
How long does it take to reach mash temp and boil?
It of course varies based on how much liquid you’re heating up, and I’m typically trying something different about every batch. But I get about 1 – 1.5 degrees F/minute.
I bought a Mash and Boil and experienced the same issues with temperature fluctuation, the error code and so on.
I overcame the temperature issue by double-checking the mash temp with a separate thermometer probe, and by stirring the mash every 15 minutes or so. I also TURN OFF the unit while mashing, as it does sometime kick in the heating coil due to arbitrarily low temperature readings, though the actual mash temp had held steady. I turn it on when I’m ready to heat up to mash-out temp (168F).
In regards to the dinky valve and no pick up tube, I removed the original and put in a regular SS valve with male camlock fitting and a diptube on the inside. Works great.
In regards to the grain spillover, mash efficiency, and such with teh malt pipe – I lined the malt pipe with a fine mesh BIAB bag. This prevent spillover of grain out of the malt pipe and into the larger pot. It also allows me to continue milling very fine and achieving 84-86% mash efficiency consistently.
My bigger concern with this unit is the metal quality. Of 6 batches, 2 came out with very strong iron and metallic flavors… ended up dumping the keg. All else in my brewing set up was equal except for the M&B unit. The M&B has also started forming a gray metallic slime/coating on the bottom surface and only during the boil (where the heater coil is on for long periods of time). I can clean it off, but never entirely. I’m thinking this is happening due to bad or questionable metal quality (ie not really stainless steel) of the pot. I use carbon filtered tap water, neither particularly hard or soft, doing minor water adjustments with salts, use only stainless steel parts throughout the brewery, and keep all items clean and sanitized.
Due to the metal issue, I stopped using the M&B for full brew day and went back to my 16 gal Spike SS kettle for all BIAB. I do however use the M&B to heat up strike water. The night before brew day, I set the controller to whatever temp my mash in calls for and then pump in to my Spike kettle first thing in the morning. This is super convenient as I can get started brewing without waiting for water to heat up. Curiously, using the M&B as a hot liquor tank results in no metallic flavors.. go figure.
I just did my first all-grain brew with the Mash and Boil. I’m wondering whether since the Grain tube is smaller diameter than the unit. The amount of strike water should be increased. I didn’t get the utilization from the grain that I have come to expect.
I should note I usually brew bigger batches but I work away from home and this unit was purchased so I could do all-grain in an apartment at the client’s location. I did notice too that the LED readout was all over the place when the mash was running swinging between 148-169 at one point. I’m thinking I need to have a thermometer to run down into the mash.
Comments would be appreciated
I don’t know what efficiencies you’re used to on your other system, but I get around 70 – 73% with the Mash & Boil. That said, I do hook up a pump to recirculate the wort during mash. I don’t know if that adds to the efficiency or not, but I do it because of the temperature sensor effect I saw. If I wasn’t moving the fluid, the temperature sensor wouldn’t read accurately (as gauged by a manual thermometer I was sticking in the mash to compare to).
You can/should definitely use another thermometer just to get a feel for what’s going on. I launched into my temperature experiment after seeing the big temperature swings similar to what you note. I was skeptical because I knew I didn’t loose that much temperature in a mash sitting in a single-wall mash kettle when I was still doing 3-vessel brewing with a false bottom in my kettle for a mash tun. The double-wall should’ve performed even better. It’s easy to see why the temperature sensor can get big swings, as it’s on the floor of the vessel, close to the heating elements. Without forced circulation (via an external pump), you’ll get some natural convection (wort flowing from hot to cold areas just based on temperature difference). But you’ll have a micro-climate, and the controller logic has to be tuned to not react right away, otherwise it would be constantly switching on & off, which would wear out the electronics.
I did wort recirculation with the Mark II wort pump (Williams carries this) and that worked fine with some thick-walled high temp hose + hose clamps. What worked even better was the Blichmann Riptide pump as it has a built-in flow control valve, so you can tune the volume of your recirc, and it’s mighty powerful to handle whatever challenges you send its way.
Brad, thanks for this helpful review (and the one on the Robobrew unit as well.) I’ve been an all grain brewer for 30 years using 15 gallon half barrels (yep, bought ’em from a brewery) and with so many years experience can really nail all the targets I want to hit. That said, I’m really intrigued by a simpler process that doesn’t require propane and so much manual temp checking.
The Robobrew and Mash and Boil seem pretty simpler with the exception of Robo’s pump and extra filters. Given I don’t recirculate my mash now but am able to keep the mash temp steady through good insulation, I’m thinking the pump isn’t really necessary… I would love your thoughts on a couple questions:
1. Sounds like you are able to hit and keep your desired mash temp by accounting for the temp probe location and perhaps one good stir halfway through the mash. Is that correct?
2. It sounds like you really appreciated the extra filters provided by Robo. However, if one recirculates after the mash and uses a good hop container/spider this would seem to be less of an issue?
3. It also sounds like you felt the Mash and Boil was a bit more sturdy/better made? Would you be willing to recommend one over the other?
Lastly, I hope you don’t mind I tweeted you a question…I didn’t realize I had this way to leave you a reply/question. Great website, too.
Really lastly, I grew up in the Detroit area myself…
Yay Detroit! Good questions.
1. Yes, I was able to maintain the set point temperature quite well. The Robobrew automation/control worked really well and held things very steady. It was smart enough to know to just turn on the low power heating element to avoid overshoots and big temperature swings.
2. A hop spider would serve the same function as the false bottom in the Robobrew, I do agree with that in theory. I’ve never used a hop spider, but assuming you have the same surface area and similar hole size, that should do it. I had issues with the Grainfather when it came time to chill the wort and recirculating in the kettle clogged the filter good. I know folks have gotten around this with a good whirlpool stir before chilling the wort. The crew at Keg King said they studied the Grainfather a lot to try to determine weaknesses and where to improve. The false bottom was one thing they specifically did for this issue.
3. There are pros & cons to each system, so it’s difficult to give a blanket statement of recommending one over the other. There’s the obvious difference of price. If you can only afford the M&B, don’t sweat it. It’s a good unit and well built, it will do you well. For the extra money, the Robobrew brings with it very impressive temperature holding capability while recirculating the mash, and the convenience of the pump being part of the brew kettle. You might argue that the need for temperature control isn’t as critical with the M&B as it has the double wall, which is true. But there’s something reassuring about seeing that temperature stay rock steady.
Hombrew Finds recently alerted me to a deal on this unit. I bought it and first brewed an extract kit in it. I dumped the crushed grains from the kit directly into the malt tube instead of using the provided sock. It was during this brewing that I realized I could not use a screen tube on the inside of the pot, attached to the valve as I had been doing on my previous pot. To compensate, I used a Bouncer and a Bouncer HD filters in series, first the HD with a coarse screen, followed by the smaller Bouncer with a fine screen. This seemed to work well. A few days later I brewed an all grain French Saison, using 11 lbs of grain. What a great brew day! The temperature set and holding capability really is great. I heated water in a separate pot to gravity feed through a Fermentap Sparge Arm placed on top of the malt tube when I lifted it out. Once the malt tube is removed I hung my hop basket and began the boil. Compared to my previous propane gas method, this day seemed much less stressful. I highly recommend this unit, and you can’t beat the price.