
How-To: iSpindel Brew Temperature Control – Using Smart Life, IFTTT and Ubidots!
Thank to you Neil Catley for this write up! Neil assembles iSpindel hydromters and sells them via eBay
The iSpindel is a DIY Wi-Fi enabled hydrometer. The project originated in Germany, but an English translation is available. See: iSpindel Documentation
Learn More about iSpindel!
Hands on Review: iSpindel Digital WiFi Hydrometer!
Compare iSpindel to TILT
Our iSpindel Review has some thoughts comparing iSpindel and TILT
iSpindel/RAPT Pill/Tilt
- Hands on Review: iSpindel Digital WiFi Hydrometer!
- Hands on Review: Tilt Bluetooth Fermentation Hydrometer!
- RAPT Pill Digital Hydrometer from Kegland
- TILT and iSpindel work with Brewfather App! Sign up for a free trial! – check out our Hands on Review of Brewfather
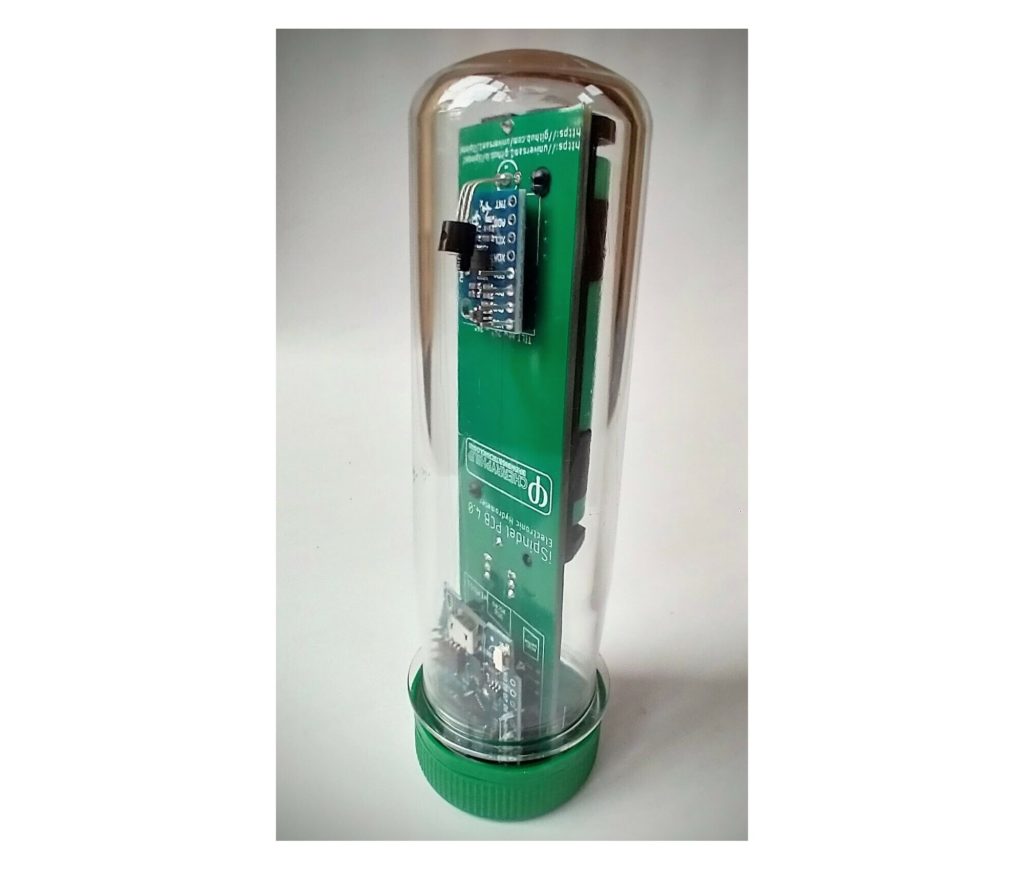
Pre-Built iSpindel
As mentioned previously. the iSpindel is a DIY build. However, it seems that some people are building these and selling them on eBay. The pictured iSpindel is one such option.
iSpindel WiFi Hydrometer << This shows all seller’s items in case this ends and is re-listed
If that offering has sold out or is otherwise, unavailable… search eBay for iSpindel
Related: Search Amazon for “Smart Life Plug”
iSpindel Brew Temperature Control – Using Smart Life, IFTTT and Ubidots
by Neil Catley
Note that these are technical, step by step directions. Specific steps may change over time. Make sure the components you use are compatible and rated for your intended application. Contact manufacturer with questions about suitability or a specific application. Always read and follow manufacturer directions.
Overview
This guide will help you set-up online tools to enable fermentation temperature control using your iSpindel. I find this one of the main benefits of having the device, especially in the cold UK winters when I have a brew going in the garage
Required:
- iSpindel
- Ubidots account (free)
- IFTTT account (free)
- Smart plug/device that uses the (free!) Smart Life app (I use a cheap plug from amazon @<£10)
- Mains powered brewing heat pad, heat collar etc for the brew
- Some basic IT skills – but its REALLY simple if you follow along…
- A celebration beer once you’re done!
- We’ll jump about between tools a little to get things set up in the right order. You can do this using smartphone apps, but through a web browser can make things easier
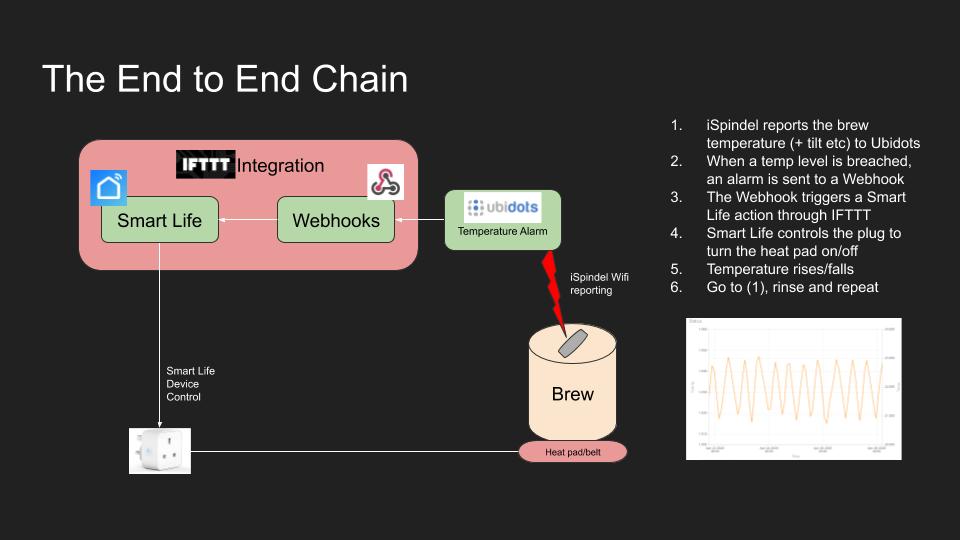
The End to End Chain
Ubidots Part 1
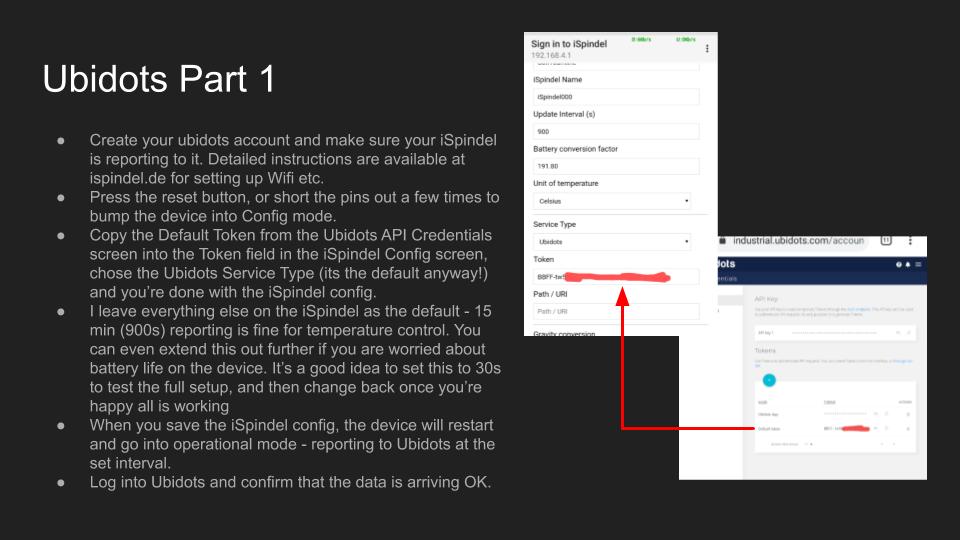
- Create your ubidots account and make sure your iSpindel is reporting to it. Detailed instructions are available at ispindel.de for setting up Wifi etc.
- Press the reset button, or short the pins out a few times to bump the device into Config mode.
- Copy the Default Token from the Ubidots API Credentials screen into the Token field in the iSpindel Config screen, chose the Ubidots Service Type (its the default anyway!) and you’re done with the iSpindel config.
- I leave everything else on the iSpindel as the default – 15 min (900s) reporting is fine for temperature control. You can even extend this out further if you are worried about battery life on the device. It’s a good idea to set this to 30s to test the full setup, and then change back once you’re happy all is working
- When you save the iSpindel config, the device will restart and go into operational mode – reporting to Ubidots at the set interval.
- Log into Ubidots and confirm that the data is arriving OK.
Smart Life

- Smart Life seems to be the tool that the majority of ‘generic’ smart plugs use for control. I use a cheap plug from amazon that cost about £10, and now have about 5 of them in the house for various things! Just make sure it’s one that supports Smart Life (and likely Google, Alexa etc too as they all work through Smart Life integration)
- I hear that the Ink Bird Wifi controller also uses Smart Life – but don’t blame me if that’s wrong, as I don’t have one to test with!
- Follow the Smart Life instructions to connect up your plug and create the device in the app.
- Test the device using the app to ensure you can operate it over the network
IFTTT – Smart Life
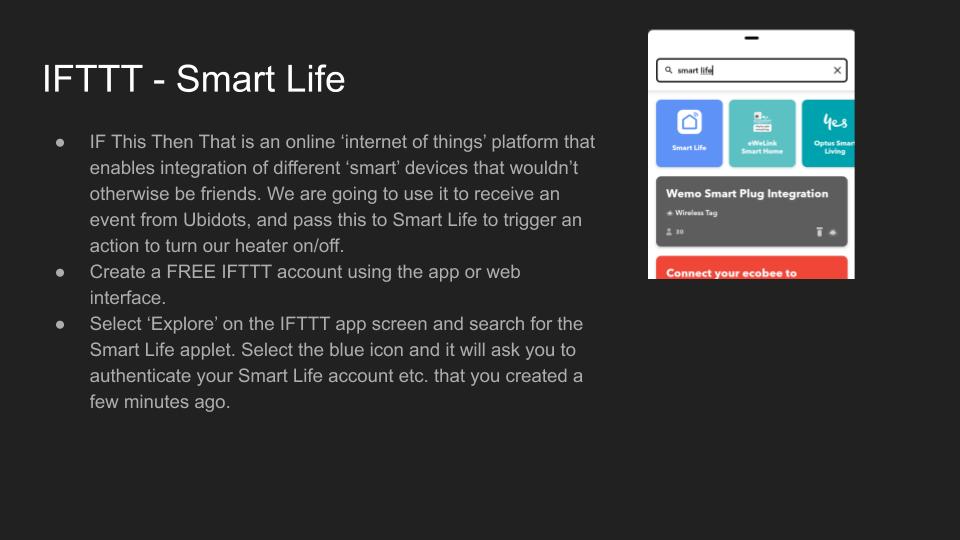
- IF This Then That is an online ‘internet of things’ platform that enables integration of different ‘smart’ devices that wouldn’t otherwise be friends. We are going to use it to receive an event from Ubidots, and pass this to Smart Life to trigger an action to turn our heater on/off.
- Create a FREE IFTTT account using the app or web interface.
- Select ‘Explore’ on the IFTTT app screen and search for the Smart Life applet. Select the blue icon and it will ask you to authenticate your Smart Life account etc. that you created a few minutes ago.
IFTTT – Webhooks & Smart Life
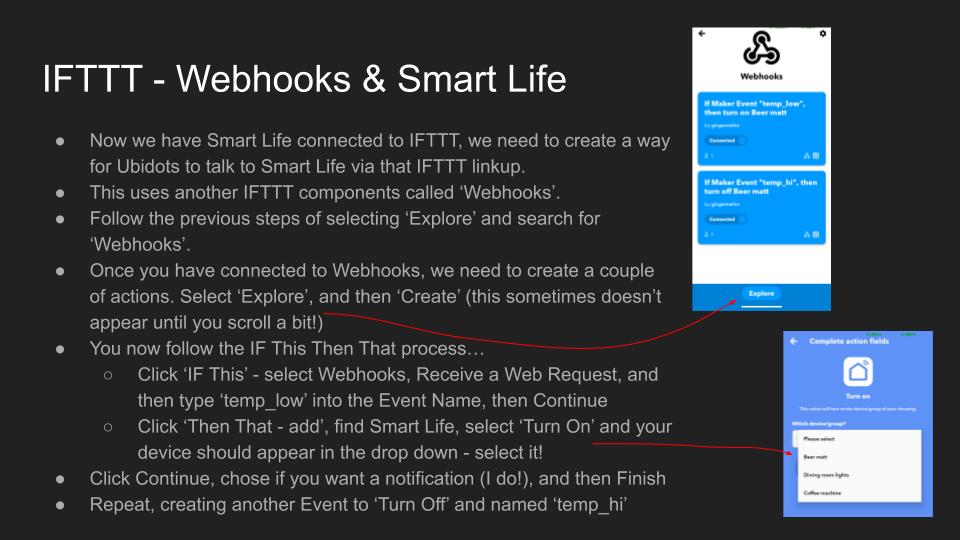
- Now we have Smart Life connected to IFTTT, we need to create a way for Ubidots to talk to Smart Life via that IFTTT linkup.
- This uses another IFTTT components called ‘Webhooks’.
- Follow the previous steps of selecting ‘Explore’ and search for ‘Webhooks’.
- Once you have connected to Webhooks, we need to create a couple of actions. Select ‘Explore’, and then ‘Create’ (this sometimes doesn’t appear until you scroll a bit!)
- You now follow the IF This Then That process…
- Click ‘IF This’ – select Webhooks, Receive a Web Request, and then type ‘temp_low’ into the Event Name, then Continue
- Click ‘Then That – add’, find Smart Life, select ‘Turn On’ and your device should appear in the drop down – select it!
- Click Continue, chose if you want a notification (I do!), and then Finish
Repeat, creating another Event to ‘Turn Off’ and named ‘temp_hi’
IFTTT – Ubidots

- Now we have IFTTT connected to Webhooks and two Webhooks created to talk to Smart Life (one to turn on, one to turn off)… we now need to create Ubidot events to fire at the right temps to turn our plug on/ff.
- Go back to the IFTTT start screen, select your email address from the the top right, then My Services, Webhooks. The screen on the right will show.
- Select the ‘cog’ at the top right, and then select the ‘user_url’. This will take you to a web page with the details we need for Ubidots.
- This is far easier than it looks… we will configure an Ubidots alarm that sends a message to the internet address shown. Copy the ‘https://blahblahblah’ bit – all of it. This is the bit thats often easier using a browser. The bit I have blanked out is your unique service key
- The rest is done in Ubidots….
Ubidots Events
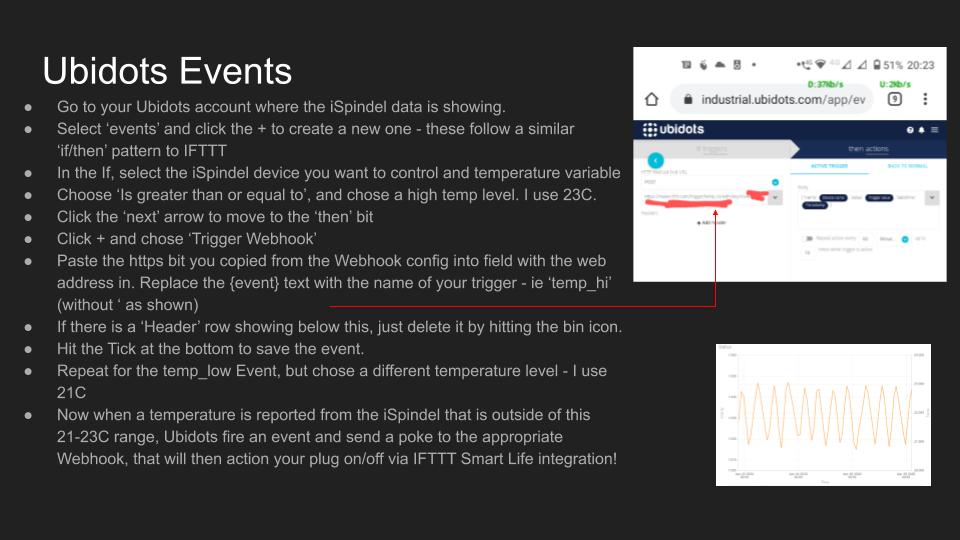
- Go to your Ubidots account where the iSpindel data is showing.
- Select ‘events’ and click the + to create a new one – these follow a similar ‘if/then’ pattern to IFTTT
- In the If, select the iSpindel device you want to control and temperature variable
- Choose ‘Is greater than or equal to’, and chose a high temp level. I use 23C.
- Click the ‘next’ arrow to move to the ‘then’ bit
- Click + and chose ‘Trigger Webhook’
- Paste the https bit you copied from the Webhook config into field with the web address in. Replace the {event} text with the name of your trigger – ie ‘temp_hi’ (without ‘ as shown)
- If there is a ‘Header’ row showing below this, just delete it by hitting the bin icon.
- Hit the Tick at the bottom to save the event.
- Repeat for the temp_low Event, but chose a different temperature level – I use 21C
- Now when a temperature is reported from the iSpindel that is outside of this 21-23C range, Ubidots fire an event and send a poke to the appropriate Webhook, that will then action your plug on/off via IFTTT Smart Life integration!
Wrap Up
- That’s it!
- You’ll get an IFTTT smartphone notification (assuming you chose that option) when your plug goes on or off.
- Follow the steps – it’s easier than it looks!
I use an Android smartphone and apps, but all of this can be done using a standard web browser. It’s often easier to cut and paste between screens that way, and you can have all the tools open at once. - TOP TIP! I also create 2 more events as ‘safety nets’. A temp_hi at 24C and a temp_low at 20C, just in case something goes wrong and the first is missed. You can tighten this to 20.9/23.1C if you like – or just not bother.
- Ubidots Events are really handy – for example I have an email event trigger when the battery drops to a low level. If the iSpindel battery dies, then obviously the data reporting does too. That means there is a risk that the heat pad doesn’t get turned off when the actual brew temp rises back over the temp_hi level. I use the battery alarm to ensure keep an eye on the brew manually, or fish out the device and recharge it! If you find the battery is running out, extend the reporting to 900+ seconds. You really don’t need data every 10 mins to make this all work!
- Happy brewing – and welcome to Smart Control!
- There is no reason to limit this to brewing! I have a spare iSpindel in my outside office (ie shed!) triggering my little heater on/off using EXACTLY the same process!
Note that these are technical, step by step directions. Specific steps may change over time. Make sure the components you use are compatible and rated for your intended application. Contact manufacturer with questions about suitability or a specific application. Always read and follow manufacturer directions.
TILT Hands on Review!
iSpindel Review!
https://www.homebrewfinds.com/2023/03/hands-on-review-ispindel-digital-wifi-hydrometer.html
More Homebrew Finds!
pinnedThis post may contain affiliate links. We may make a commission when you use our links. This will never cost you extra. Thank you for supporting Homebrew Finds!
greatdealsHomebrew Finds makes no representations as to accuracy, completeness, currentness, suitability, or validity of any information in this article and will not be liable for any errors, or omissions in this information or any losses, injuries, or damages arising from its display or use. All information is provided on an as-is basis. To use Homebrew Finds you must be 21 years or older. tag:tpr toppost:ispindelifttt