
The Steam Slayer from Brew Hardware – Kettle Steam Condenser Assembly – eliminates need to vent from your brewing room
The Steam Slayer via Brew Hardware is designed to eliminate the need to vent steam from your brewing room.
More InfoFrom the product description, check product page for current description, price and availability:
The Steam Slayer(tm) is a brand new product that eliminates the need to vent steam from your brewing room. More and more people are converting over to electric brewing systems allowing brewing indoors and even in quite confined spaces. The rude awakening occurs when you evaporate a gallon or more water into the air and your walls and ceiling drips with condensation. In some cases it is impossible or unreasonable to install fan-based exhaust systems to vent that steam. Enter the Steam Slayer!
Condensing boil steam is a relatively common practice in large scale industry and some breweries. Homebrewtalk.com user “Brundog” did a lot of experimentation and documentation and many folks built clone systems in turn. When it came time to install one on the shop brewing kettle, we couldn’t leave well enough alone with off the shelf parts.
How It Works:
You will install a 1.5″ TC port in the upper sidewall of your electric powered boil kettle, typically as high as you can get it without interfering with the closure of the kettle’s lid. The unit is equipped with a fine mist sprayer that fits inside the main body and is fed with cold tap water. When you reach a boil in your kettle, you will put the lid on and start the flow of cold water into the unit. Steam will enter the tee and encounter the spray turning the steam back into water. The waste water runs out the bottom of the unit into the included silicone hose which you will position over a catch bucket. Depending on your tap water pressure, and the selected sprayer option, you will typically consume 6-10 gallons of water in a 60 minute boil. This water can be discarded or saved for cleaning your equipment afterwards.
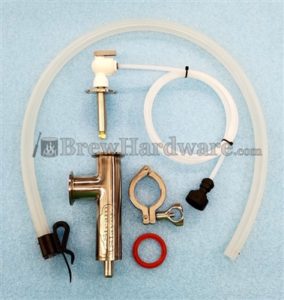
What’s Included:
- Main Body Tee with 1.5″ TC top and side flanges and welded 5/8″ hose barb on the bottom.
- 1.5″ TC sprayer adapter with your choice of 6 or 9 gallon per hour sprayer tip. The GPH ratings are at 40 PSI. We find the 6GPM works great on 45 PSI on a 7 gallon boil. If you have low pressure, you may need the 9GPM sprayer. If you are doing 10 or 15 gallon batches, you may need the 9 GPH. We are still trying to figure out better guidelines.
- Right angle water shut off valve with push in connection five feet of 1/4″ poly supply line (5ft is standard, select longer runs in the dropdown selection above.
- Water supply connection fitting with push in connection: Your choice of 3/4″ Female Garden Hose or In-Line faucet connection valve (select in the drop down above). More about this in the instructions below.
- 3 feet of 1/2″ ID silicone hose for waste water drain. The tubing must reach from the bottom of the steam slayer body to the TOP of your catch bucket. If you need more tubing, it can be purchased by the foot and we can combine the added length onto the standard 3′ if you direct us to.
- Hose holder clip to keep drain hose positioned at the inside top of your collection bucket.
* Note that the clamp and gasket to attach the unit to the kettle is not included, nor is the hardware to install the actual TC port in the kettle. See the list of available accessories if you need any of those parts.
Instructions:
First, keep in mind that this is a new process for small scale homebrewing and we’re all learning the best practices. When you buy this unit, consider yourself a part of a beta test. These instructions will evolve.
- Clamp the main unit to the existing kettle port and the sprayer TC to the top of the unit. The integrated hose barb should be facing down towards the floor.
- Install your water source fitting. If you selected the Garden Hose fitting, attach it to your garden hose bib, a garden hose, a slop sink faucet, or a washing machine supply port. If you selected the inline faucet supply fitting, shut off the cold water valve under your sink, remove the hose feeding your faucet and install the inline fitting. Replace the faucet hose on top and turn the water back on to check for leaks. The inline faucet fitting is shown on the right. Just below that we show where it would install under a sink or toilet.
- Connect the 1/4″ Poly line to your source water fitting and the shutoff valve on the top of the Steam Slayer. Making sure the ends are cut cleanly, simply push the tubing into the fittings all the way and install the C-shaped retaining clips.
- Install the silicone waste tubing on the unit’s barb and attach the holder clip to the end. We include a 5/8″ OD stainless steel ring that should be inserted into the end of the silicone to expand the tubing large enough to fit the holder clip tightly. The waste tubing should be trimmed so that it only extends into your catch bucket/vessel by 1-2 inches. The open end of this tubing must never be submergedor the steam slayer will not work properly.
- Once your boil begins, turn on the cooling water and place your kettle lid on the kettle. Since the condensing action creates a mild vacuum, the lid does not need a gasket. If you notice steam leaking out of the lid, make sure it is not warped creating extra spaces.
- Adjust your boil intensity to approximately HALF of what you’re used to using and plan for about half as much boil off. For a typical example, we used to run our 5500 watt element at 65% when the kettle is full of 7 gallons and the lid off. We experienced 1.5 gallons per hour of boil off. With the Steam Slayer installed, we run at 32% and experience .75 gallons of boil off per hour. In other words, to use the Steam Slayer, your electric kettle must be equipped with a power controller.
Frequently Asked Questions:
1. Can I go through the lid?
Yes. In order to through the lid, you will need to install a 1.5″ TC port towards the edge and then clamp on a 1.5″ TC 90 degree elbow. From there the Steam Slayer gets clamped on as noted above. You may need to place a counterweight on top of the lid, opposite the TC port to keep it firmly seated on the kettle.
2. I use the BIAB method and I’m concerned that a side mount TC port will reduce my kettle capacity.
You can put a TC blank cover over the port during the mash and then fit the Steam Slayer after you pull the grain bag.
3. How do I run the hot waste water directly to a plumbing drain.
We don’t know for sure. We do know that you want the water to freely drain out. Even in cases where the output hose bends into a loop where water collects in the hose is enough to stop the vacuum on the kettle. You may get steam to escape via the lid if there is any back pressure on the drain hose. If your sewer pipe is well below your brewing location, you can run a horizontal drain line over to the kettle, install a P-trap and then end in an oversized vertical entrance pipe. Treat this like the catch bucket and run the silicone drain hose to it using the holder clip to hold it to the upper lip of the pipe.
About, from Brew Hardware: “Sometimes we have a grand plan for a given fitting. This time we’re just spit balling to see what sticks. We took the profile of a ball lock keg post and replaced the poppit and spring with just two large bored out holes. The other end is a generous 3/8″ OD hose barb that will work with 3/8′ ID silicone, 5/16″ Racking tubing, or whatever.”
- Since Brew Hardware introduced this, availability has been an issue.
- We keep a close eye on the Steam Slayer. If it’s sold out again – connect with us – and we’ll give you a heads up when it’s back.
STEAM SLAYER – KETTLE BOIL STEAM CONDENSER ASSEMBLY
More: Recent Great Deals
Make sure the components you use are compatible and rated for your intended application. Contact manufacturer with questions about suitability or a specific application. Always read and follow manufacturer directions. prod:bwsslay