
Hands on Review: Brewers Hardware The Dry Hopper!
This review is by Homebrew Finds Contributor Brad Probert. Brad is an engineer, expert homebrewer and experienced reviewer. Grab a link to Brad’s website at the end of this review.
Brewers Hardware Dry Hopper
Dry hops. Homebrewers debate their favorite dry hop, how to calculate their IBU contribution, and when is the best time to add dry hops. While many love them, the technical challenge of adding them “right” is a hefty one. Whether you’ve heard of hop creep, or tasted an oxidized IPA, you are interested in minimizing the introduction of oxygen to your beer when you add dry hops.
This article contains affiliate links. We may make a small percentage if you use our links to make a purchase. You won’t pay more and you’ll be supporting Homebrew Finds and more content like this. Thank you for your support!
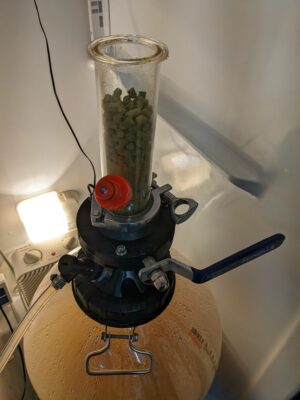
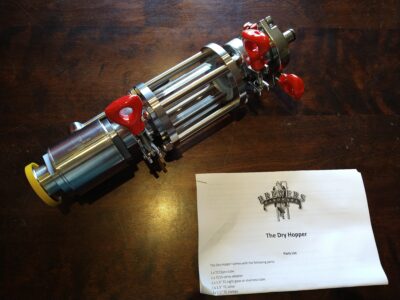 Dry Hopper Assembly
If you add oxygen to your beer at the tail end of fermentation, you can spur your yeast on to keep going. When they would otherwise be content to be finished, the addition of oxygen gets them going, converting more sugars. The result is a lower FG, and a highly attenuated beer. And if you introduce oxygen after the yeast have officially called it quits, instead of the yeast using it up in fermentation, the oxygen is available to make oxidation compounds in your beer. These oxidation compounds are the things you taste in stale beer, and I’ve personally battled with harsh hop bitterness in IPAs when I got sloppy with oxygen intake on a finished beer.
Related: Build a Dry Hopper for Cornelius Kegs!
 Building a Dry Hopper for Corny Kegs – Dry Hop Under Pressure!
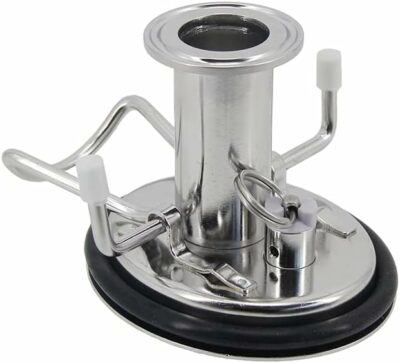
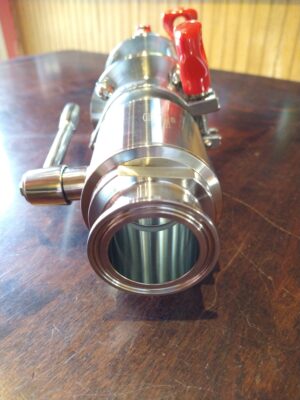 Bottom Valve and Mounting Flange
Another dry hopping challenge is how to add the hops to a beer you’re fermenting under pressure. If you’ve gone through the work to finish up fermentation with your beer under pressure, you don’t want to simply vent the pressure to add dry hops. And if you’ve ever watched pressurized beer in a fermentor drop to 0 pressure, you know the whole thing becomes a churned-up mess- totally undoing all the work of precipitating trub and yeast.


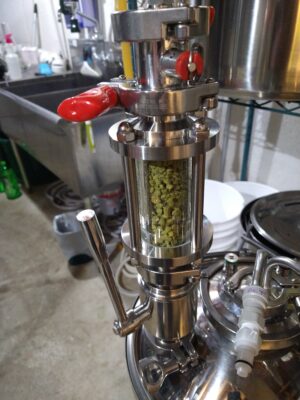
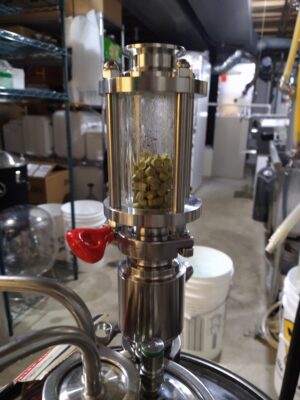
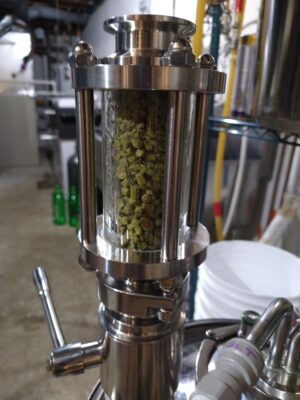
 Sight Glass Hop Chamber
Brewers Hardware came out with the Dry Hopper to specifically deal with these challenges. The Dry Hopper attaches to a Tri Clover flange on your lid. There are two sizes- one for a 1.5” TC port, and one for 3” TC port. Both designs contain the same 3 elements- a valve at the bottom that mates to the lid of your fermentor, a tube in the middle to hold the hops, and a fixture on top with a gas ball lock port and a PRV valve. The 3” TC version is larger and holds more dry hops (14 oz) than the 1.5” TC version (4 oz).
Related: Fermenting Under Pressure
Related: Kegland’s Hop Bong!
 Hands on Review: Kegland Hop Bong
Related: Tri Clamp Cornelius Keg Lid
304 stainless steel Cornelius Keg Lid with 1.5″ Tri-clamp Ferrule,NEW Corny Beer Keg Lid 60PSI PRV Food Grade Dry Hopper – affiliate link, note that multiple variations of this product may be available, as such a different version may appear at this link
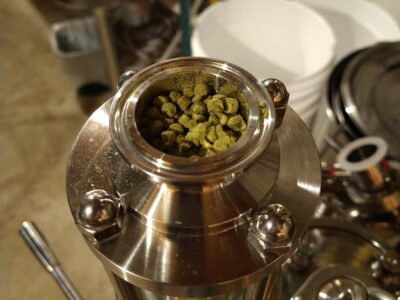
 2 Ounces of Dry Hops
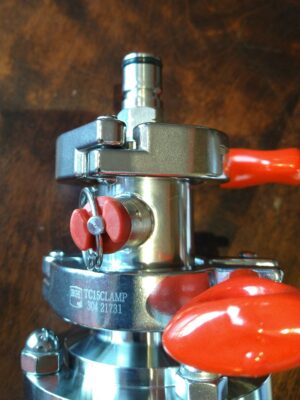 Pressurized Top
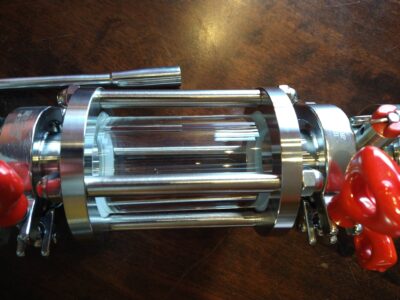
Another difference is the 3” TC version uses a butterfly valve at the bottom, whereas the 1.5” TC version has an option of either a Standard Ball Valve or a Hybrid Ball Valve. The Hybrid Ball Valve design is different in how the ball is sealed, which eliminates the pocket that can trap liquid like a typical ball valve. This also makes a difference in the overall height of the Dry Hopper, with the standard ball valve unit measuring 14.25” from mounting flange to top of gas post (15.5” with gas disconnect attached), and the hybrid about 2” shorter. The final option available to both is whether you want a solid stainless tube to hold the hops, or a clear sight glass. The sight glass option costs more, but with the potential of hop pellets to get stuck in the tube, it really seems like you want to see in there without having to depressurize the Dry Hopper and open the top to look in.
 4 Ounces of Hops
This is the process for how you use it. With the valve closed, you put your hops into the tube, and put the pressure top on it. Using your CO2 tank, you attach a gas disconnect and pressurize the tube. With the PRV valve, you can vent the air/CO2 mix, and repeat the cycle of adding CO2 and purging several times to evacuate most of the air out of your hop charge. You then adjust the pressure of your fermentor or Dry Hopper accordingly, so the Dry Hopper is at a higher pressure than the fermentor to help the hops drop in. The Dry Hopper is pressure rated to 15 psi. If you have more than one dry hop charge, you close the valve, vent the pressure out of the hopper with the PRV, then you can fill the tube and repeat the cycle again.


Hands on Review
I have a BrewBuilt X1 conical – Review – that has TC flanges on the lid. Although I have the Uni+ model, which has the collection chamber at the bottom that can also be used to add dry hops, it can be tricky to get the chamber removed without making at least a small mess. With the 7-gallon X1, there are multiple TC port options in the lid, but the 1.5” TC flange for the blowoff tube was the most convenient to attach the Dry Hopper to. I used the 1.5” TC version with the standard ball valve. I trialed the Dry Hopper on two batches that had dry hop additions.
 Dry Hopper Filled and CO2 Charged – Related: Hands on Review BrewBuilt X1 Conical


The first trial was on an Amber Ale that had a whopping 8 ounces of Amarillo in dry hops. I let that beer ferment most of the way with the blowoff tube attached to the lid TC, then switched over to the Dry Hopper. I attached it with the ball valve closed to let the fermentor build up a bit of pressure through the tail end of fermentation. I split the dry hops in half, but found that 4 oz filled the 1.5” TC tube fully to the top. Since the included directions advised to leave a bit of head space at the top, it’s probably more of a 3 oz hop charge holder. I filled with CO2 and purged 4x before leaving it with a bit of pressure to drop the hops. Some of the hops fell and the rest got stuck. I was able to get them to drop with tapping and bumping things a bit with my hands. I split the remainder of the hops into two more charges and these followed the same pattern.
Valve Open but Hops Not Dropping
Additional Notes, Review Continues Below:
Brewer’s Hardware recommends using the dry hopper clean and dry.
Also, via the product page: After some testing, we noticed sometimes hops can get caught after a few fall in. To help prevent that from happening we recommend not filling above the top glass gasket in the sight glass version and leaving about an 1″ of room in the stainless tube version. When pouring the hops into the sight glass or stainless tube try not to cram them in as that can cause them to jam as well.
My second trial was an IPA that had 3 different types of hops, for a total of 5 ounces. Typically, when I have different hop types, I add them in individually, with 4-8 hours in between. This is a technique I read about somewhere that supposedly helps in hop complexity and seems to have served me well. Dry hopping through the X1 collection ball with 3 different additions would be too much hassle, but the Dry Hopper worked well for that. This time when the hops didn’t want to drop, I solved the problem much easier by using my nearby crescent wrench and lightly tapping on the stainless steel body of the Dry Hopper. It worked way better than smacking it with my hand, and I highly recommend it.


One issue I encountered during my second batch was I found the Dry Hopper wasn’t holding pressure over time. After the first hop charge was dropped in, I left the ball valve open and attached my Spunding valve to the gas post on the Dry Hopper. I figured I could use the pressure venting from the hop additions to help dry out the tube. But I found my pressure bled down to zero. After the fermentation was over, I removed the Dry Hopper and submerged the whole thing pressurized in a bucket of water to find the leak. I found it was leaking from underneath the gas post. Removing the post and inspecting I didn’t find anything awry, but it still had a slow gas leak when I reassembled. I was able to make it stop finally by just torquing the gas post down super tight. A slow leak isn’t that critical, since when you’re finished dropping hops you can just close the ball valve and remove the chamber. But if you plan to use the assembly as your Spunding connection, then you should do a simple test like this of pressurizing it and putting it in a bucket of water before your first use.

Conclusions
Overall, the Dry Hopper is very well made and has a high-quality look and feel. It’s a great combination of known hardware bits to solve the challenge of how to make dry hop additions a low-oxygen affair. And if you’re a “pressure fermenter”, the ability to do both pressurized fermentation AND dry hop additions is great. The hops clinging to the side of the tube at first seemed like a big flaw, but as goofy as it sounds, tapping on the structure with a nearby tool was super simple. The Dry Hopper is not a cheap addition, but if you’re struggling to find solutions to these problems, it’s a good tool for your brewing toolbox.
Also Kegland Hop Bong
- Hop Bong Upgrade Kit for FermZilla – 2 in. FE206
- Hop Bong Pressure Pack for FermZilla – 2 in. FE205
- All Hop Bong Options & Accessories
- All FermZilla Fermenters & Accessories
- Hands on Review: Kegland Hop Bong
Related: Build a Dry Hopper for Cornelius Kegs!
Building a Dry Hopper for Corny Kegs – Dry Hop Under Pressure!
Related: Tri Clamp Cornelius Keg Lid
304 stainless steel Cornelius Keg Lid with 1.5″ Tri-clamp Ferrule,NEW Corny Beer Keg Lid 60PSI PRV Food Grade Dry Hopper – affiliate link, note that multiple variations of this product may be available, as such a different version may appear at this link
Related Resources & Reviews:
- Fermenting Under Pressure
- Build a Spunding Valve! – How and Why
- Hands on Review: BrewBuilt X1 Uni+ Conical Fermenter
- Brewers Hardware 1.5″ Dry Hopper User Guide & Instructions
- The Dry Hopper Instructions
Our Spunding Valve Resource Post!

Get A Deal on Hops to Put in Your Dry Hopper!

More Homebrew Finds!
- Last 50 Finds!
- Top Deals – a curated list of the best deals
- Homebrew Reviews – one of the largest libraries of homebrew reviews in existence!
- Our Top Posts – tips, how-tos, resources posts and more
- Let’s be Friends!
Recent Deals!

10 Most Recent Homebrew Resource Posts & How-To’s!

We are Homebrew Review HQ! Our 10 Most Recent Reviews

This post may contain affiliate links. We may make a commission when you use our links. This will never cost you extra. Thank you for supporting Homebrew Finds!
Special Thanks to Brewers Hardware for providing the unit used for evaluation in this review.
By Brad Probert. Check out Brad’s website – beersnobby.com
Make sure the components you use are compatible and rated for your intended application. Contact manufacturer with questions about suitability or a specific application. Always read and follow manufacturer directions.
Price, promotions and availability can change quickly. Check the product page for current price, description and availability. dry hoppper 1.5 dry hopper 3 tag:lnksfxd review:bhdryhopper tag:tpru