
Using a Tire Inflator To Check for Keg Leaks
I see two primary ways to check for keg CO2 leaks
- Soak everything with Star San and look for bubbles
- and… the Pressure Gauge Method
I’ve been a big proponent of the Pressure Gauge Method and, to my knowledge, coined the term and made the original case for this technique. In practice, I use both as they compliment each other.
This post outlines a modified version of the Pressure Gauge Method using DeWalt’s DCC020IB Cordless Tire Inflator. I’m a fan of DeWalt’s 20V Max Lineup of Tools. Looking around for 20V MAX compatible equipment, I ran into the DCC020IB Cordless Tire Inflator. Note that this post outlines something I have personally done. I am not recommending that you do it. See the end of this post additional disclaimers.
Why the Pressure Gauge Method?
The main benefit of The Pressure Gauge Method is it’s ability to check a certain problem spot. Secondarily, it’s less messy than the “soak everything with Star San” approach.
A problem spot. There is one place on the CO2 side that the soak-everything-with-Star-San method doesn’t really work…. the keg’s gas post. Testing at this point using the spray bottle method is impossible (or at the very least difficult and messy). Unless your poppet is messed up, leaks will only surface here when a gas QD is actually engaged. The problem is, you can’t easily see that spot when a QD on. Stated more simply, you need a QD on to see if it’s leaking, but you can’t see it if a QD is on.
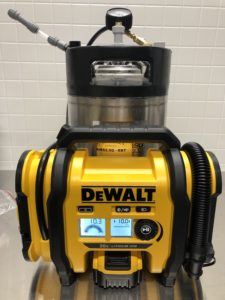
A Quick Look at DeWalt’s DEWALT 20V MAX Cordless Tire Inflator DCC020IB
 The left screen shows current pressure the right screen shows set pressure. The dial allows you to set pressure and start and stop the inflator.
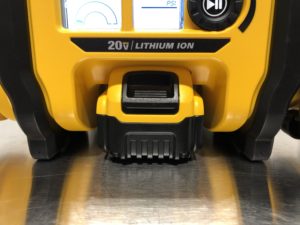 A closeup of an installed 20V MAX Lithium Ion Battery. Helping trim weeds one day and check kegs for leaks the next!
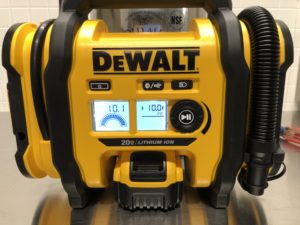
 Close up of the control panel. The scale on the left screen changes based on set pressure.
DeWalt Tire Inflator Accuracy Check
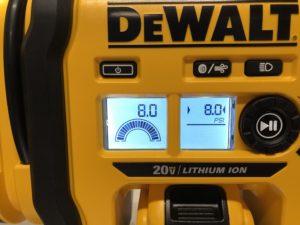
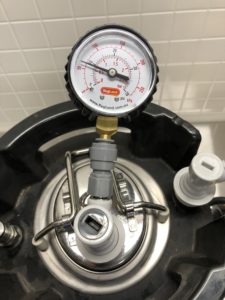 This is a pressure check using a Ball Lock Keg Carbonation Lid + DuoTight Gauge – Hands on Review: Kegland DuoTight Fittings & EVABarrier Tubing! – with the inflator set to 8 PSI. I found the DeWalt inflator’s pressure reading to be pretty well spot each time I compared the two readings.
Adding a Schrader Style Valve to a Homebrew Keg
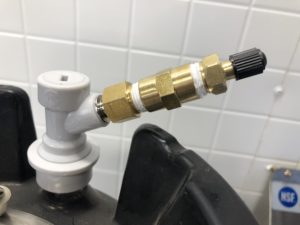 The connection that makes this possible is a Keg Coupler Schrader Valve Assembly. This is a Ball Lock setup, but it could just as easily be a Pin Lock Setup. See: Adding a Schrader Valve to a Homebrew Keg
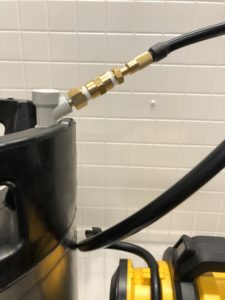 The Tire Inflator Threads on to the Keg Coupler Schrader AssemblyThe Complete Setup
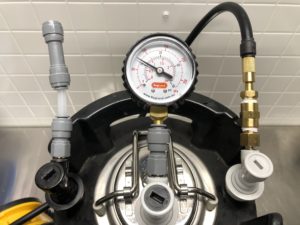 The Liquid Ball Lock QD on the left is has a DuoTight Check Valve – Hands on Review – on it oriented to stop the flow of gas. I could just as well use a DuoTight stopper or some other mechanism to stop the flow of gas. I’m using a a Ball Lock Keg Carbonation Lid + DuoTight Gauge to double check everything – this is not necessary, I’m using these components to double check pressures. On the right you’ll see the Schrader equipped Gas Ball Lock QD.
Having both QDs installed means I can check post o-rings for leaks. QDs are installed that means that o-ring is in play. The liquid side isn’t super important in my book. Leaks there are easy to see, since you’ll see… beer leaking. Having said, I have the fittings to check that, so I might as well.
What Pressure To Use?
In my opinion a valid leak test uses a pressure similar to the pressure you use in your kegerator. Pressurizing to a higher pressure may result in better seals and give you the false impression that your keg is leak free. Stated another way, a keg lid o-ring may seal really well at 30 PSI but may leak at 10 PSI
My Process for Checking for Keg Pressure Leaks Using the DeWalt Tire Inflator
- Connect the Schrader equipped QD and tire inflator to the gas side.
- Install a plugged liquid QD on the liquid side.
- Having both QDs installed means I can check post o-rings for leaks. QDs are installed that means that o-ring is in play.
- Set the Inflator to 10 PSI, or whatever equipment-compatible serving pressure I’m using.
- After set pressure is achieved, watch the left screen reading for quick changes. If the pressure drops quickly there is a leak.
- Wait for a couple hours to see if the pressure reading drops. The inflator will “go to sleep” after a certain amount of time. Powering on causes my DeWalt inflator to take a new reading.
- A small pressure change could be temperature related. What I don’t want to see is a quick or significant drop in pressure.
- This technique checks the entire keg including post o-rings… without using any CO2.
- Practically speaking, I will follow up with a Star San Spray check after filling a keg. The DeWalt tests the general condition of the keg, but in my opinion a quick spray is in order after kegging a beer.
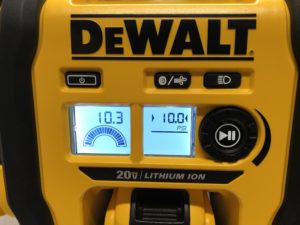 Inflator set to 10 PSI (left screen), current pressure reading 10.3 PSI (right screen). If the left screen value drops quickly or significantly over time, I have a leak.
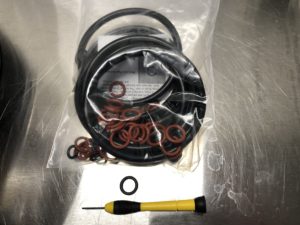 During the process of testing this, I kept losing pressure. After tightening everything, double checking and re-tightening… I was still losing pressure. At that point, I came to suspect my old foe… gas post o-ring. I put a new one on grabbed from this set… Universal O-Ring Ten Gasket Sets for Home Brew Kegs With Silicone Post O-Rings and whammo, no leaks. Since the inflator clearly shows pressure and seems to be quite accurate it makes it easy to check for leaks without wasting CO2.
Tip: Save CO2 When Using the Pressure Gauge Method
If you’re interested in using the pressure gauge method using your kegerator’s CO2 pressure and want to save CO2, fill your keg up with water. Doing so means you’ll only need to pressurize the head space of your keg.
Mentioned in This Post:
- DEWALT 20V MAX Cordless Tire Inflator, Tool Only (DCC020IB) via Amazon
- Checking for Draft System CO2 Leaks – Using The Pressure Gauge Method
- Adding a Schrader Valve to a Homebrew Keg
- Universal O-Ring Ten Gasket Sets for Home Brew Kegs With Silicone Post O-Rings via Amazon
- Hands on Review: Kegland DuoTight Fittings & EVABarrier Tubing
Closely Related:
Also: Search Amazon for dewalt 20v MAX
Important: Make sure every component in your setup is rated for the amount of pressure you decide to use.
Make sure the components you use are compatible and rated for your intended application. Contact manufacturer with questions about suitability or a specific application. Always read and follow manufacturer directions.
I have two posts that feature the tire inflator mentioned here. Here is the other. One objection that I’ve received is that the inflator could use a lubricant that is not food grade. As a reminder, this post outlines something I have personally done. I am not recommending that you do it.
Also: Kegerator Tips & Gear | Keg Repair Part #s | Recent Keg Finds
Our Top Draft Resources!
- The Most Difficult Spot to Check for CO2 Leaks
- Keg O-Ring Materials Selection! – EPDM, Silicone and Buna-N?
- Why Do I Have Bubbles in My Beer Line? Diagnosing and Fixing Kegerator Foam Problems
- Five Benefits of Using Corny Kegs As Fermenters
- Rebuilding & Reconditioning Homebrew Kegs!
- Food Safe Replacement Keg O-Rings in Bulk
- Hands on Review: Kegland DuoTight Fittings & EVABarrier Tubing!
- Why Won’t My Homebrew Keg Carbonate? Fixing Draft Beer Carbonation Problems
- What Does a Flow Control Faucet Do?
- Upgrade Your Kegerator – 6 Improvements!
- Serve Homebrew on Any Kegerator & Convert Commercial Kegerator to Homebrew
- Tips and Gear for Growler Filling
- What’s the Difference Between Ball Lock Kegs and Pin Lock Kegs?
- Checking for Draft System CO2 Leaks – Using The Pressure Gauge Method
- Tip: Consider Oetiker Stepless Clamps for Kegerator Gas and Beer Lines
- Hands On Review: Inkbird ITC-308 Dual Stage Temperature Controller +WiFi Version
- Universal Poppets Tips and Tricks!
- Convert Your Mark II Keg & Carboy Washer to a Recirculating Draft Line Cleaning Pump!
- Step by Step: Finding and Fixing Keg CO2 Leaks
- Kegerator Beer Line Temperatures & Reducing Foam with a Recirculating Fan
- Kegging CO2 Use Estimations and Calculations
- Step by Step: Balancing Your Kegerator Draft System
- Building a Simple Ball Lock Draft Line Flushing Setup
- Build a Recirculating Draft Line Cleaning Pump
- Home Brew Keg Roundup – New & Used, 5 and 2.5 Gallon & More!
- Damp Kegerator? Fix Kegerator Condensation
- Portable Draft Beer Serving Options!
- Homebrew Temp Controller Roundup! – Kegerator and Fermentation – concepts, applications and models
- Bulk Keg Orings and Keg Repair Part Numbers
This post may contain affiliate links. We may make a commission when you use our links. This will never cost you extra. Thank you for supporting Homebrew Finds!


toppost:pgmdewalt tag:tpr