
Hands on Review: Blichmann BrewCommander Controller!
This review is by Homebrew Finds Contributor Brad Probert. Brad is an engineer, expert homebrewer and experienced reviewer. Grab a link to Brad’s website at the end of this review.
Blichmann BrewCommander Controller
Controllers for an electric brew rig are surprisingly expensive. They seem to have such a simplistic job- control temperature and/or modulate output power. But of course that job is the heart of an electric brew system. It’s what allows you to have a more stress-free brew day because you can set the temperature and then go do something else. It’s what enables you to brew inside with electric and not have to battle the weather, or have to drag equipment from a storage space inside to a brew area outside. So I guess even though they do a job that’s easy to describe, the value they provide to the brew day is pretty significant. And thus justify their price tag with that.
As electric brewing continues to grow in popularity, more controller options become available. Blichmann has had a controller out on the market for a while, but they were long overdue for an upgrade. The BrewCommander, however, is more than simply an upgrade, as it leapfrogged itself with more features and came out with a lower price. From a features standpoint, it distinguishes itself from other stand-alone controllers with features like an LCD touchscreen and delayed start timer that previously was only available with built-in controllers on all-in-one electric brew systems. The BrewCommander comes in a version to control your gas-fired rig, but my review will focus on their electric controllers.
Compare Models, Prices and Availability, Review Continues Below:
- Blichmann Engineering BrewCommander at MoreBeer
- Blichmann Engineering BrewCommander at Adventures in Homebrewing
- Blichmann Engineering BrewCommander at Great Fermentations
- Blichmann Engineering BrewCommander at Beer & Wine Hobby
- Blichmann Engineering BrewCommander at Keg Connection
- Blichmann Engineering BrewCommander at homebrewsupply.com
Features
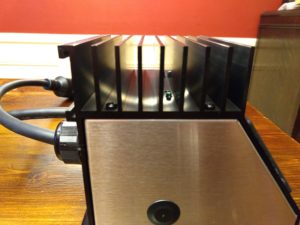 Cooling Fins on Top of Controller
There are 2 models of the BrewCommander electric controller- one for 120V electric set-ups (heating element up to 2250W on a 20A GFCI breaker, or 2400W on a 25A GFCI breaker), and one for 240V electric set-ups (heating element up to 5750W on a 30A GFCI breaker, or 7200W on a 35A GFCI breaker). It’s a very compact size with a metal housing for durability, large built-in heat sink cooling fins for the electronics inside and a good sized LCD touchscreen. It has a short lead with an L5/L6 male connector (120V/240V model) to hook up your wire to the wall outlet, and another short lead and an L5/L6 (120V/240V model) female connector for your wire run to the heating element. It also has a standard 3-prong outlet for you to plug in your pump to let the BrewCommander control it, as well as a receptacle for you to plug in the provided temperature probe. Included with the temperature probe is a fancy weldless bulkhead to add the probe to your set-up. An important note with the 120V is that it comes with a NEMA 6-20 plug, which means one of the blades is sideways and will only fit in 20A receptacle.
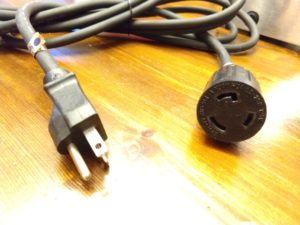 Power Cord with NEMA 6-20 and L5-20
 L5 Connectors on Controller
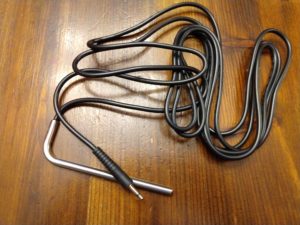 Included Temperature Probe
The controller can be used as both a mash controller and a boil controller. If you go into the mash screen, you set the target temperature and the maximum output % you want the controller to use during mash. You can either set a single temperature and let it control to that, or you can program in your own profile. You can program in up to 9 different profiles that are saved in the controller, each with up to 5 different rest steps. Each step has a target temperature and a duration. It uses a value in the Settings menu (which you can fine tune) to account for the time needed to heat up from step to step. A portion of the screen changes colors, and the controller makes an audible beep when you get within a customizable range of your target temperature. There is a short list of settings you can adjust to accommodate performance in a RIMS or HERMS system, as well as some high level control parameters that adjust response time and temperature stability. You don’t have the ability to set individual PID controller gains- which some will find frustrating, and others will find refreshing.
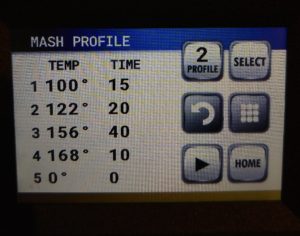 Mash Profile ScreenBoil Screen
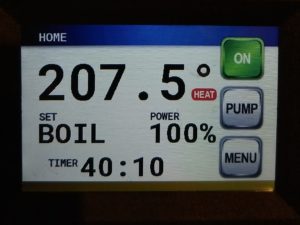
The Boil Profile screen offers similar customization ability. There is a simple screen where you can just set the % duty cycle and be done. Or if you want the controller to help prompt you for hop/ingredient additions, you can set up to 9 different notification schedules. Within each schedule you can customize the total boil time and set up 7 alarms within that boil time. You can set up a 60 minute boil with hop addition alarms at 60, 15, and 5 minutes left in the boil (using just 3 of the alarms), or you can add even more steps. Or store different schedules for your 90 minute boils, or your “bittering only” boils, etc. When you hit one of those alarm points in your schedule, you get a beep and then the whole screen changes from the standard data display to an “Add Ingredient” message. This screen stays up until you touch it to acknowledge you’ve added it. While your timer is running in the background, you can adjust your controller output % if you want to adjust your boil intensity on the fly.
You can set a delayed start timer from the settings menu, selecting a number of hours to delay before starting the system. If you fill your system with water and want it to come on automatically to heat to strike temperature, you just pick your target temp and output %, and the controller will come on automatically. If you have it set to run the pump as well, it will kick on the pump and heating element when the timer runs down (be sure to prime your pump first). The controller comes configured to set on a benchtop with your power & heating element cables coming out the back, but you can also re-route them to come out the bottom in case you want to mount it to the wall.
Hands on Trial
My initial look at the hardware out of the box showed the same high level quality I’ve come to expect from Blichmann. High quality materials, put together with good craftsmanship. The touchscreen was impressive. The clarity and readability of it was superb, and most importantly the response was fast and precise. I’ve dealt with cheap touchscreens that let you down- and this is definitely not one of those. The quality of the plugs/wire leads is worth noting as well. On a lot of controllers, the external wiring leads seem to be an afterthought. The BrewCommander has good solid strain-relief pass-thrus on the body of the controller, and the heavy gauge wires have a good durable matte finish insulation to prevent accidental nicks and cuts.
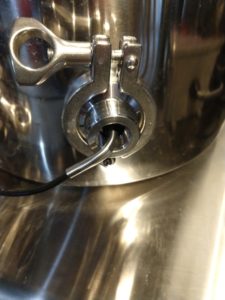
 Temperature Probe in RIMS Rocket – Hands on Review
I used the controller first with my mash tun. I was running a 120V/2000W Blichmann RIMS Rocket in a RIMS configuration. I ran it with a couple of different multi-step mash temperature profiles, and it worked well. I’ll pass along a tip when running Mash Mode that wasn’t self-evident to me. If you set your target temperature and then switch to Auto mode, it won’t actually start heating anything until you change the power % to something other than its default of 0. I figured since I was in “Auto” mode, it would just take over, but the power setting is really more like a “maximum power” number. So I set it to 100%, and then in Auto, it would use up to 100% power if needed to catch up to the target.
Running a programmed mash profile worked great, but there’s an important tip here, too. For the countdown timer to work properly between your mash steps, you have to be sure the “Mash Heat Rate” in degrees/minute is set to match your system. I found with my system, it works out to 2.0 degrees/minute. The controller uses this value to determine how long to spend in “ramp” mode, before it starts counting down the timer at your target mash step. If you don’t program this value correctly, your mash step timer will either start counting down before your reach your target, or will be sitting at your target for some time before starting to count down. But I found this worked really well, and didn’t take any tweaking or adjusting after first measuring it on a test run. And having it run through a multi-temperature mash schedule is great. You can devote more of your time & energy to focusing on other things.
The Settings menu has other things you can customize to affect how the controller responds. By adjusting the Cycle Time and the Control Band, I found I could adjust the temperature performance on mash steps to get an acceptable level. I had good temperature stability at my target temperature, and it didn’t spend forever creeping up on the target. Although I tried different values, in the end, I landed on the default settings as the best.
 Temperature Probe in TC Thermowell
My boil kettle used a 120V/2250W tri-clamp foldback heating element. When running the controller in Boil Mode, it was very straightforward. I made use of the programmed boil timer schedules to program in my hop additions. I run a brew session timer in Brewfather when brewing, but if you don’t have a brew session timer you like, the BrewCommander makes this a simple process to use. It’s far better than running your own 60 minute timer, or buying a fancy multi-countdown timer.
Conclusions
Overall, this controller comes with a lot of functions and a great touchscreen to go with it. It is very competitively priced, and with the build quality, looks, and functionality, you feel like you are getting a lot of value for your money.
Compare Models, Prices and Availability:
- Blichmann Engineering BrewCommander at MoreBeer
- Blichmann Engineering BrewCommander at Adventures in Homebrewing
- Blichmann Engineering BrewCommander at Great Fermentations
- Blichmann Engineering BrewCommander at Beer & Wine Hobby
- Blichmann Engineering BrewCommander at Keg Connection
- Blichmann Engineering BrewCommander at homebrewsupply.com
More Photos
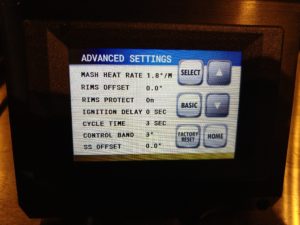 Advanced Settings Screen
 Mash Screen
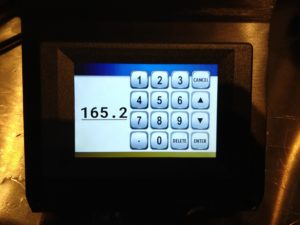 Set Point Temperature to Decimal Point
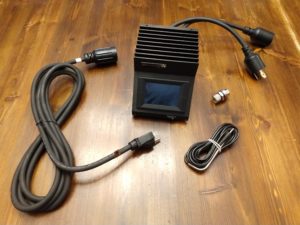 Contents out of Box
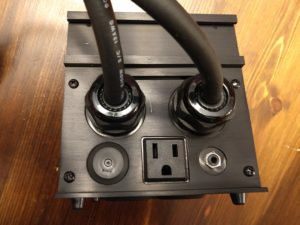 Back Side of Controller
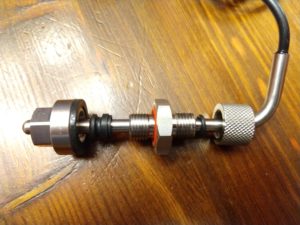 Weldless Thermowell with Temperature Probe
 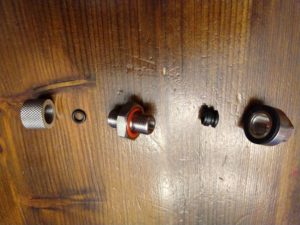 Weldless Thermowell Pieces

More Blichmann Engineering Reviews!

More Homebrew Finds!
- Last 50 Finds!
- Top Deals – a curated list of the best deals
- Homebrew Reviews – one of the largest libraries of homebrew reviews in existence!
- Our Top Posts – tips, how-tos, resources posts and more
This post may contain affiliate links. We may make a commission when you use our links. This will never cost you extra. Thank you for supporting Homebrew Finds!
Special Thanks to Blichmann Engineering for providing the unit used for evaluation in this review.
By Brad Probert. Check out Brad’s website – beersnobby.com
review:blichbc tag:tpr