
Hands on Review: MoreBeer’s Fermentap Magnetic Stir Plate
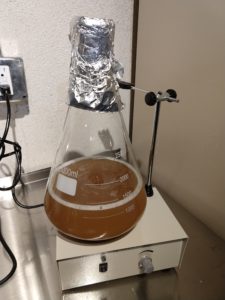 MoreBeer’s Fermentap Stir Plate along with a 3,000 mL Erlenmeyer Flask
This review is by Homebrew Finds Contributor Brad Probert. Brad is an engineer, expert homebrewer and experienced reviewer. Grab a link to Brad’s website at the end of this review.
Updates & Alternatives:
- Since this review was published, specs have been revised to say that this is rated for up to 3L size flasks.
- Alternatives to Consider: The StirStarter and StirStarter XL
About Stir Plates and Erlenmeyer Flasks
Stir plates are pretty simple machines. There’s a small electric motor in a housing with a flat surface for you to set your vessel on that has wort needing to be stirred. When the motor spins, a magnetic field is created as a by-product of the electric motor. This is used together with a small plastic-coated magnet that looks like a small capsule, called a stir bar. If your flask is filled with wort, the stir bar spins around at the speed of the electric motor in the stir plate and creates turbulence in your wort. It creates a vortex like an underwater tornado as the spinning motion pulls wort down towards it and then flings it away when it contacts the stir bar.
This underwater tornado is the key to the stir plate’s success in preparing starters. This stir plate motion has two functions: 1) Keeping the yeast constantly in suspense and not letting them settle out, 2) The constant circulation of wort helps expose all of the wort to the surface where it can interact with incoming oxygen and purge CO2 developed by the yeast’s fermentation processes. There have been experiments done that show you can more than double the amount of yeast cell growth in a starter made with a stir plate versus a starter that doesn’t.
The vessel of choice for starters made on a stir plate is the Erlenmeyer flask (named after a German chemist who invented it in 1860). Its wide, flat base make it stable to sit on your brew table or on the stir plate without concerns of it getting bumped and tipping over. And very importantly, its flat bottom allows your stir bar to rest in the center and spin. A glass growler with its domed-in bottom, will not keep the magnet centered and then won’t work to stir the wort.
When looking for Erlenmeyer flasks, you want to make sure you get one made with Borosilicate glass. It is less sensitive to growth/shrinkage with temperature extremes, meaning it can go through thermal shock with less risk of breaking. But there’s an important caution here. Borosilicate is not recommended for direct heating. I heard from a Customer Service Manager at a homebrew shop about the horrific pictures he got from someone that was carrying their boiling starter wort from stove to sink when the glass bottom broke and showered his [sandaled] foot with glass and 200 degree wort. So boil in a separate vessel before pouring into your flask, or let it sit and cool a bit before you move to the cooling stage.
Hands on Review Fermentap Magnetic Stir Plate
The Y705 Stir Plate from MoreBeer has a rotary dial knob lets you adjust the speed, which you definitely need. On my first starter, I thought all was well because I could hear some klinking around inside the flask. However, I didn’t see a vortex, and I could see the yeast piling up on the bottom of the flask instead of being in constant motion. I shut off the power, and I heard the stir bar klink as it re-centered itself. Then when I started it up from a slow speed, I could see the vortex and knew the stir bar hadn’t been thrown off-center. I could then gradually dial up the speed to get the level of vortex I wanted.
Fermentap Stir Plate with an active vortex
The stir plate also comes with a 6” rod that screws into the base and has a rubber gripper to hold a thermometer. I found this to be useless since the flask was taller than this rod. According to MoreBeer, the Y705 stir plate can accommodate up to 5L flasks. Not all stir plates are the same, as some are so small they can only accommodate a 2L flask, or a smaller stir bar. And as every experienced homebrewer knows, whatever size equipment you think you’ll need- always get the next size bigger!
I employed this same “next size bigger” strategy on the flask. Most of the starters I’ve seen were around 1.5L in size, so a 2L flask would work. But I went with the 3L flask to protect for the unknown. Low and behold, the unknown came along as the Pilsner I was brewing wanted me to make a 2L starter. It worked well in the 3L flask, but a 2L would’ve been a bit overfilled.
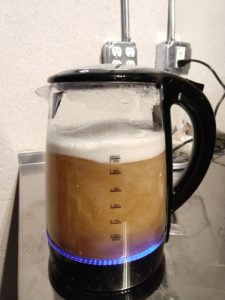 Boiling starter wort in an electric kettle
To boil my starter in my basement brew area, I bought a small electric kettle from Amazon. It’s limited in size (1.7L), so for bigger starters, I had to do two batches. But with 1500W of heating power, it’s quick to bring to a boil. I then transferred it into my flask, and then dunked it into my sink full of cold water and had no problems (like blowing out the bottom of my glass growler like I did when I tried this step with that).
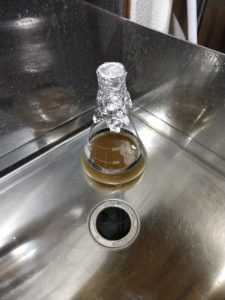 Flask chilling in a cold water bath after boiling
I then did a couple fermentation trials. For the first one I made a Black Lager with an OG of 1.066 and split it into two fermentors, with 3.75 gallons in each. One fermentor got yeast that came from a starter made from a single yeast pack and spun up on the stir plate, whereas the other one just got a yeast pouch dumped straight into the fermentor. To make the experiment more challenging, both of the White Labs WLP801 Czech Budejovice Lager yeast were 1 month past their “Use By” date. The batch with the starter began fermenting 22 hours after pitching the yeast. The batch without the starter spent 4.5 days trying to start fermentation, but ultimately had to be rescued with elevated temperatures and an injection of oxygen. That batch also suffered from unwanted flavor harshness from fermenting at too high of a temperature.
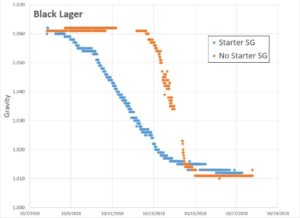 Side by Side – Starter VS No Starter Tilt Fermentation Plot – Hands on Review TILT
The second trial was a Pilsner with a gravity of 1.057. One batch of wort was split between two fermentors. Into a 3.7 gallon batch I pitched a pack of Wyeast 2278 Czech Pils yeast that was 4 months old. The other batch was slightly larger at 4 gallons, and I used an older yeast pack that was 6 months old. But this batch had its yeast made into a starter on the stir plate, and had oxygen added to the fermentor. The starter batch started first, but it took a slow 2.5 days to do so at 50-52F. The non-starter batch languished for 5.5 days until a dose of oxygen and a temperature increase to 58F coaxed it into starting.
 Side by Side – Starter VS No Starter Tilt Fermentation Plot – Hands on Review TILT
Conclusions
I was not one to mess with a starter before I did these experiments. It seemed just like extra hassle for a mysterious gain. I don’t typically make high gravity beers or brew a batch bigger than 5 gallons. But I do brew lagers. And after seeing these sort of results with this little of effort, I have changed my ways!
Get the Gear
Fermentap Magnetic Stir Plate – Magnetic Y705 via MoreBeer
Updates & Alternatives
- Since this review was published, specs have been revised to say that this is rated for up to 3L size flasks.
- Alternatives to Consider: The StirStarter and StirStarter XL
More Photos
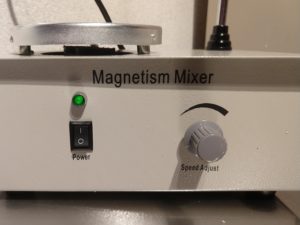 Fermentap Stir Plate Control Panel
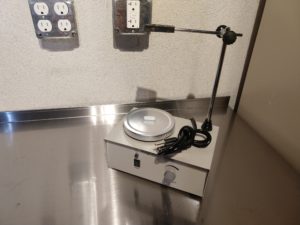 Assembled
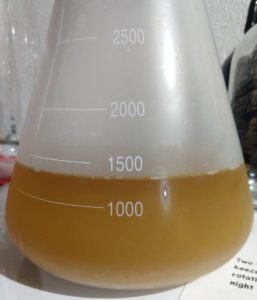 Starter after cold crashing
More MoreBeer Reviews+Related:

More Homebrew Finds!
- Last 50 Finds!
- Top Deals – a curated list of the best deals
- Homebrew Reviews – one of the largest libraries of homebrew reviews in existence!
- Our Top Posts – tips, how-tos, resources posts and more
Special Thanks to MoreBeer for providing the equipment used for evaluation in this review.
By Brad Probert. Check out Brad’s website – beersnobby.com
More Fermentation Related!
- Our Fermentation Related Reviews – Fermenters and More
- Yeast Starters and Fermentation Resource Page
- Yeast: The Practical Guide to Beer Fermentation
- Compare Prices: StirStarter Stir Plate
This post may contain affiliate links. We may make a commission when you use our links. This will never cost you extra. Thank you for supporting Homebrew Finds!
review:fermentapstirplate