
MoreBeer Deal of the Day: ITC-308 Digital Dual Stage Temperature Controller – $32.99 + free ship eligible, limited availability

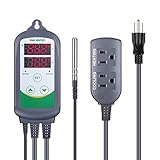
Inkbird digital dual stage temp controller via MoreBeer. Dual stage means that the Itc-308 can control both a heating and cooling device. Alternatively, it can control a heating or a cooling device. This controller displays in Fahrenheit and Centigrade. Dual Display shows both measured and set temperature.
Use to control fermentation or kegerator temperatures. This is a great controller. Check out my Hands on Review
Limited Availability Deal of the Day: As of this posting, this is marked down to $32.99 as a MoreBeer Deal of the Day. Shipping is also free to addresses in the contiguous US with most $59 Orders. Availability: This is available today only, while supplies last. Quantities are limited. Check the MoreBeer’s Deal of the Day to check today’s offering.
Product Description – Here – Use coupon code BEERDEAL to get this discount.
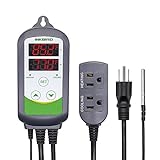
Inkbird Dual Stage Digital Temperature Controller FE640
Deal of the day is valid 3/22/24 only while supplies last
Also:
- Inkbird ITC-308 Digital Temperature Controller – affiliate link, note that multiple variations of this product may be available, as such a different version may appear at this link
- Inkbird WiFi ITC-308 Digital Temperature Controller – affiliate link, note that multiple variations of this product may be available, as such a different version may appear at this link
MORE MoreBeer Deals!… This post contains affiliate links. We may make a commission when you use our links. This will never cost you extra. Thank you for supporting Homebrew Finds!

Price, promotions and availability can change quickly. Check the product page for current price, description and availability.